Shopify Node API: How to Integrate It in Your App
If you're in the e-commerce space, you've probably heard of Shopify, a platform that lets business owners create their online stores. And if you're looking to develop an app that interacts with Shopify stores, the Shopify API is what you need to know. This post will walk you through how to set up and use the Shopify API with your Node.js app. We'll also show you examples of what you can do with it. So read on to find out more!
Note: This tutorial assumes you already have a Shopify Partner account, a working version of Node.js installed, and knowledge of using and running Node.js apps.
What Is the Shopify API and What Are Its Features?
The Shopify API is a set of endpoints that let you get data, update data, and create data in Shopify stores. It's perfect for building apps that need to interact with Shopify in some way.
Some of the things you can do with the Shopify API include:
- Getting a list of products from a store.
- Adding a new product to a store.
- Updating product information.
- Deleting products.
- Getting a list of orders from a store.
- Adding a new order to a store.
- Updating order information.
And that's just the tip of the iceberg! With the Shopify API, you can do pretty much anything you need concerning interacting with data in Shopify stores.
Now that we've got a general idea of what the Shopify API is and what it can do, let's take a look at how to set it up and use it with Node.js.
With the Shopify API, you can do pretty much anything you need concerning interactinv with data in Shopify stores.
Setting Up a Shopify Node API Project
To start, open a new terminal window. Create a new directory for your project called Shopify-node-API and switch to that directory, then initiate a node project.
mkdir Shopify-node-API
cd Shopify-node-API
npm init -y
Next, install the dependencies you'll need:
npm install express dotenv typescript @types/express @shopify/Shopify-API
Next, create a file called shopify-api.js. Then copy and paste the following code into your file:
const express = require('express');
const app = express();
const http = require('http');

app.get('/', async (http_request, http_response) => {
    http_response.send('<html><body><p>Your Node instance is running.</p></body></html>');
});

const httpServer = http.createServer(app);

httpServer.listen(3000, () => console.log('Your Slack-OAuth app is listening on port 3000.'));
This code is importing some of the basic Express and HTTP packages. Next, there is a route at the base URL with a message. Then it creates an HTTP server and starts to listen for requests on port 3000.
Run the file with the command:
node shopify-api.js
Open a web browser and navigate to http://localhost:3000. You should see a message with "Your Node instance is running."
Using ngrok
The Shopify server needs to know how to get to your local development server. The easiest way to do that is to sign up for a ngrok account, install the service, and start up an ngrok session with:
ngrok HTTP 3000
Please take note of your ngrok address under Forwarding, as you need it for the next step.
Getting Ready to Use the Shopify API
Before you can connect your app, you need to set up an API key and API secret key for your app.
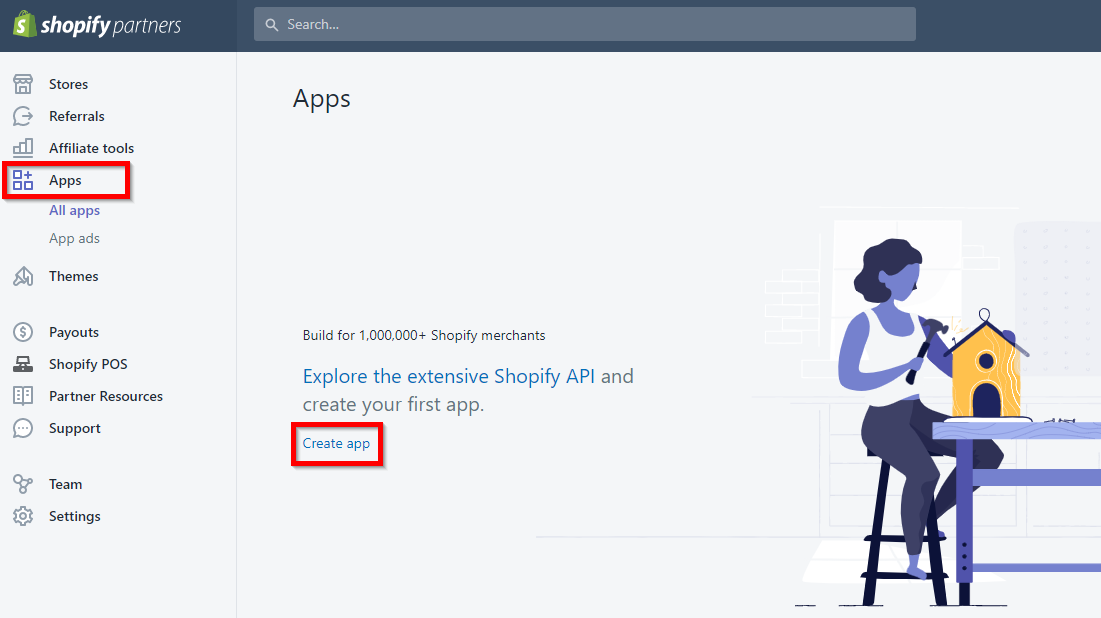
Go into your partner portal, select Apps, and then Create App.
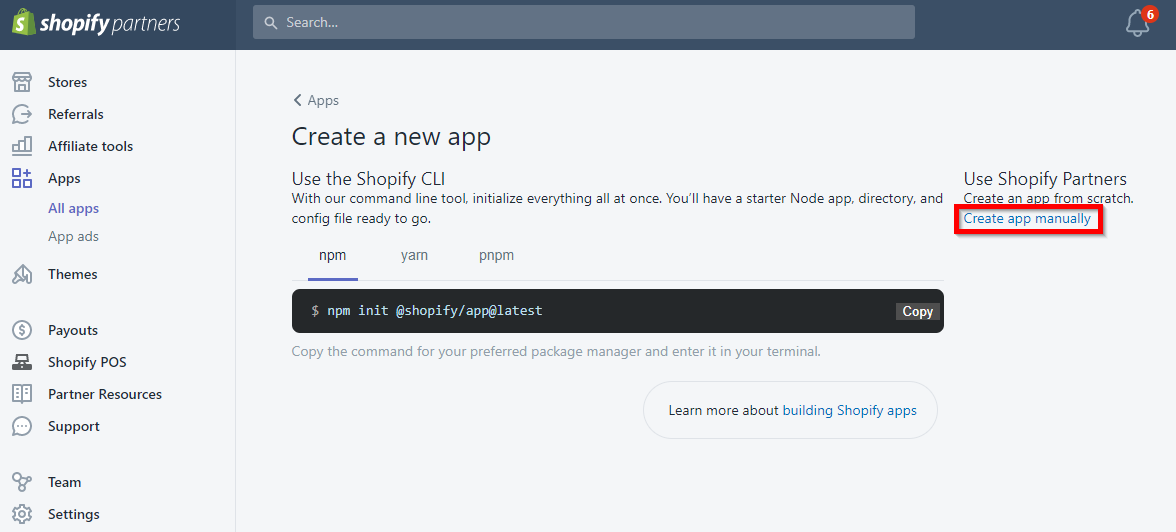
Select Create app manually.
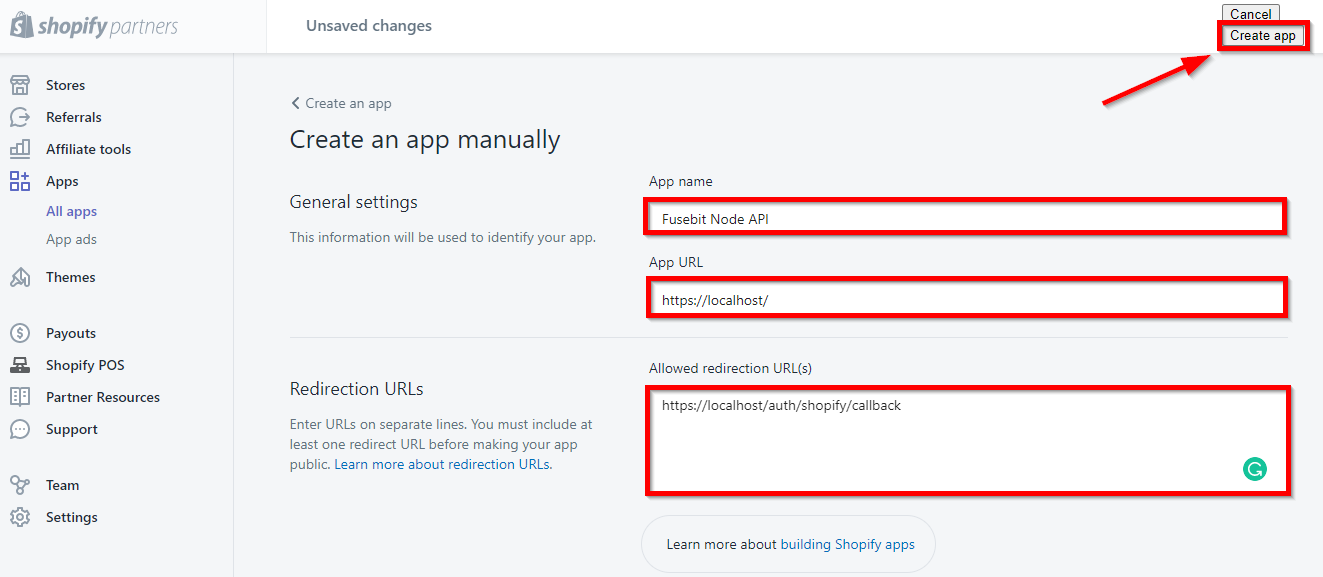
Enter your app name, URL, and allowed URLs for your app. The App URL is https\://{ngrok-url}/. In your allowed URLs, enter https\://{ngrok-url}/auth/Shopify/callback, where you substitute the ngrok address in the URL space. Click Create App to create your app.
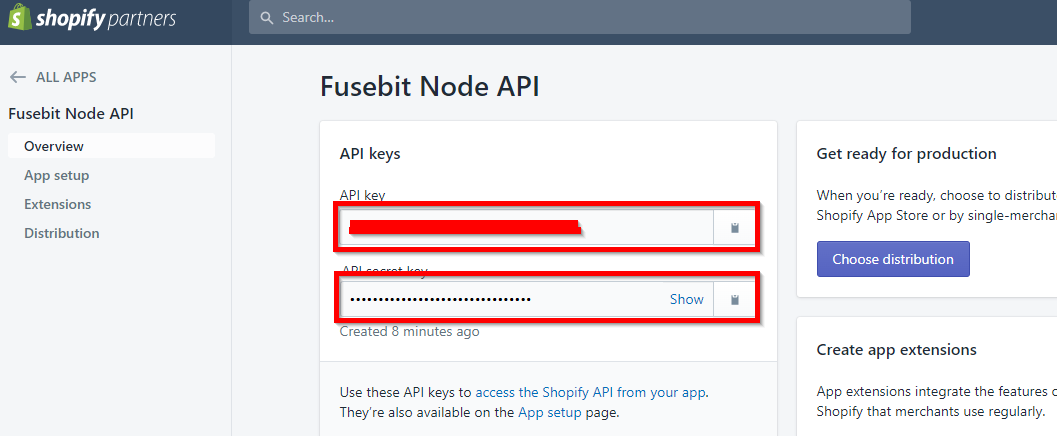
On the next page, scroll down to the App Info tab and take note of your API Key and API Secret Key. You'll need these to authenticate your app with Shopify.
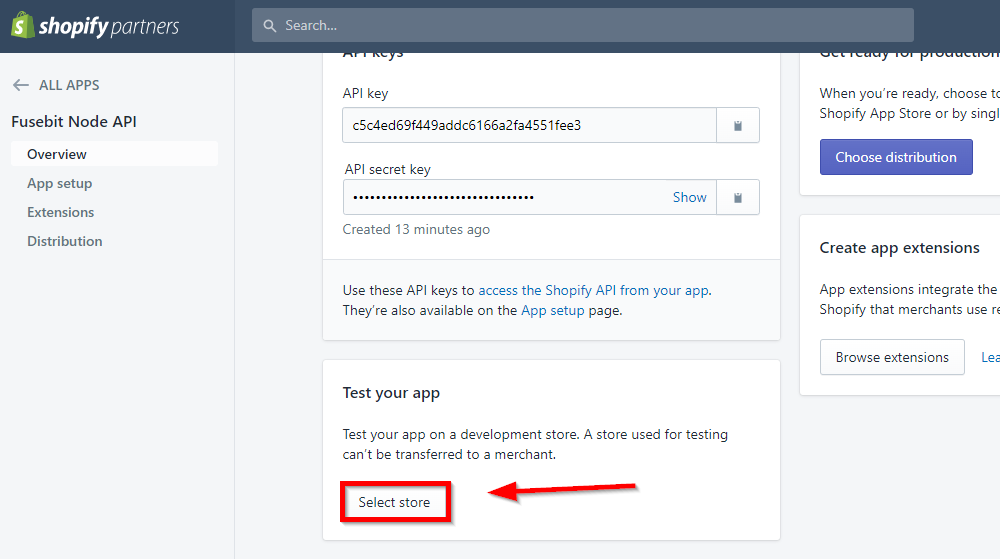
Next, you must create or select a store to test your app. Scroll down to Test your app and click Select store.

Then click on Create new store.
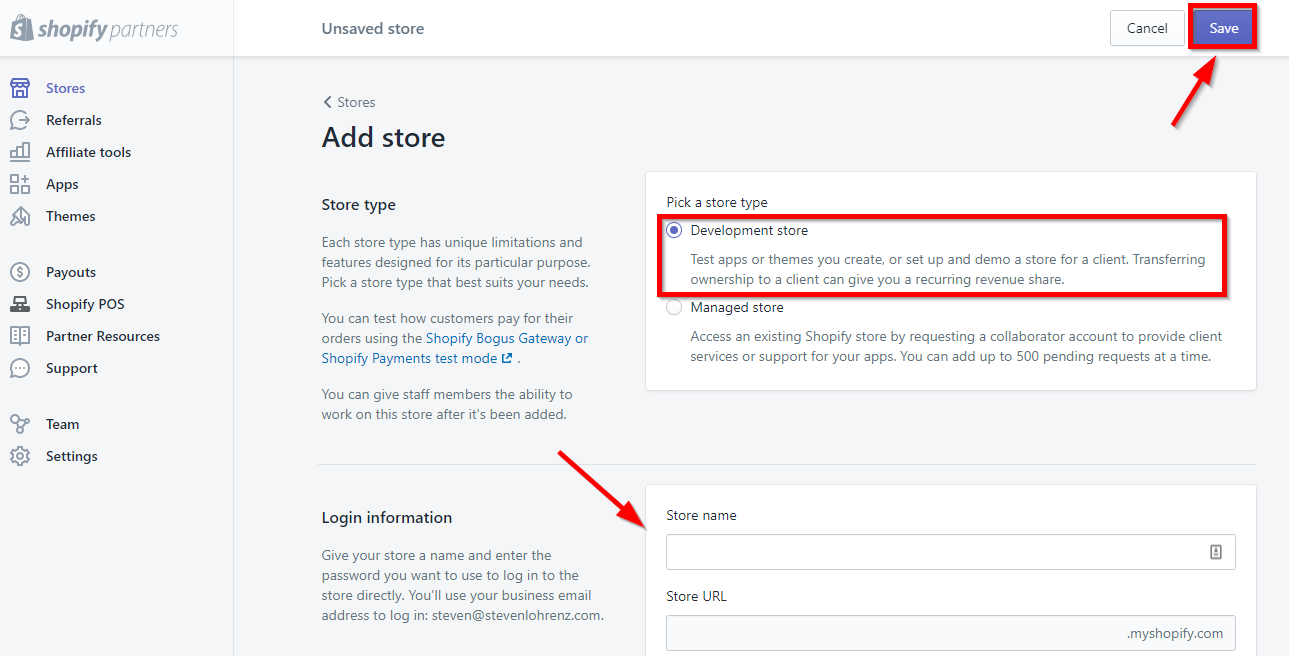
Select Development store, fill in the store name, store URL, and login details, then click Save.
The next screen should show a successful store creation.
Now that you have your API key, secret key, and a development store, you're ready to use the Shopify API.
Two ways to access the Shopify API are via the REST API or the GraphQL API. We'll be focusing on the REST API in this post, but we'll also briefly touch on the GraphQL API.
What Are the GraphQL API and the REST API?
The REST API lets you add products, update products, process orders, and manage customers. It uses standard HTTP requests to GET, POST, PUT, and DELETE data, and it returns a common dataset defined on the server.
The GraphQL API also allows you to add products, update products, process orders, and manage customers. It doesn't split out different HTTP requests. Instead, it'll enable you, the end user, to define the data you want back.
GraphQL is a little more work to set up and use, but it allows a lot more flexibility for payload size and iterating. REST has been a standard for a long time, and your developers may understand it better. They both do the same things, but you should evaluate which one is best for your needs.
Setting Up the Shopify API
The Shopify API package is an officially supported Node.js package from Shopify to make connecting to the Shopify APIs easier.
In the project's root directory, create a .env file. Note: If you're using version control, ensure you have it and ignore this file.
Copy the below data into your .env file and replace the sections in brackets with your own information. SHOP is the URL to your development store. API_KEY and API_SECRET_KEY come from the configuration settings in your app in Shopify. Use your ngrok URL without the prefix and https for the HOST and HOST_SCHEME, respectively.
SHOP=super-test-api.myshopify.com          # Your test store URL
API_KEY={your_api_key}                     # Your API key
API_SECRET_KEY={your_secret_key}           # Your API secret key
SCOPES=read_products,write_products        # Your app's required scopes
HOST=exa3-82-187-69-129.ngrok.io           # Your app's host, without the protocol prefix (in this case we used an `ngrok` tunnel to provide a secure connection to our localhost)
HOST_SCHEME=https                          # Either http or https. Note http is intended for local development with localhost.
Modify your shopify-api.js file to match the following:
const express = require('express');
const app = express();
const http = require('http');
const Shopify = require('@shopify/shopify-api').Shopify;
const ApiVersion = require('@shopify/shopify-api').ApiVersion;
require('dotenv').config();

const { API_KEY, API_SECRET_KEY, SCOPES, SHOP, HOST, HOST_SCHEME } = process.env;

Shopify.Context.initialize({
    API_KEY,
    API_SECRET_KEY,
    SCOPES: [SCOPES],
    HOST_NAME: HOST.replace(/https?:\/\//, ""),
    HOST_SCHEME,
    IS_EMBEDDED_APP: false,
    API_VERSION: ApiVersion.July22
});

const ACTIVE_SHOPIFY_SHOPS = {};

app.get('/', async (http_request, http_response) => {
    if(ACTIVE_SHOPIFY_SHOPS[SHOP] === undefined) {
        http_response.redirect('/auth/shopify');
    } else {
        http_response.send('<html><body><p>Your Node instance is running.</p></body></html>');
    }
});

app.get('/auth/shopify', async (http_request, http_response) => {
    let authorizedRoute = await Shopify.Auth.beginAuth(
        http_request,
        http_response,
        SHOP,
        '/auth/shopify/callback',
        false,
    );
    return http_response.redirect(authorizedRoute);
});

app.get('/auth/shopify/callback', async (http_request, http_response) => {
    try {
        const client_session = await Shopify.Auth.validateAuthCallback(
            http_request,
            http_response,
            http_request.query);
        ACTIVE_SHOPIFY_SHOPS[SHOP] = client_session.scope;
        console.log(client_session.accessToken);
    } catch (eek) {
        console.error(eek);
        http_response.send('<html><body><p>${JSON.stringify(eek)}</p></body></html>')
    }
    return http_response.redirect('/auth/shopify/success');
});

app.get('/auth/shopify/success', async  (http_request, http_response) => {
    http_response.send('<html><body><p>You have successfully authenticated and are back at your app.</p></body></html>');
});

const httpServer = http.createServer(app);

httpServer.listen(3000, () => console.log('Your Slack-OAuth app is listening on port 3000.'));
In the code above, it's importing some packages required by Shopify, loading the .env file, and there's a constant to keep track of the shops the user has logged into.
The root route is modified to redirect to /auth/shopify if there isn't a match to a logged in shop. The /auth/shopify route begins the Shopify OAuth authorization process and redirects to /auth/shopify/callback when done.
The next route, /auth/shopify/callback, validates the callback, and if it's successful, redirects the user to the /auth/shopify/success page to display a success message.
Restart your server and go to http://localhost:3000. It should take you to log in and install the app and then back to your local instance where you'll see "You have successfully authenticated and are back at your app."
Using the Shopify API in Your App
Next, you can start using the API to retrieve and post data.
The first thing our store needs is products.
Add a route to the app to retrieve all the products in your store and display their names:
app.get('/products', async (http_request, http_response) => {
    const client_session = await Shopify.Utils.loadCurrentSession(http_request, http_response);
    console.log('client_session: ' + JSON.stringify(client_session));

    const client = new Shopify.Clients.Rest(client_session.shop, client_session.accessToken);

    const products = await client.get({
        path: 'products'
    });
    console.log('Products: ' + JSON.stringify(products));

    let product_names_formatted = '';
    for(let i =0; i < products.body.products.length; i++) {
       product_names_formatted += '<p>' + products.body.products[i].title + '</p>';
    }

    http_response.send(`<html><body><p>Products List</p>
          ${product_names_formatted}
          </body></html>`);

});
This bit of code retrieves the session's request/response, creates a client, and then sends a request to the products REST API for the list of products. Then it splits the titles in a for loop (typically done in the view) and displays it.
Add a link on the home page to make navigating easier:
app.get('/auth/shopify/success', async  (http_request, http_response) => {
    http_response.send('<html><body><p>You have successfully authenticated and are back at your app.</p><p><a href="/products">View Products</a></p></body></html>');
});
Restart your server, then navigate to the home page. It should run through the OAuth process, and then you can click on the View Products page.
Next, our application needs to add products. Usually, you'd build a form with all the fields and route it appropriately, but right now, you'll add products with predefined values.
Add some imports:
const {DataType} = require("@shopify/shopify-api");
const Shopify = require('@shopify/shopify-api').Shopify;
And then another route:
app.post('/products/add', async (http_request, http_response) => {
    const client_session = await Shopify.Utils.loadCurrentSession(http_request, http_response);


    const client = new Shopify.Clients.Rest(client_session.shop, client_session.accessToken);


    const payload = {
        product: {
            title: "T-shirt with witty saying " + randomInt(1, 500),
            vendor: "Best T-shirts Evah",
            product_type: "Clothing",
            tags: ["T-shirt", "Funny", "Geeky"],
            body_html: "<strong>Binary jokes</strong>",
            published: false
        }
    };

    await client.post({
        path: 'products',
        data: payload,
        type: DataType.JSON
    });

    http_response.redirect('/products');
});
Once again, this route retrieves the session and creates a client. Next, it constructs the body with the required fields, then sends a post request to the products path, the payload, and the type of JSON. Then it redirects back to the products listing page.
Add a form and button to your product list page in the /products route to make testing easier:
http_response.send(`<html><body><p>Products List</p>
          ${product_names_formatted}
          <p><form action="/products/add" method="post"> <button>Add Product</button>
          </form></p>
          </body></html>`);
Restart the server again, navigate to http://localhost:3000, then go to the products list page. Click on Add Product. You should see new products added to your products list. Great!
See the full code in a gist is here.
Benefits of Using the Shopify API in Your App
The Shopify API is a powerful tool that can help take your Node.js application to the next level. With the Shopify API, you can easily access data from your Shopify store, including product information, customer orders, and shipping data. This data can be used to create custom reports, automate order processing, and more.
In addition, the Shopify API makes it easy to integrate Node.js applications with Shopify's vast ecosystem of partner apps and services. The breadth of options gives you access to a wealth of additional features and functionality, such as payment processing, inventory management, and customer support. The possibilities are endless! With the Shopify API, you can build a truly unique and powerful Node.js application that meets the needs of your business.
One Common Issue
One of the common issues developers come across in using the Shopify API is related to whitelisting the URLs.
You'll have to ensure the application URL concatenated to the redirect_uri in your OAuth call matches precisely with a value you defined in the app configuration. Not doing so results in a "uri_redirect is not whitelisted" error.
Wrapping Up
Shopify's API is a powerful tool for developers who want to create apps to interact with Shopify stores. This tutorial showed you how to set up and use the Shopify API with your Node.js app. We've also given some examples of what you can do with it. So if you're looking to add e-commerce functionality to your app, the Shopify API is a great option to consider.
This post was written by Steven Lohrenz. Steven is an IT professional with 25-plus years of experience as a programmer, software engineer, technical team lead, and software and integrations architect. They blog at StevenLohrenz.com about things that interest them.
