How to Access Jira Data From a Node.js App Using Jira OAuth
In the world of information technology (IT), data rules. For example, information consists of data. Therefore, to execute tasks in the IT field, you need data.
Not only is data important in the IT field, but you also need to properly access data to obtain useful information. This is why tools like Jira exist. It allows bug tracking and agile software development, where shipping products happens at a faster rate. It does this through teamwork and aligning development with customer needs and company philosophy.
But how do teams get access to data from Jira? Jira not only allows teams to access data on the Jira application, but they can also access data via third-party applications.
The cool thing about this is the involvement of users in this authorization. This means that the user decides which third-party application they'll want to share their data with.
All of this is possible with Jira OAuth. In this post, we'll explore accessing Jira data from a Node.js application while using OAuth.
Jira OAuth
To understand how Jira OAuth really works, let's explore OAuth first.
OAuth (open authorization) is an open protocol that allows secure access to third-party applications on behalf of the resource owner. Therefore, the resource owner must approve before third-party applications get access to their resources.
Some authentication protocols like PAP (password authentication protocol) require the users to put in their passwords before they get access to protected data.
However, the process is risky, as cybercriminals can get a hold of the user's passwords and username. OAuth prevents malicious users from getting access to an application. This is possible because the resource owner needs to approve the request of the third-party application before releasing access to them.
All of these processes are done without the need for anyone to input their password. This type of authorization where the resource owner is involved is a three-legged OAuth (3LO).
OAuth prevents malicious users from getting access to an application.
Authorization With OAuth
Node.js is a JavaScript runtime environment that runs on the V8 engine and executes JavaScript code outside a web browser. It's cross-platform and open-source, as well as the perfect tool for creating a node server for Jira. A high-level OAuth workflow involves the following steps:
- authorization request from a third-party application
- authorization grant
- RSA-SHA1 signing
- access to resources
We'll create a Node.js server, where we'll get data from our Jira application. Next, we'll display this data in our client's browser. Let's configure Jira and generate an RSA public/private keypair.
Configuring Jira
Since OAuth utilizes the RSA-SHA1 signing for authentication, this means we need a private key to sign requests. To do this, we'll create a private key, extract the private key to the PKCS8 format, and extract the public key to a .pem file with OpenSSL.
// Generate a 1024-bit private key
openssl genrsa -out jira_privatekey.pem 1024

// Create an X509 certificate
openssl req -newkey rsa:1024 -x509 -key jira_privatekey.pem -out jira_publickey.cer -days 365

// Extract the private key (PKCS8 format) to the jira_privatekey.pcks8 file:
openssl pkcs8 -topk8 -nocrypt -in jira_privatekey.pem -out jira_privatekey.pcks8

// Extract the public key from the certificate to the jira_publickey.pem file:
openssl x509 -pubkey -noout -in jira_publickey.cer  > jira_publickey.pem
First, run the commands above in your terminal to create the private key we need for authorization.
Next, we'll generate an application key from Jira. Log in to Jira as an administrator and navigate to Jira settings (cog icon) > Products, and select "Application Links" in the menu on the left side. Select "Create link."
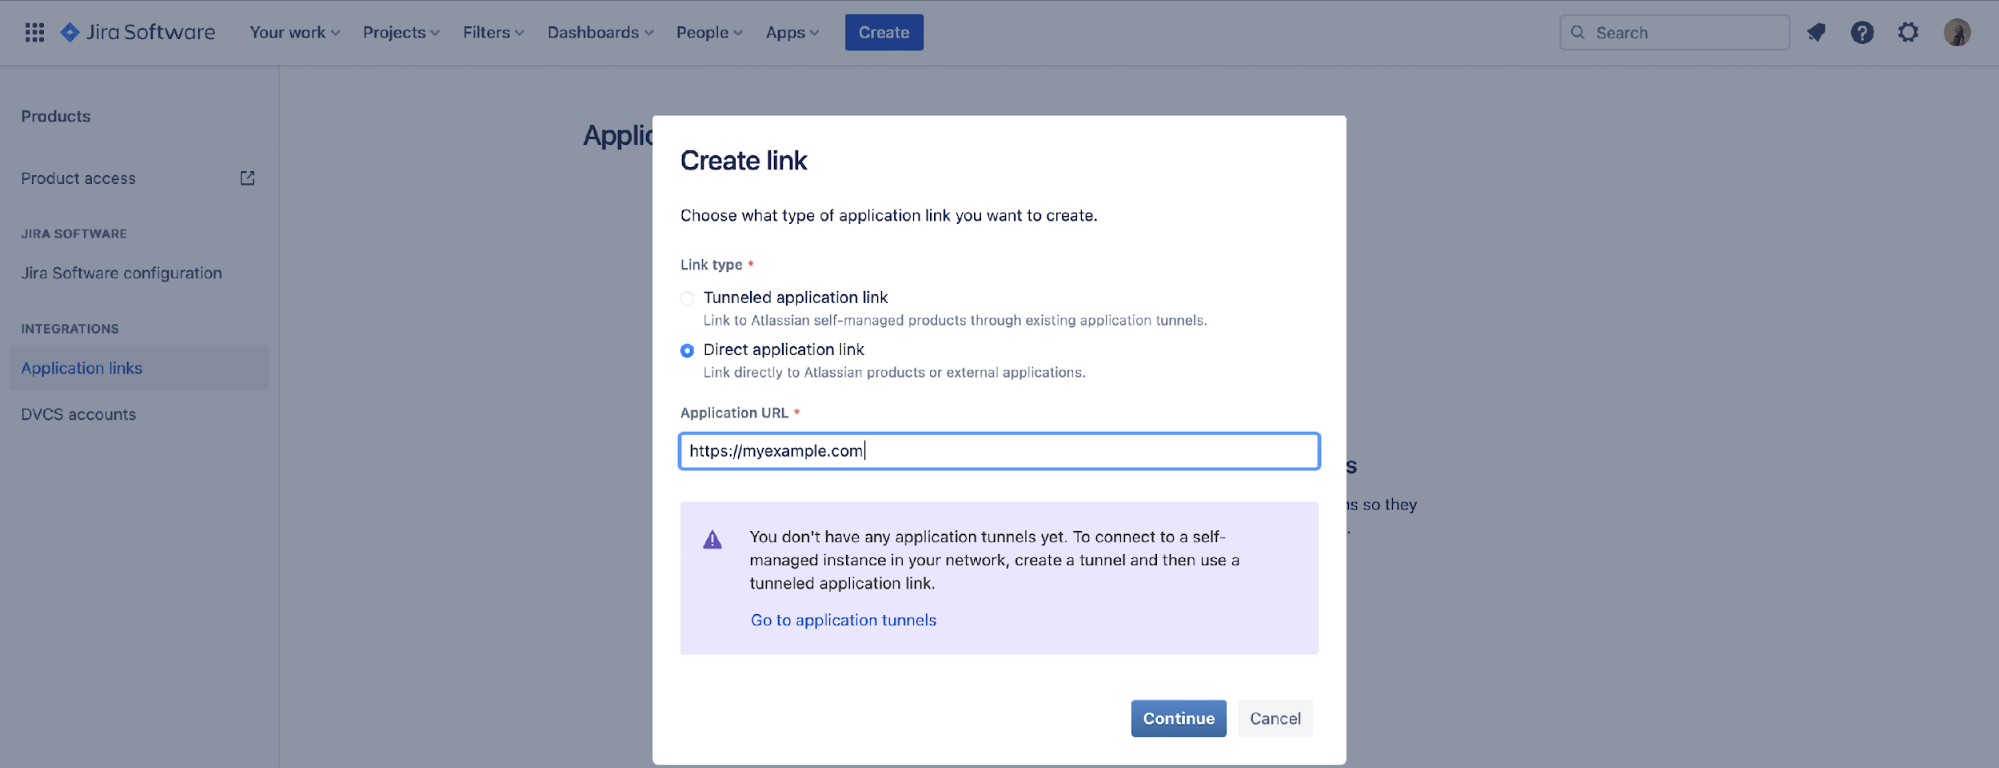
Here, you'll enter any URL of your choice in the "Enter the URL of the application you want to link" field. Now, click on the "continue" button to create your application link. You may get a warning that says "No response was received from the URL you entered," but you can ignore it.
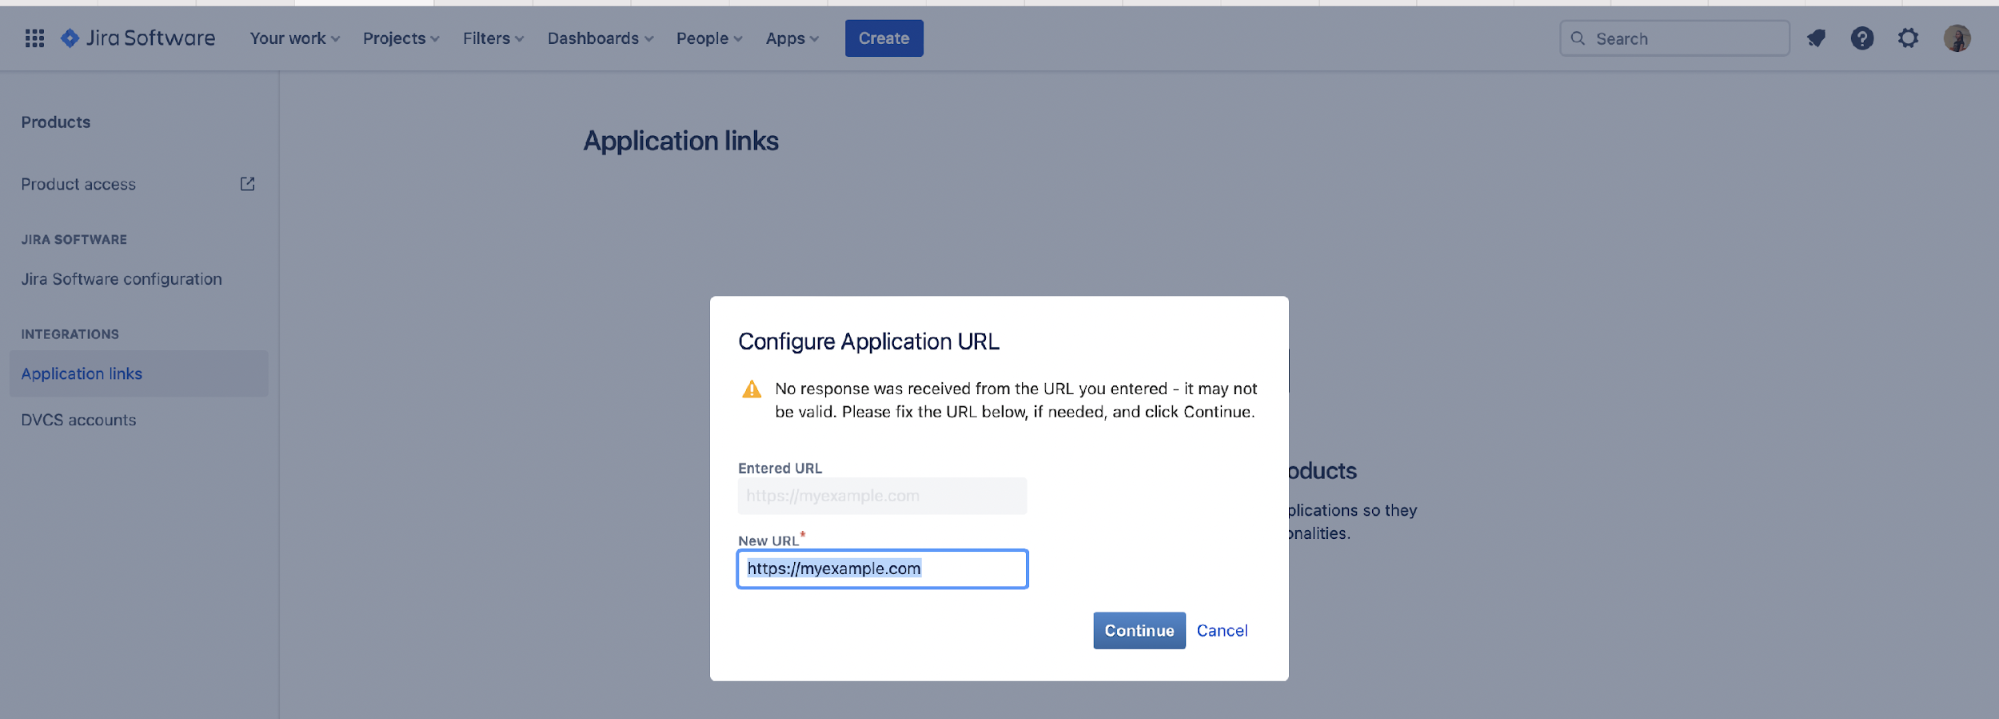
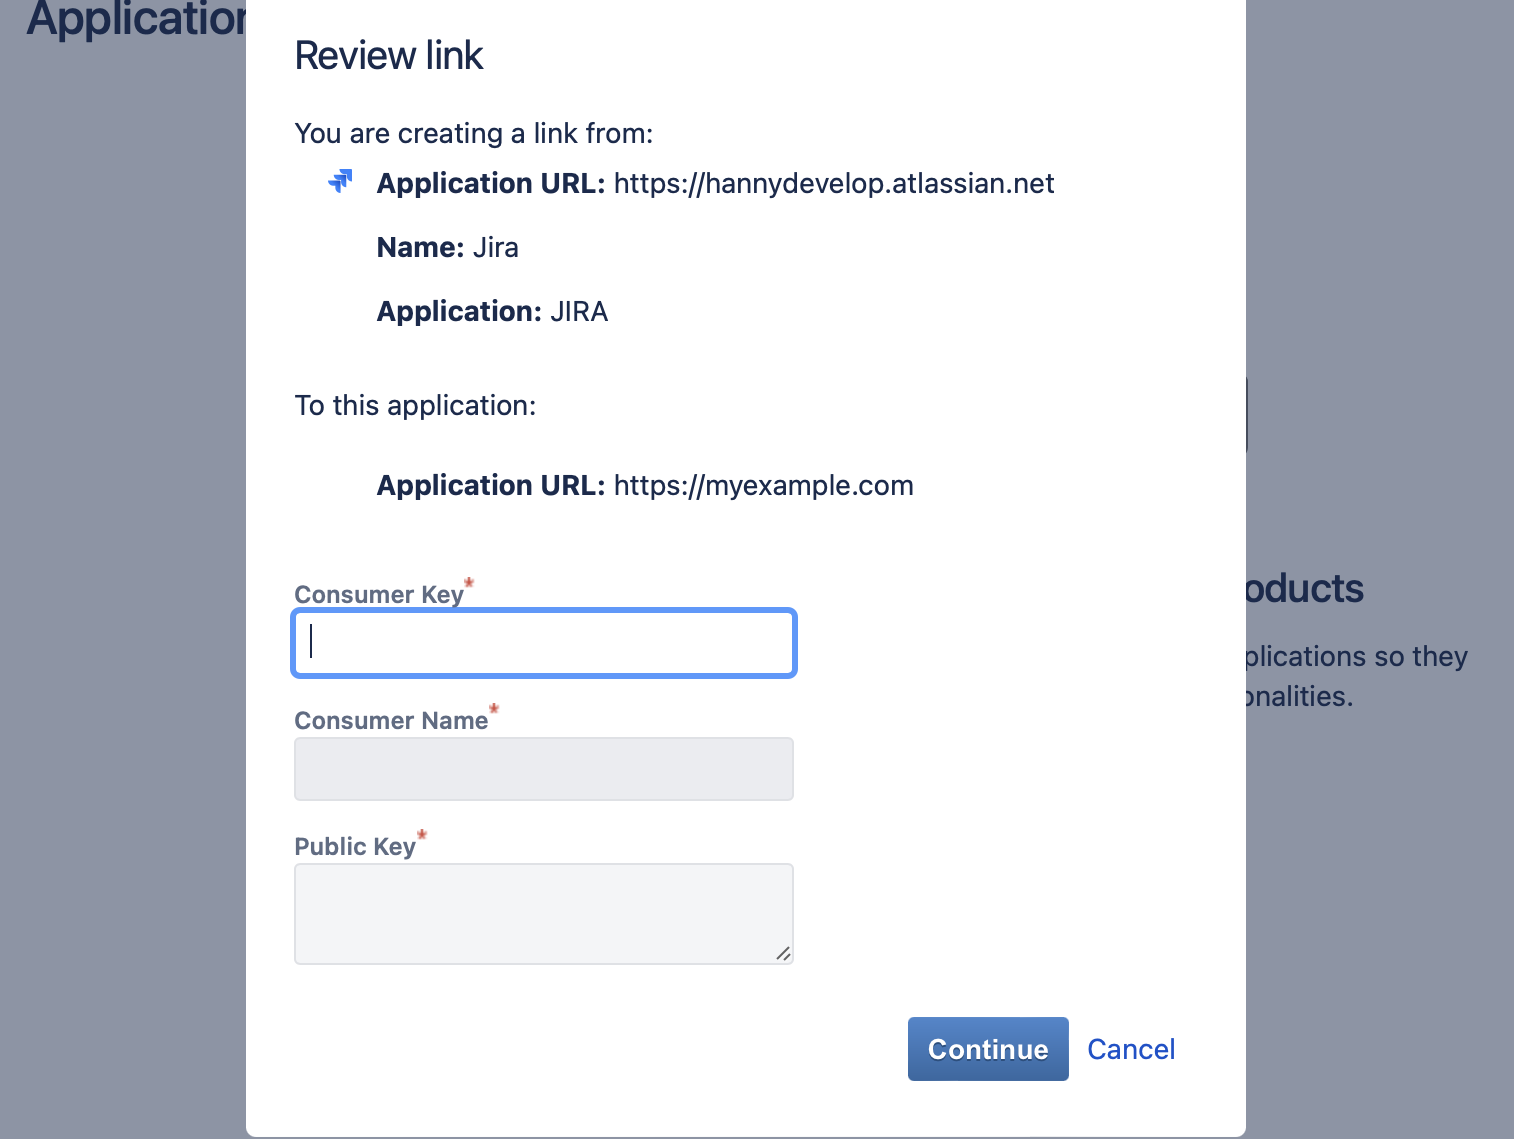
Click "continue," and on the next screen fill in the necessary information before selecting the "Create incoming link" checkbox. Then, navigate to the next screen and enter the consumer details for the sample client. The consumer key and consumer name can be any name of your choice. For instance:
- consumer key = OauthKey
- consumer name = Example Jira app
- public key = copy the public key from the jira_publickey.pem file you generated previously and paste it into this field (for example, dv5y+mjc4fZHHoLAwg...)
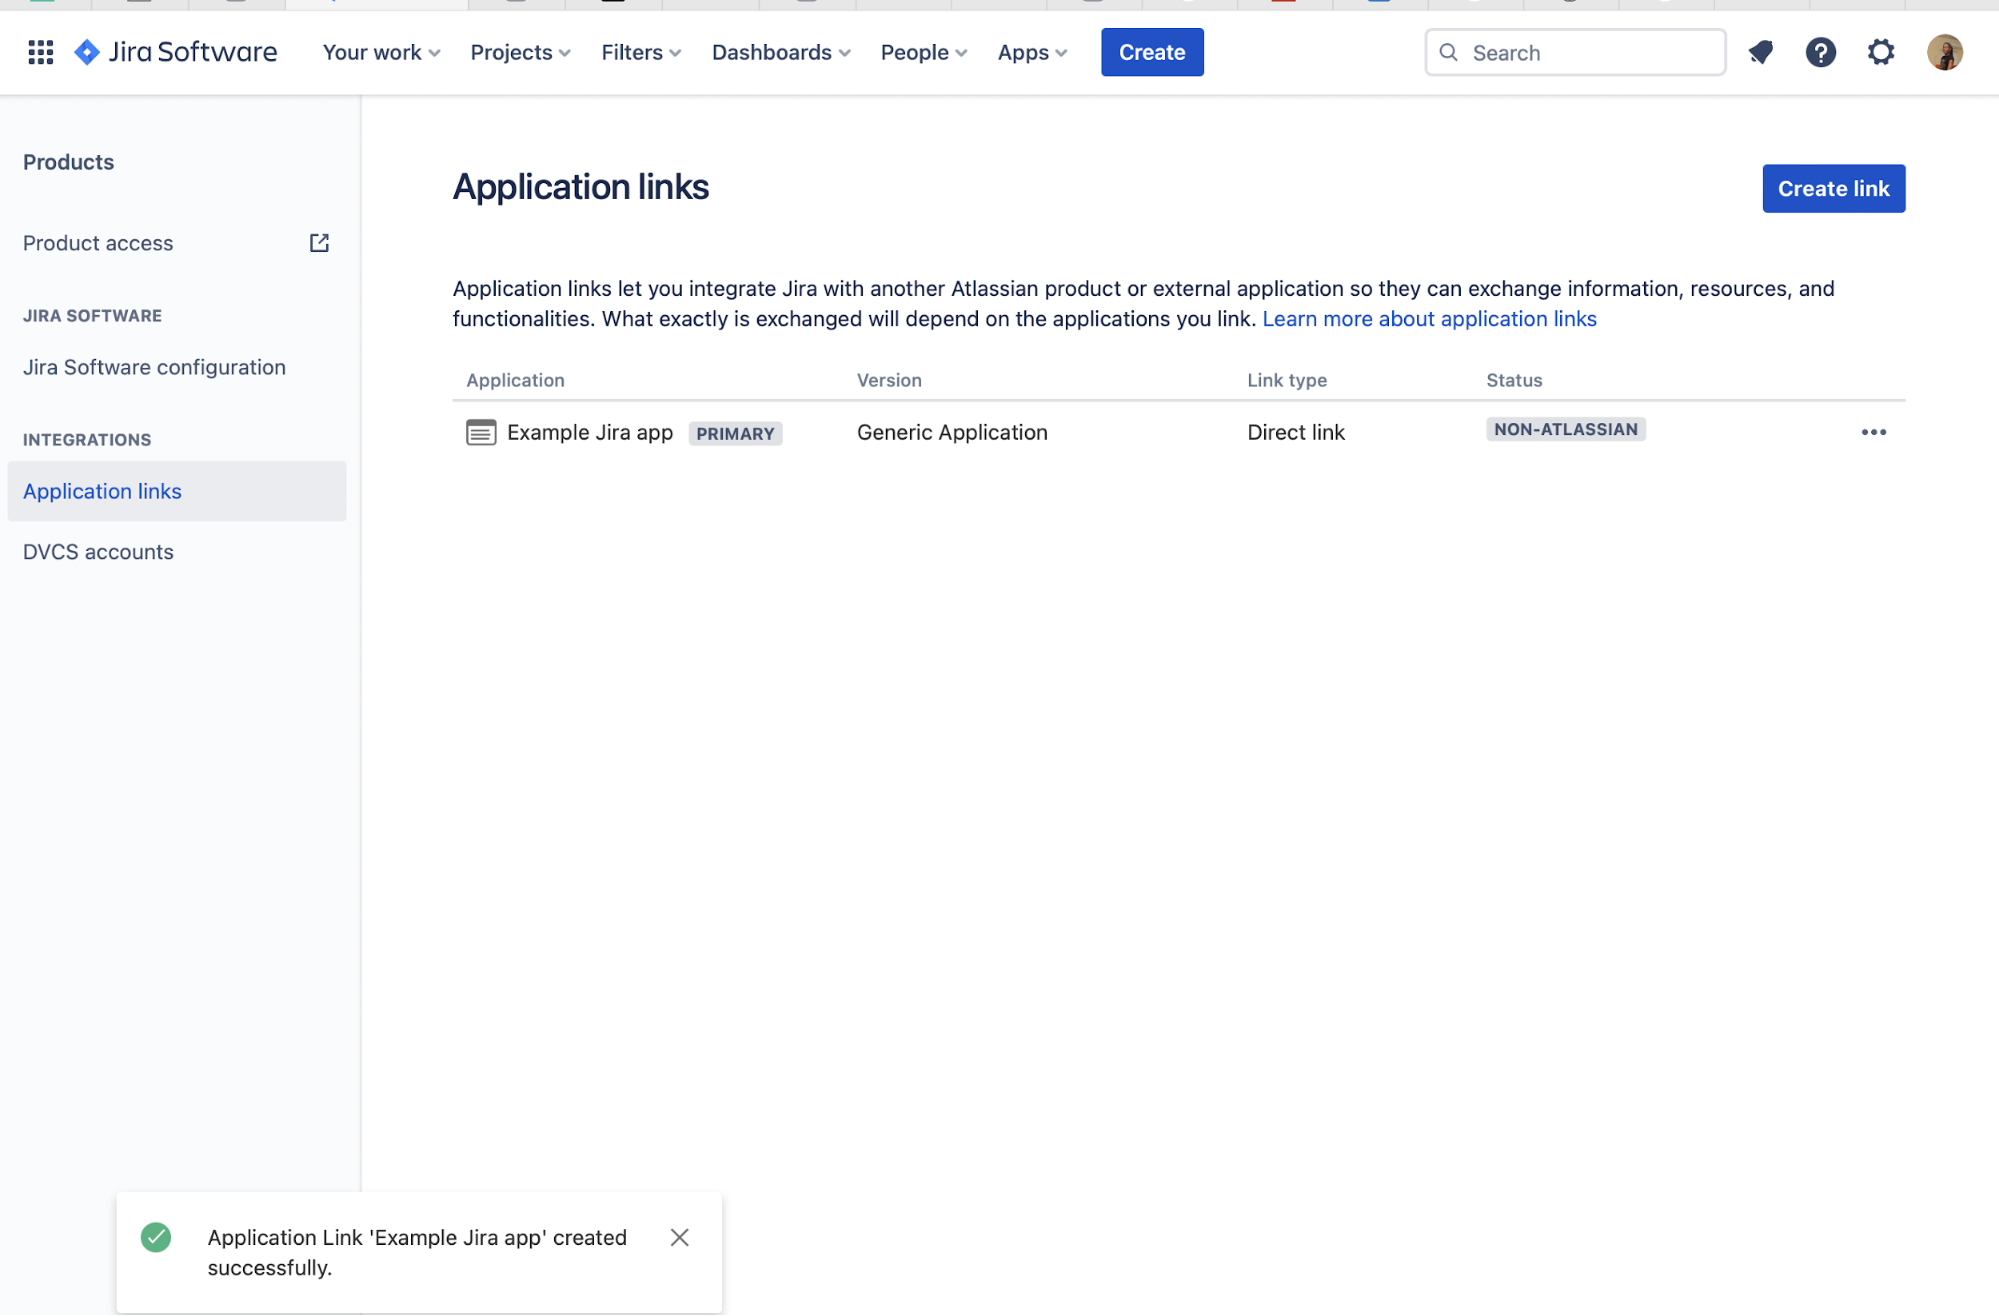
If the link creation is successful, it'll show on your screen under the "Application" sections.
Application Client
In this section, we'll create an application client. This client will display the content we want to retrieve from Jira.
In this tutorial, we'll be creating a Node.js server that'll access our Jira data and display it on the web (client) via HTTP requests. The official atlassianlabs has an example repository in Bitbucket. Here's another example by Mateusz Dargacz.
You can clone any of the examples above. However, you can create a folder that'll house our application and run "npm init" to initialize it.
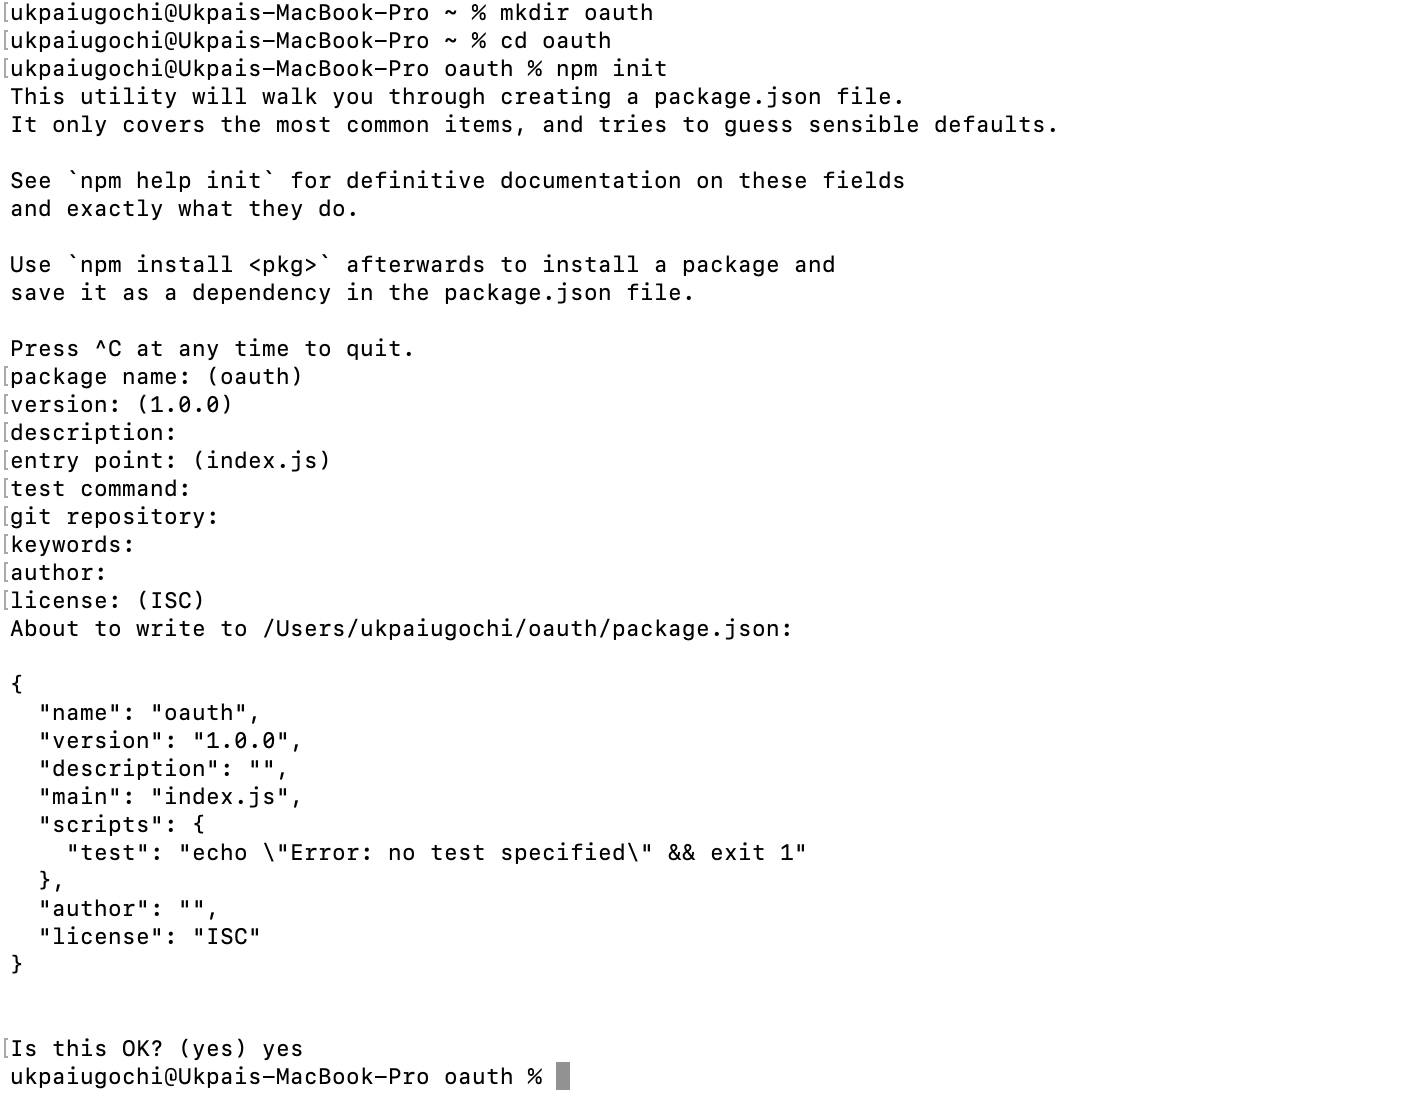
Next, create an "index.js" file and put a modified sample code from Mateusz Dargacz, as shown below, into the "index.js" file you just created.
const fs = require('fs');
const OAuth = require('oauth').OAuth;
const express = require('express');
const cookieParser = require('cookie-parser');
const session = require('express-session');
var configFile = process.env['HOME'] + "/config.js";
var config = require(configFile);
const oauthUrl = `${config.jiraUrl}/plugins/servlet/oauth/`;
console.log(oauthUrl)
var privateKeyData = fs.readFileSync(config["consumerPrivateKeyFile"], "utf8");


// monkey-patch OAuth.get since it doesn't support content-type which is required by jira's API
OAuth.prototype.get = function (url, oauth_token, oauth_token_secret, callback, post_content_type) {
  return this._performSecureRequest(oauth_token, oauth_token_secret, "GET", url, null, "", post_content_type, callback);
};
// end monkey-patch

const consumer = new OAuth(
  `${oauthUrl}request-token`,
  `${oauthUrl}access-token`,
  config["consumerKey"],
  privateKeyData,
  "1.0",
  "http://8389e5b0.ngrok.io/sessions/callback",
  "RSA-SHA1"
);


const app = module.exports = express();
app.use(cookieParser());
app.use(session({
  secret: 'example',
  resave: false,
  saveUninitialized: true,
  cookie: {secure: false}
}));
app.use((req, res, next) => {
  res.session = req.session;
  next();
});

app.get('/', (request, response) => response.send.bind(response, 'Hello Wld'));
app.get('/sessions/connect', (request, response) => {
  consumer.getOAuthRequestToken((error, oauthToken, oauthTokenSecret) => {
      if (error) {
        response.send('Error getting OAuth access token');
      }
      else {
        request.session.oauthRequestToken = oauthToken;
        request.session.oauthRequestTokenSecret = oauthTokenSecret;
        response.redirect(`${oauthUrl}authorize?oauth_token=${request.session.oauthRequestToken}`);
      }
    }
  );
});

app.get('/sessions/callback', (request, response) => {
  consumer.getOAuthAccessToken(
    request.session.oauthRequestToken,
    request.session.oauthRequestTokenSecret,
    request.query.oauth_verifier,
    (error, oauthAccessToken, oauthAccessTokenSecret) => {
      if (error) {
        response.send("error getting access token");
      }
      else {
        request.session.oauthAccessToken = oauthAccessToken;
        request.session.oauthAccessTokenSecret = oauthAccessTokenSecret;
        consumer.get(`${config.jiraUrl}/rest/auth/latest/session`,
          request.session.oauthAccessToken,
          request.session.oauthAccessTokenSecret,
          function (error, data) {
            console.log('response', data, error);
            data = JSON.parse(data);
            response.send(`Authorized username: ${data["name"]}`);
          },
          "application/json"
        );
      }
    }
  );
});

app.listen(parseInt(process.env.PORT || 8080));
Now, create a "config.js" file in your home directory. This will house the path to your private key and other configurations. The consumer key should be the same as in the last section.
var config = {};
config.consumerKey = "OauthKey";
config.consumerPrivateKeyFile = "../jira_privatekey.pem";
config.jiraUrl = "https://xxx.atlassian.net"
module.exports = config;
Authorization
After setting up your Node.js client, you'll need to authorize your client with Jira. This is because we'll need to obtain an OAuth access token from Jira. This access token will be used by our client to access the required data.
To do this, we'll utilize the JDog library from npm. This process may take a while and sometimes freeze the application's UI. Therefore, JDog helps JavaScript's loading pattern, since we'll be redirected to perform the OAuth dance.
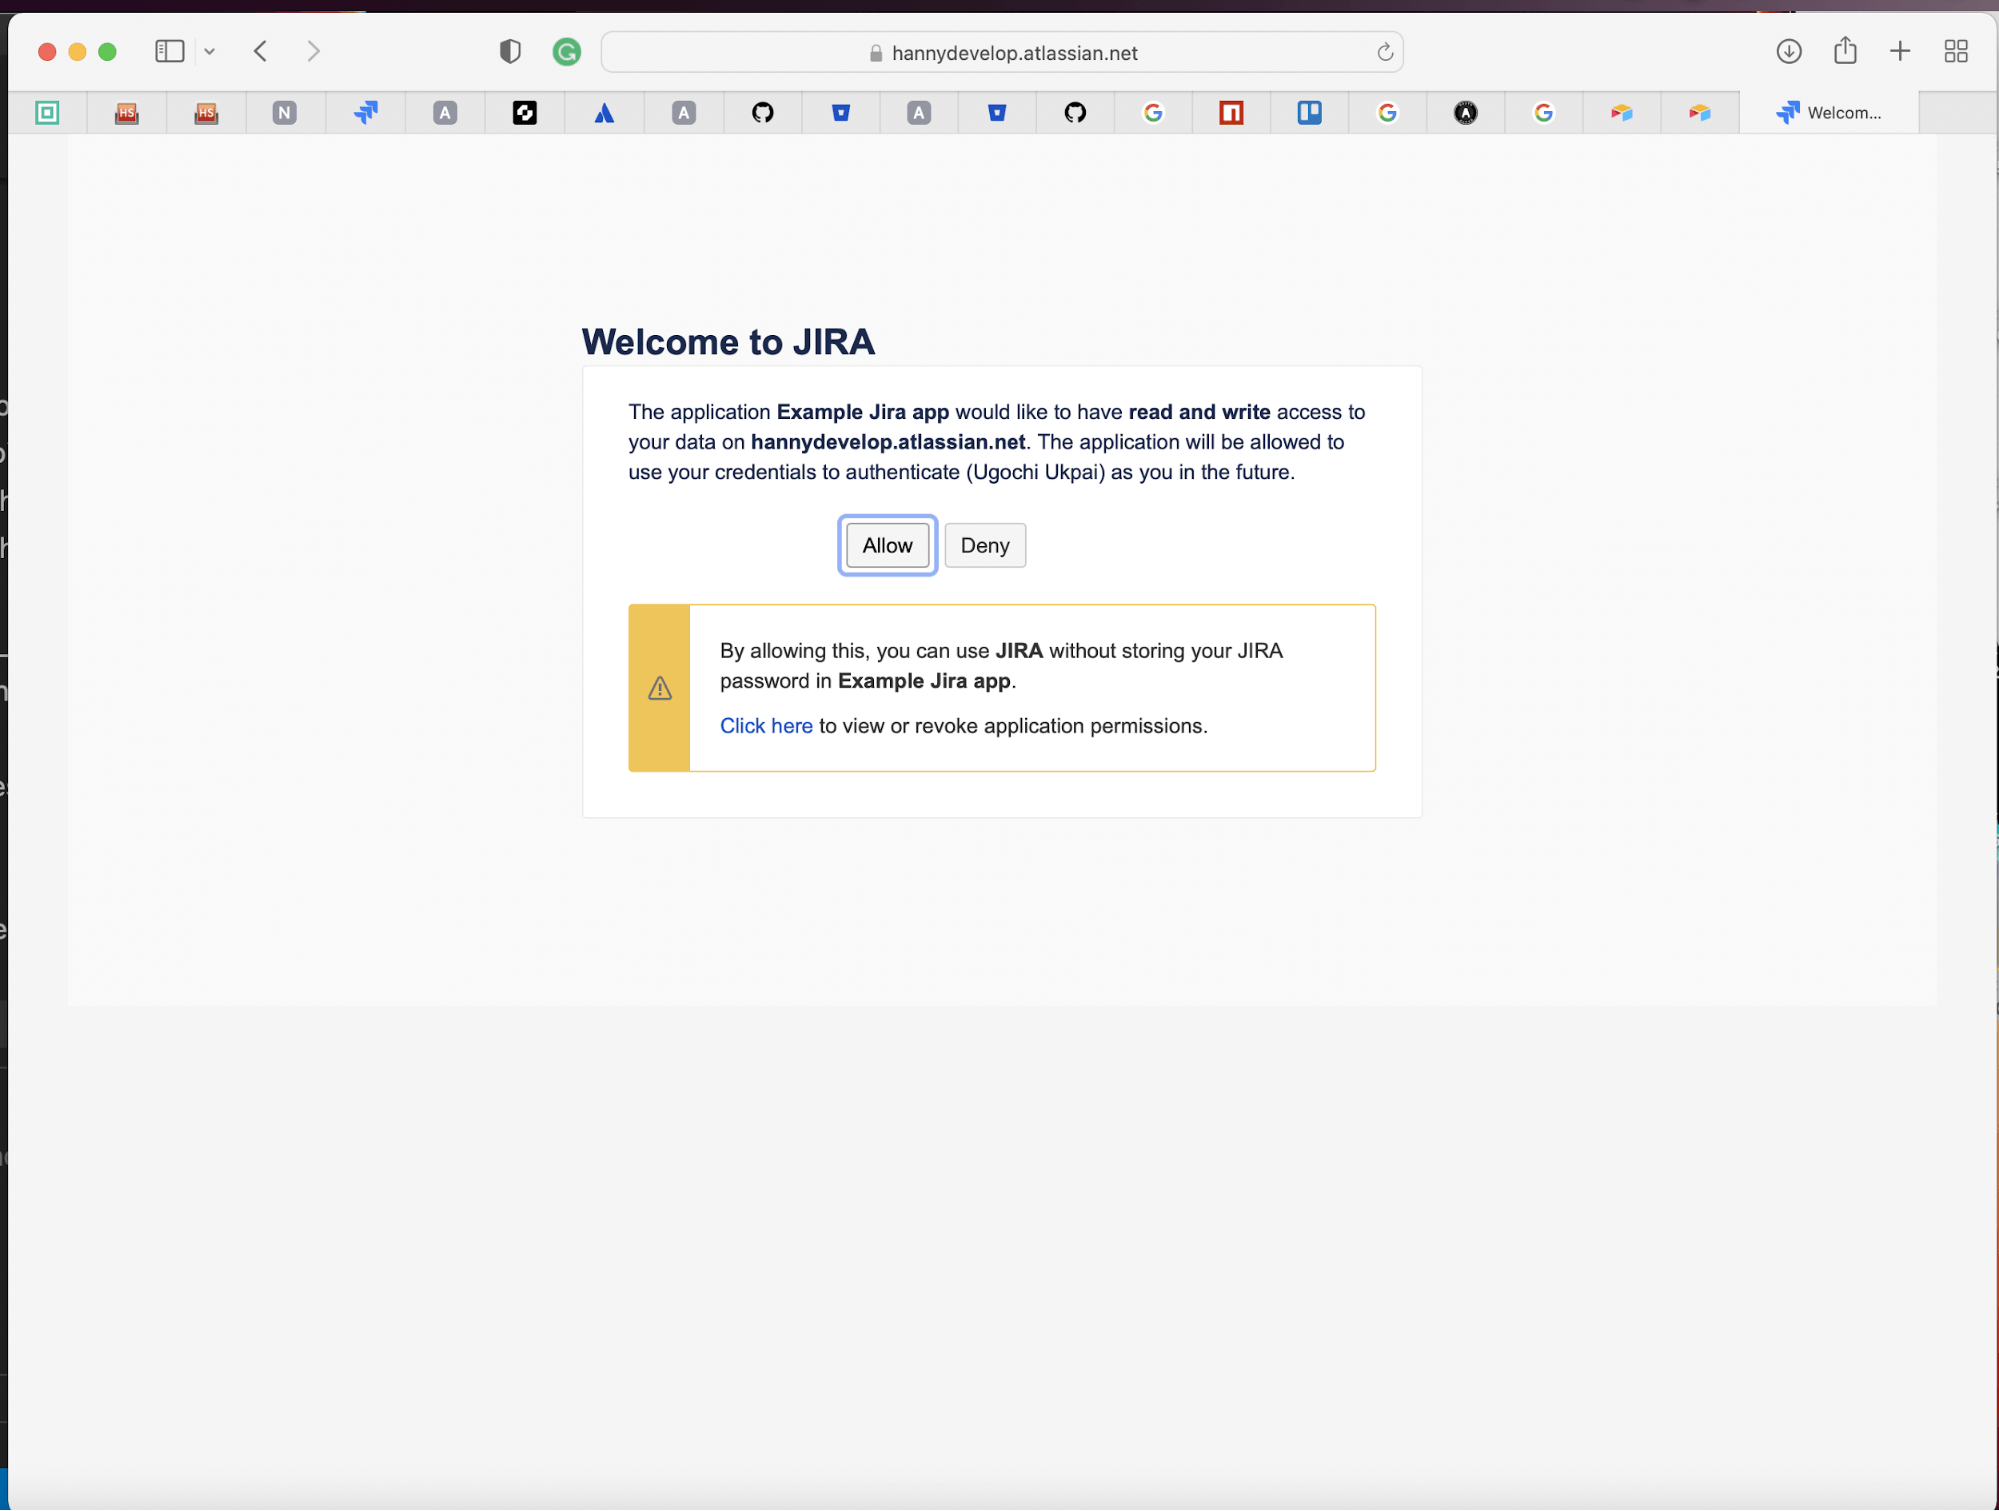
First, run npm install express cookie-parser express-session oauth fs to install all dependencies. Then, start the Node.js server by running node index.js in your terminal. Next, point your browser to http://localhost:8080/sessions/connect. Here, you'll be redirected to JDog, which will load the interface to do the OAuth dance.
Notice that after the OAuth dance, the access token will be displayed in your terminal, and you'll be taken back to the Node.js server.
Jira OAuth Conclusion
While accessing data is an important part of IT, proper authorization is necessary when accessing users' information. This is exactly what Jira OAuth provides—a means to safely port data from Jira to third-party applications.
In this post, we've created a Jira third-party server application with Node.js to access our Jira data. While this process is smooth and useful for the dissemination of data across teams, it's not a bed of roses.
For instance, without proper configuration, it'll become difficult to access these data. Also, it becomes painstakingly difficult when one needs to hire an expert to make these integrations.
Before your go..
This post was written by Ukpai Ugochi. Ukpai is a full stack JavaScript developer (MEVN), and she contributes to FOSS in her free time. She loves to share knowledge about her transition from marine engineering to software development to encourage people who love software development and don't know where to begin.
