QuickBooks OAuth: How to Set up the Online Accounting API in Your Web App
Authorization and security are critical components of any web application, especially when that app handled financial data. OAuth is the industry-standard protocol for provisioning access to application resources. So, it's no surprise that Intuit uses it for their QuickBooks applications.
In this tutorial, you'll learn how to connect to QuickBooks OAuth with a Node.js application. After creating a sample application in their developer portal, we'll use their sample code to connect to the service and retrieve a security token. Then we'll break down how their code works.
What's Oauth?
OAuth 2.0, short for “Open Authorization”, allows a website or application to use resources hosted by other applications on behalf of an authenticated user. Version 2.0 replaced 1.0 in 2012. OAuth is for authorizing access to resources and not for identifying users.
When a user wants access to a service that uses OAuth, they send a request. The service then checks with its OAuth provider.
Here's a sample flow:
- User requests access to a resource that's managed by a service.
- The service contacts its OAuth provider to ensure the user is authenticated.
- OAuth checks with the user to ensure the request is legitimate. Depending on the service, this may use two-factor authentication.
- If approved, OAuth responds to the request with a token. The token is for limited users. It has a finite lifespan and is only good for the specific application or website.
Why Use Quickbooks OAuth?
Intuit offers two APIs to developers that want to write Quickbooks Online applications: the QuickBooks Online Accounting API, which connects to QuickBooks Online, and the QuickBooks Payments API, which for processing payments for an online application.
Both APIs use Oauth 2.0 for user authentication, and you can use this code example for either API. However, we'll be looking at the accounting API in this article.
Intuit offers two APIs to developers that want to write Quickbooks Online applications
Prerequisites
If you want to follow along with this tutorial, you'll need to create a developer account at developer.intuit.com. This process will also create a sandbox company for your developer account. When you authorize an QuickBooks application with OAuth2, you entitle it to one or more sandbox company's financial information.
We're going to use sample code from Intuit to connect to the OAuth service. You'll find the code here. This is a fork that fixes a minor bug. Clone this repository, or download the zip file and decompress it. Make sure you get the patch-1 branch.
Then, perform the install in the README file:
- Run npm install
- Copy .env.example to .env
Don't start the app yet. We'll do that below.
Authenticating with QuickBooks Oauth
Create an Quickbooks Online Application
Before you can connect an application to the Quickbooks Online API, you must register it at the Intuit developer portal.
So, sign in to the portal and go to the applications dashboard.
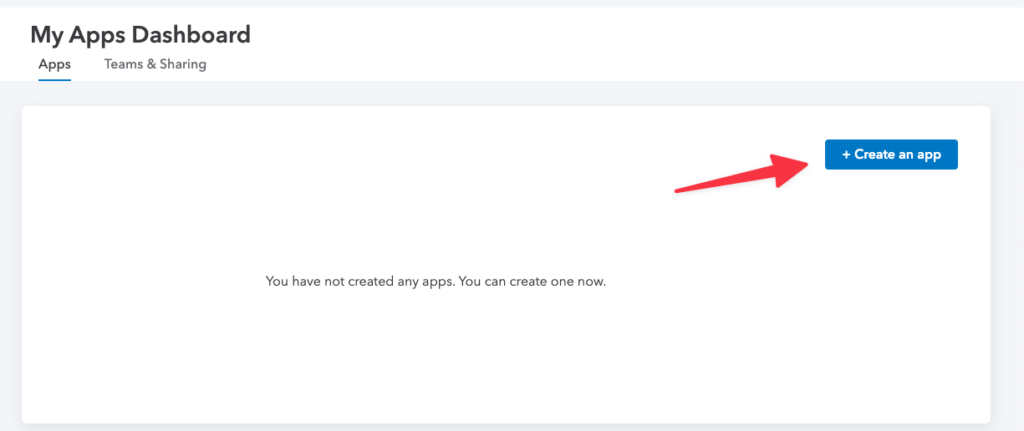
Click on the Create an app button.
This will take you to the select platform page, which only has one option.
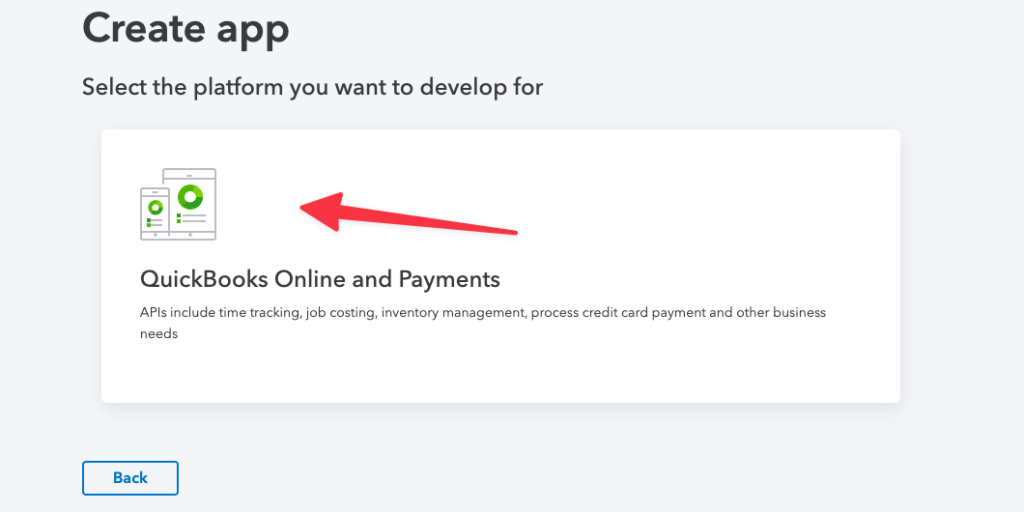
Click the only option to get past this page.
This will take you to an options page for your application's name and API options.
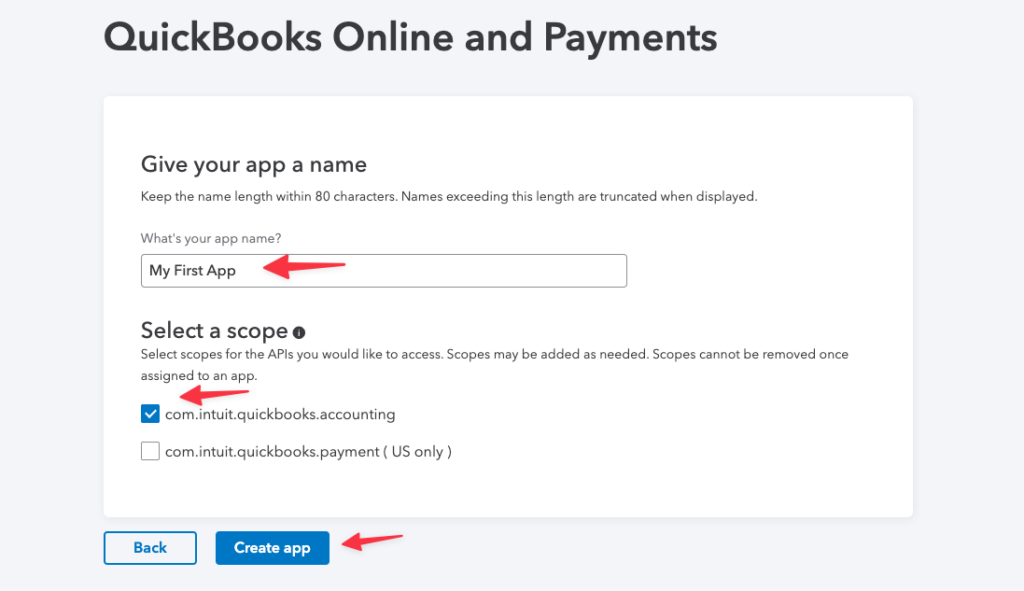
Give your application a name and check the box next to the accounting API. We don't need to enable payments for this app, because we'll only be wiring up OAuth.
Click Create app and the site will work for a few moments.
You'll receive an email confirmation that your app is now available:
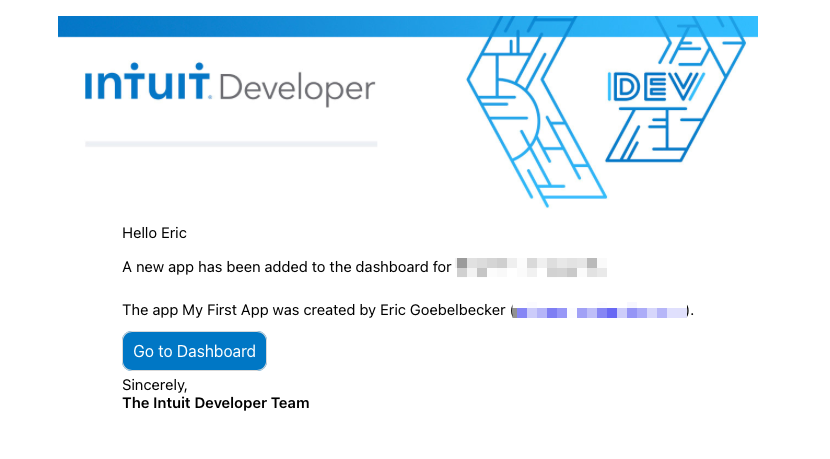
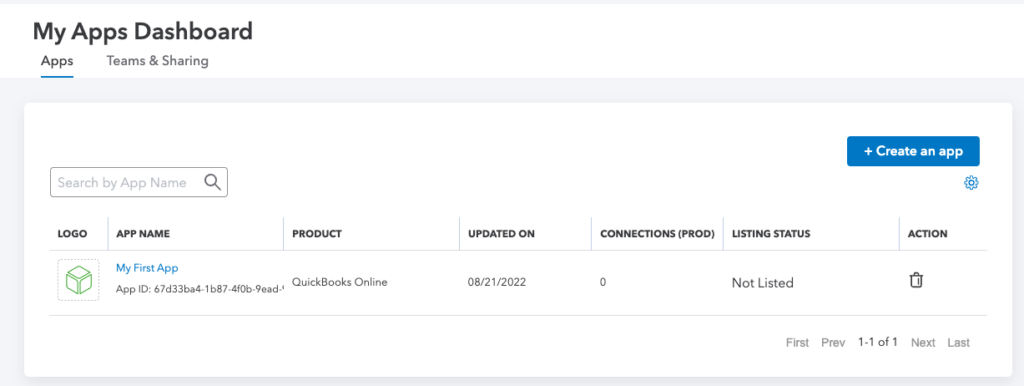
Your dashboard has your application now:
Get QuickBooks OAuth Tokens
Now, click on your application name in the dashboard.
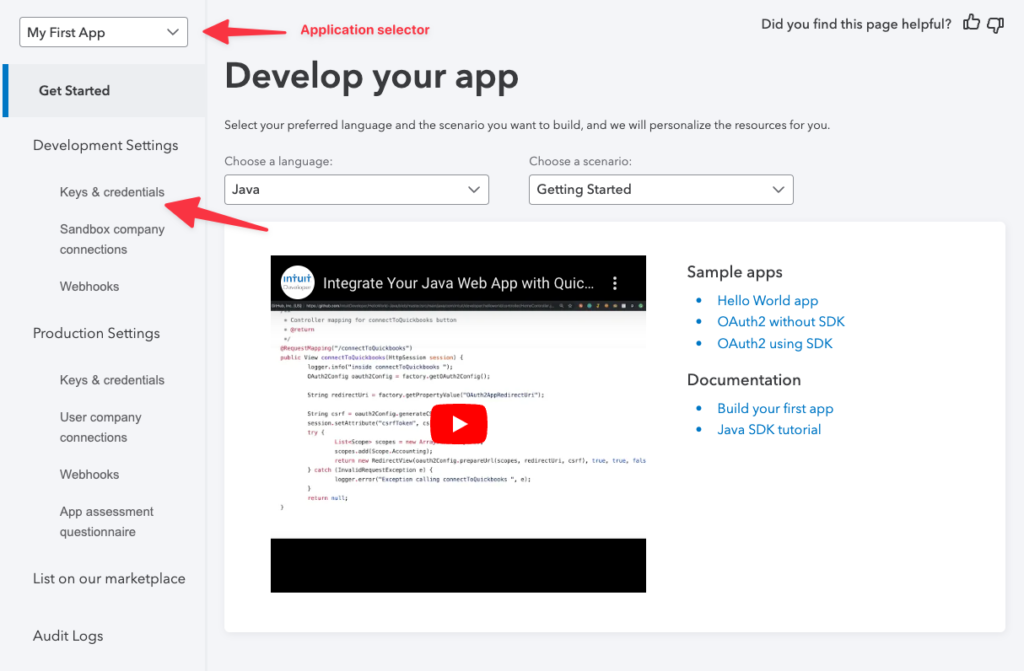
This developer page has various tools for working on your app. The selector at the top is useful if you have more than one application.
The Keys & Credentials menu item immediately below Development Settings is where you get your OAuth tokens. Click it.
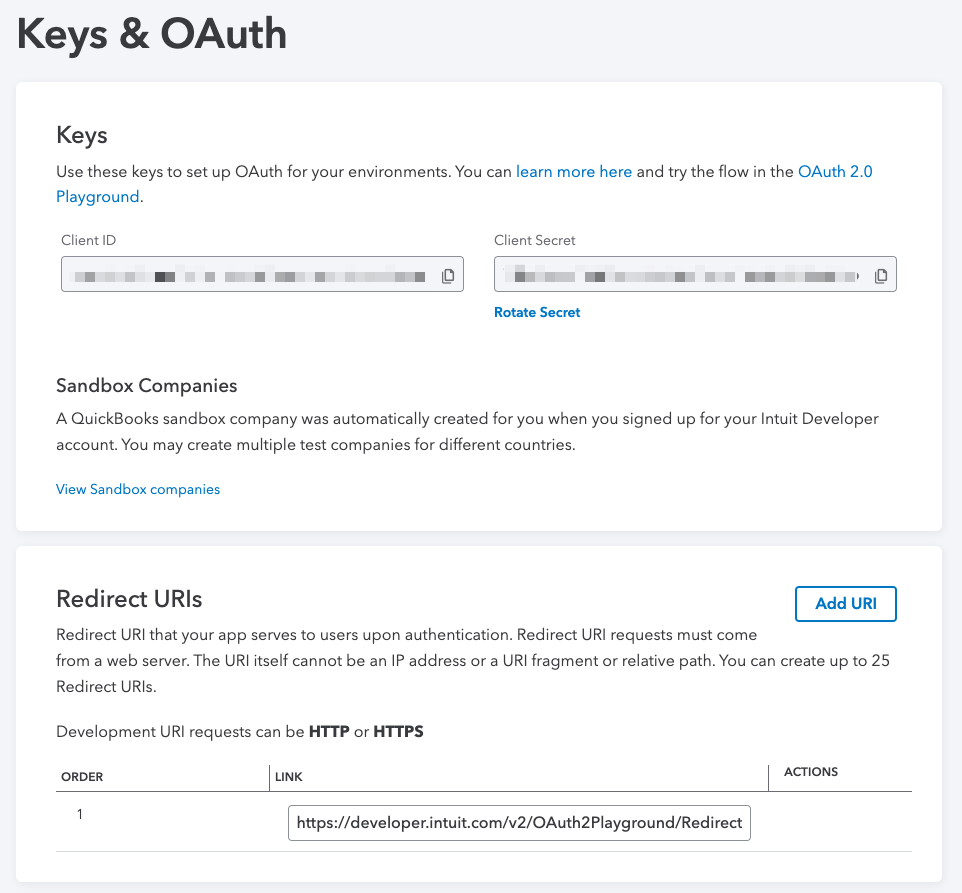
Leave this browser tab open, as you'll need the keys and you'll add a new redirect URI soon.
Connect to QuickBooks Oauth
Now, it's time to run the QuickBooks example code, then we'll go over how it works.
Before running the code, add http://localhost:8000/callback as a redirect URI on the Keys & OAUTH page for your app.
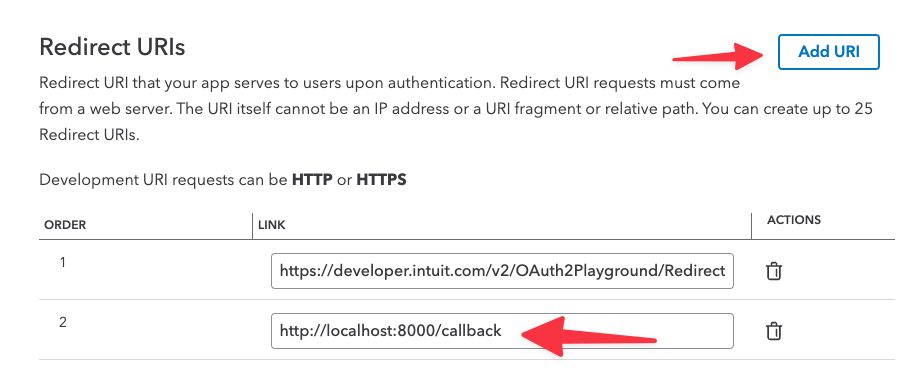
We're ready to go!
Run npm start in the example code root directory.
% npm start

> OAuth2.0-demo-nodejs@1.0.0 start
> node app

💻` Server listening on port 8000`

💳`  See the Sample App in your browser : http://localhost:8000`

💳`  Copy this into Redirect URI on the browser : http://localhost:8000/callback`

💻`  Make Sure this redirect URI is also copied on your app in : https://developer.intuit.com`
We've already added the URI, so open http://localhost:8000 in your browser.
This opens a form where you can enter your app keys and the redirect URI:
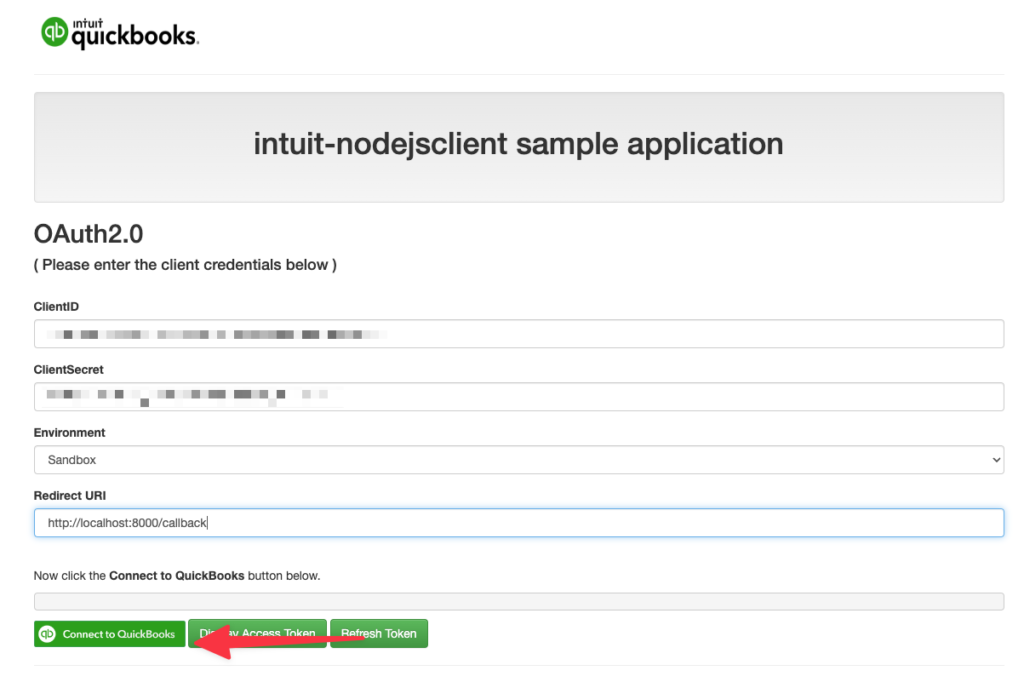
Click Connect to QuickBooks.
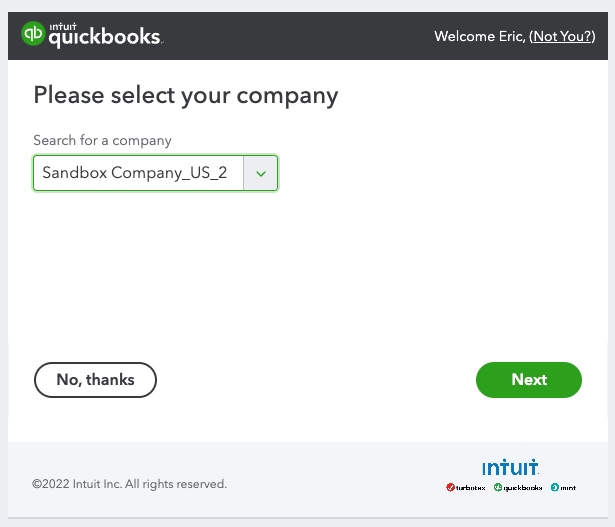
Depending on how many sandbox companies you have, QuickBooks will prompt you to select one. Pick one and click next.
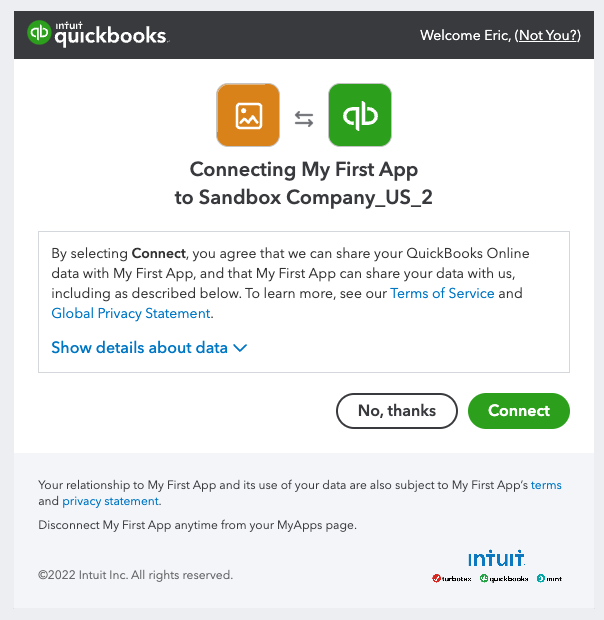
Quickbooks will confirm your choice. Click Connect to continue.
After a few seconds, the form will load again.
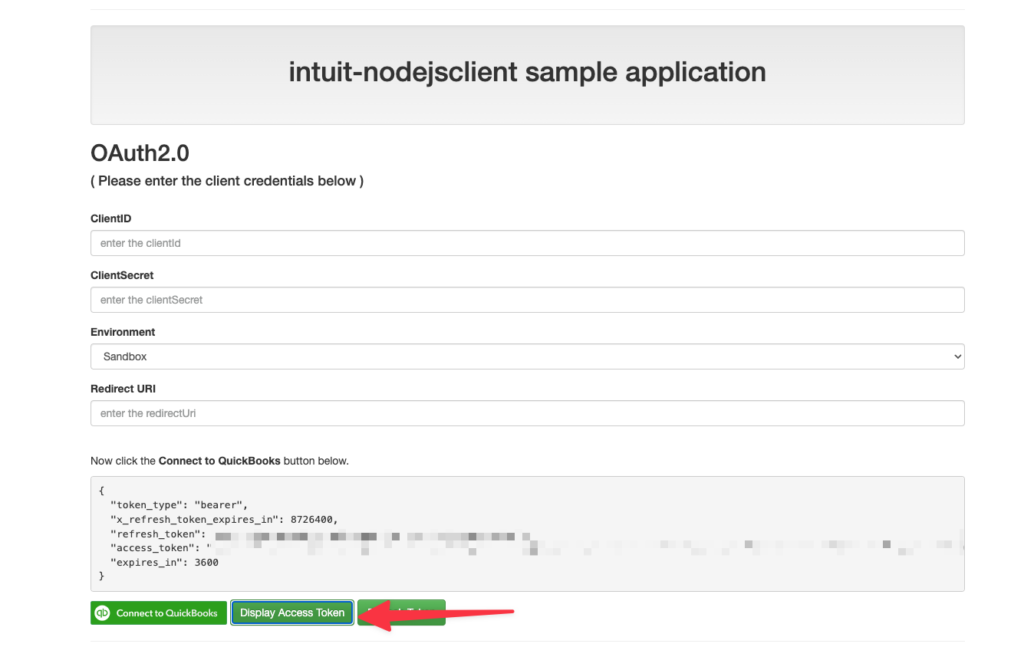
Click Display Access Token to see the tokens. You've connected to QuickBooks Oauth!
QuickBooks Oauth Code
Let's look at the code and see how it works.
All the application code is contained in app.js and public/index.html.
Let's start with the function tied to the Connect to QuickBooks button in index.html:
function authorizeUri() {

            // Generate the authUri
            var jsonBody = {};
            jsonBody.clientId = $('#clientId').val();
            jsonBody.clientSecret = $('#clientSecret').val();
            jsonBody.environment = $('#environment').val();
            jsonBody.redirectUri = $('#redirectUri').val();

            $.get('/authUri', {json:jsonBody}, function (uri) {
                console.log('The Auth Uris is :'+uri);
            })
            .then(function (authUri) {
                // Launch Popup using the JS window Object
                var parameters = "location=1,width=800,height=650";
                parameters += ",left=" + (screen.width - 800) / 2 + ",top=" + (screen.height - 650) / 2;
                var win = window.open(authUri, 'connectPopup', parameters);
                var pollOAuth = window.setInterval(function () {
                    try {
                        if (win.document.URL.indexOf("code") != -1) {
                            window.clearInterval(pollOAuth);
                            win.close();
                            location.reload();
                        }
                    } catch (e) {
                        console.log(e)
                    }
                }, 100);
            });
        }
This grabs the keys and redirects URI from the form. Then, it uses the AuthUri function to retrieve the authorization URI.
This is the URI for company authorization dialog. If the call to get the URI succeeds, it opens it in and the authorization process proceeds.
Now, let's look at the AuthUri function. It's in app.js.
First, let's look at the top of that file and see where it loads some dependencies:
'use strict';

require('dotenv').config();

/**
 * Require the dependencies
 * @type {*|createApplication}
 */
var express = require('express');
var app = express();
var path = require('path');
var OAuthClient = require('intuit-oauth');
var bodyParser = require('body-parser');
var ngrok =  (process.env.NGROK_ENABLED==="true") ? require('ngrok'):null;
The most important part for our demonstration is the intuit-OAuth library. It's doing most of the work for us. Let's see how.
On line #55 we can see the definition of AuthUri:
/**
 * Get the AuthorizeUri
 */
app.get('/authUri', urlencodedParser, function(req,res) {

    oauthClient = new OAuthClient({
        clientId: req.query.json.clientId,
        clientSecret: req.query.json.clientSecret,
        environment: req.query.json.environment,
        redirectUri: req.query.json.redirectUri
    });

    var authUri = oauthClient.authorizeUri({scope:[OAuthClient.scopes.Accounting],state:'intuit-test'});
    res.send(authUri);
});
It uses Intuit's OAuthClient to make the authorization request with authorizeUri(). zthis call retrieve the URI and manages redirecting the browser when the process completes.
For extra credit, we can look at how to refresh the token. The web page has a button that's bound to this function in app.js:
/**
 * Refresh the access-token
 */
app.get('/refreshAccessToken', function(req,res){

    oauthClient.refresh()
        .then(function(authResponse){
            console.log('The Refresh Token is  '+ JSON.stringify(authResponse.getJson()));
            oauth2_token_json = JSON.stringify(authResponse.getJson(), null,2);
            res.send(oauth2_token_json);
        })
        .catch(function(e) {
            console.error(e);
        });
});
Intuit's client has a refresh() method built it, so all that's required is calling it.
That's all we need to do to connect to QuickBooks OAuth and keep a valid token.
Intuit’s client has a refresh() method build it, so all that’s required is calling it
QuickBook OAuth
In this library, we saw how to use QuickBooks OAuth to authenticate to their service and authorize an application for access to a company's data.
We connected to their developer portal and created an application. Then we used their client library to connect to QuickBooks and exchange keys to retrieve and refresh an authorization token. Their Javascript library does all the heavy lifting for you, so you can focus on getting your application up and running.
Of course, you don't have to use Intuit's OAuth library. Intuit has instructions here for authorizing applications in several different languages, with instructions on how to access their OAuth service directly.
Before your go..
This post was written by Eric Goebelbecker. Eric has worked in the financial markets in New York City for 25 years, developing infrastructure for market data and financial information exchange (FIX) protocol networks. He loves to talk about what makes teams effective (or not so effective!).
