Discord OAuth: How to Add the Discord API to a Node.js App
Today, Discord is one of the most popular social platforms for developers. But besides the platform itself, Discord allows developers to build integrations on top of it. For instance, you can build your own Discord bot from scratch. This can be really helpful if you're hosting a developer community on Discord, or if you want to notify your users of something when an action occurs in your app.
Similarly, Discord offers a bunch of REST APIs that you can interact with. You can even let your users authenticate in your app via their Discord account using OAuth. But how do you use Discord OAuth in your application? Or how do you get an OAuth token from Discord API?
In this tutorial, we'll go over step by step how to use the Discord API and integrate Discord OAuth into your Node.js application.
Discord App Setup
First, we'll need to create a Discord app. Let's understand step by step how we can do that.
Create a Discord Application
Head over to the Discord developer portal and log in with your Discord account. Then click on the Applications tab on the left.
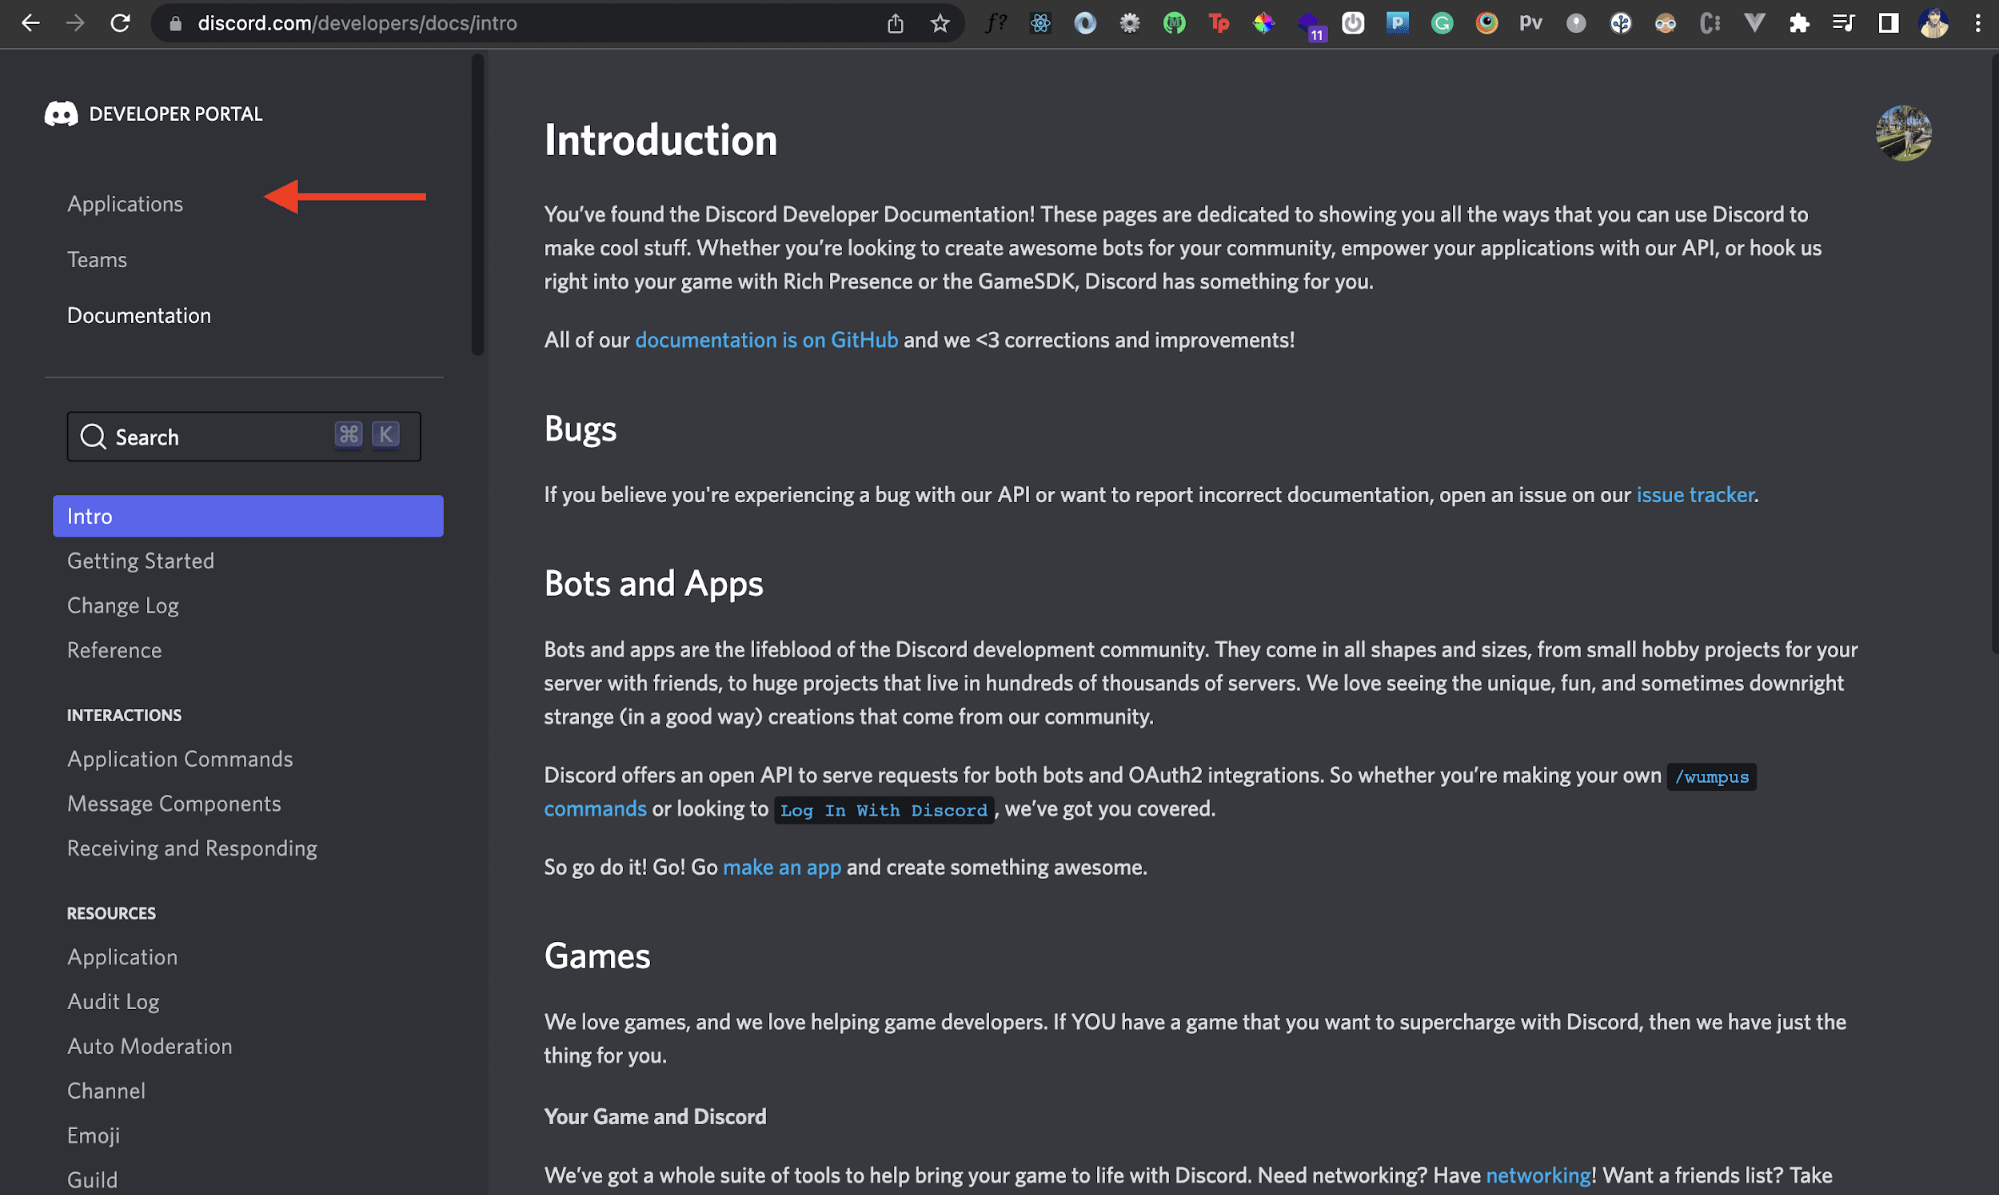
Next, we'll create a new Discord application. Click on the New Application button at the top.

Once you do that, you should see a popup asking for your application's name.
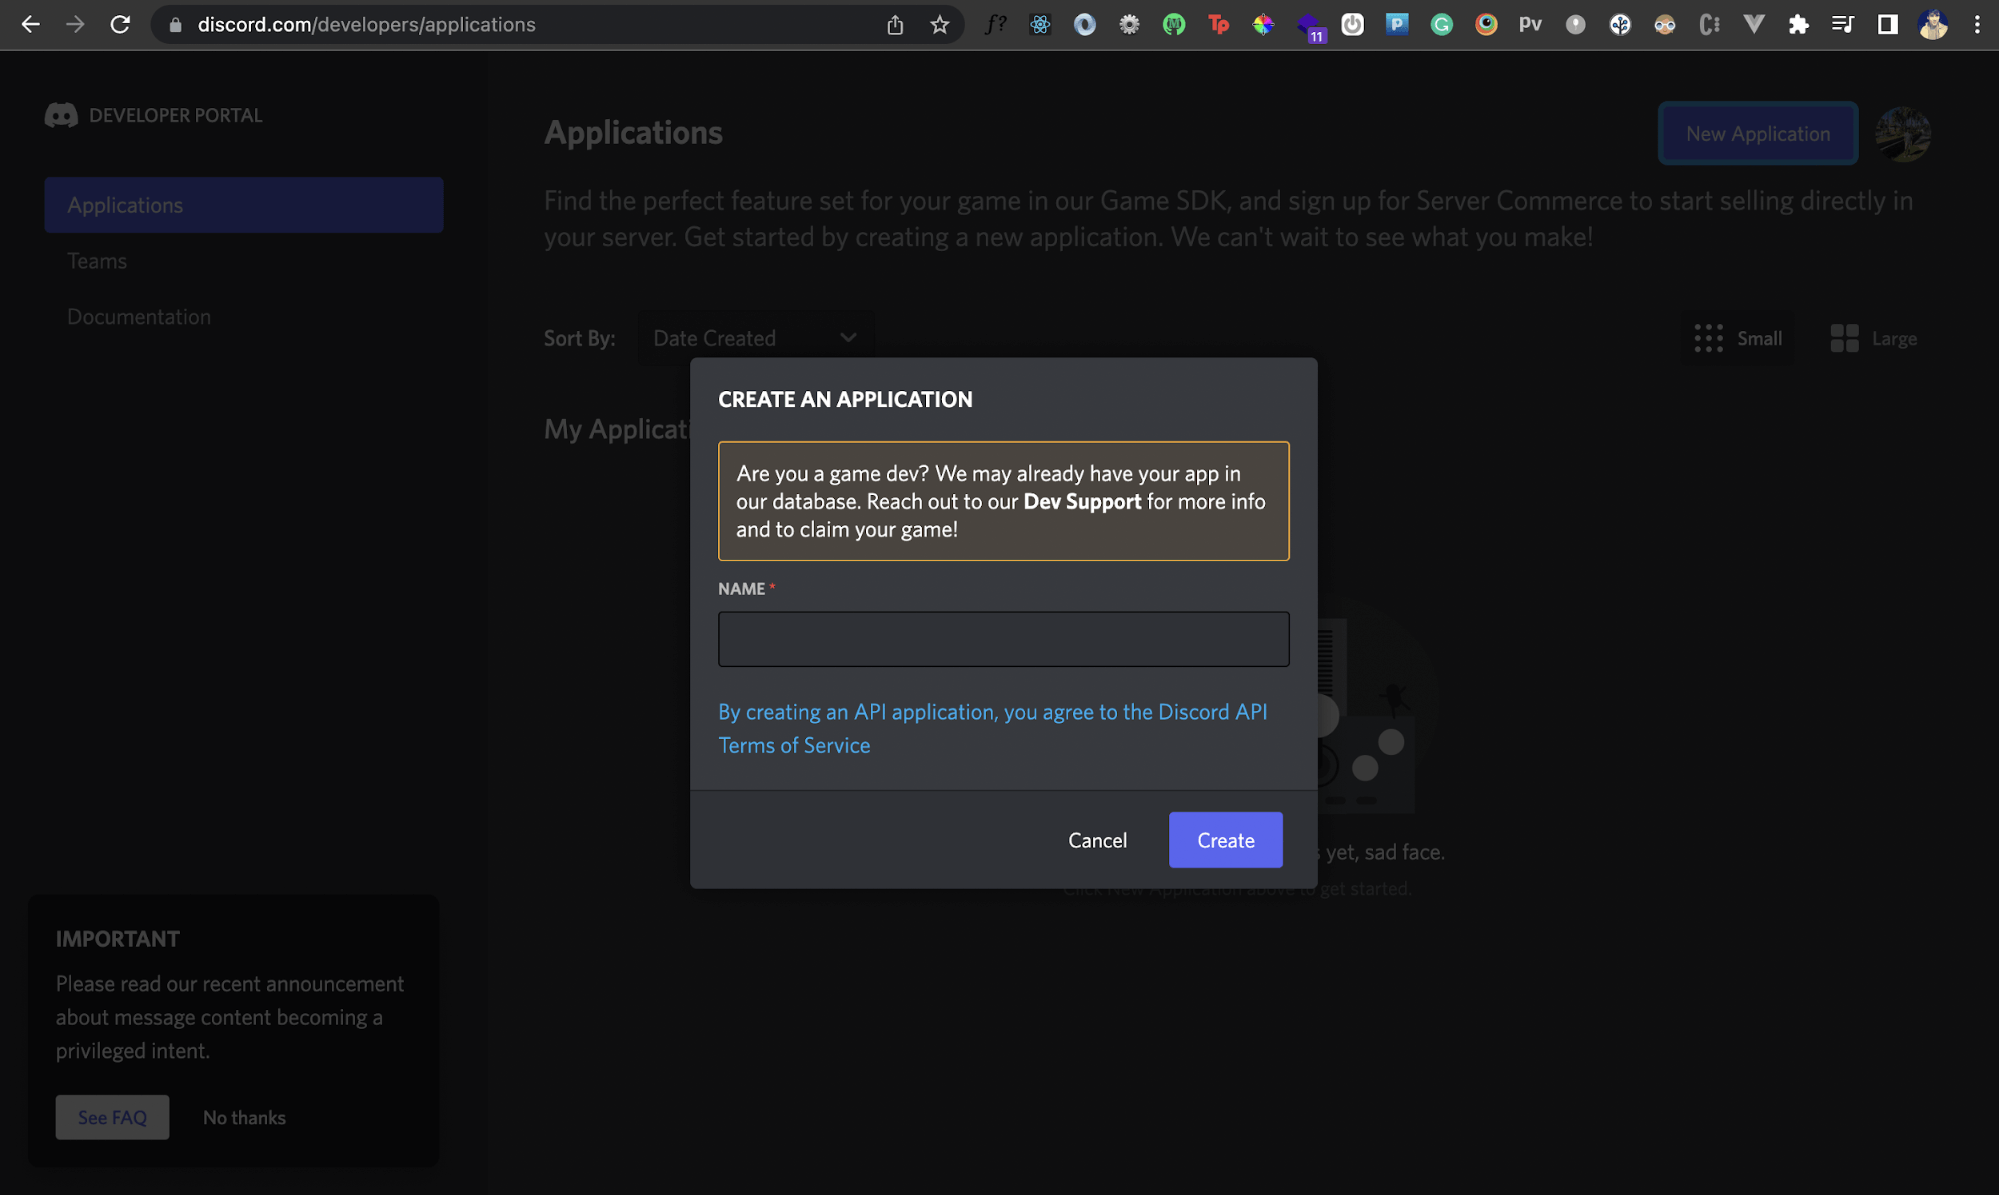
Enter the desired name of your application and click the Create button.
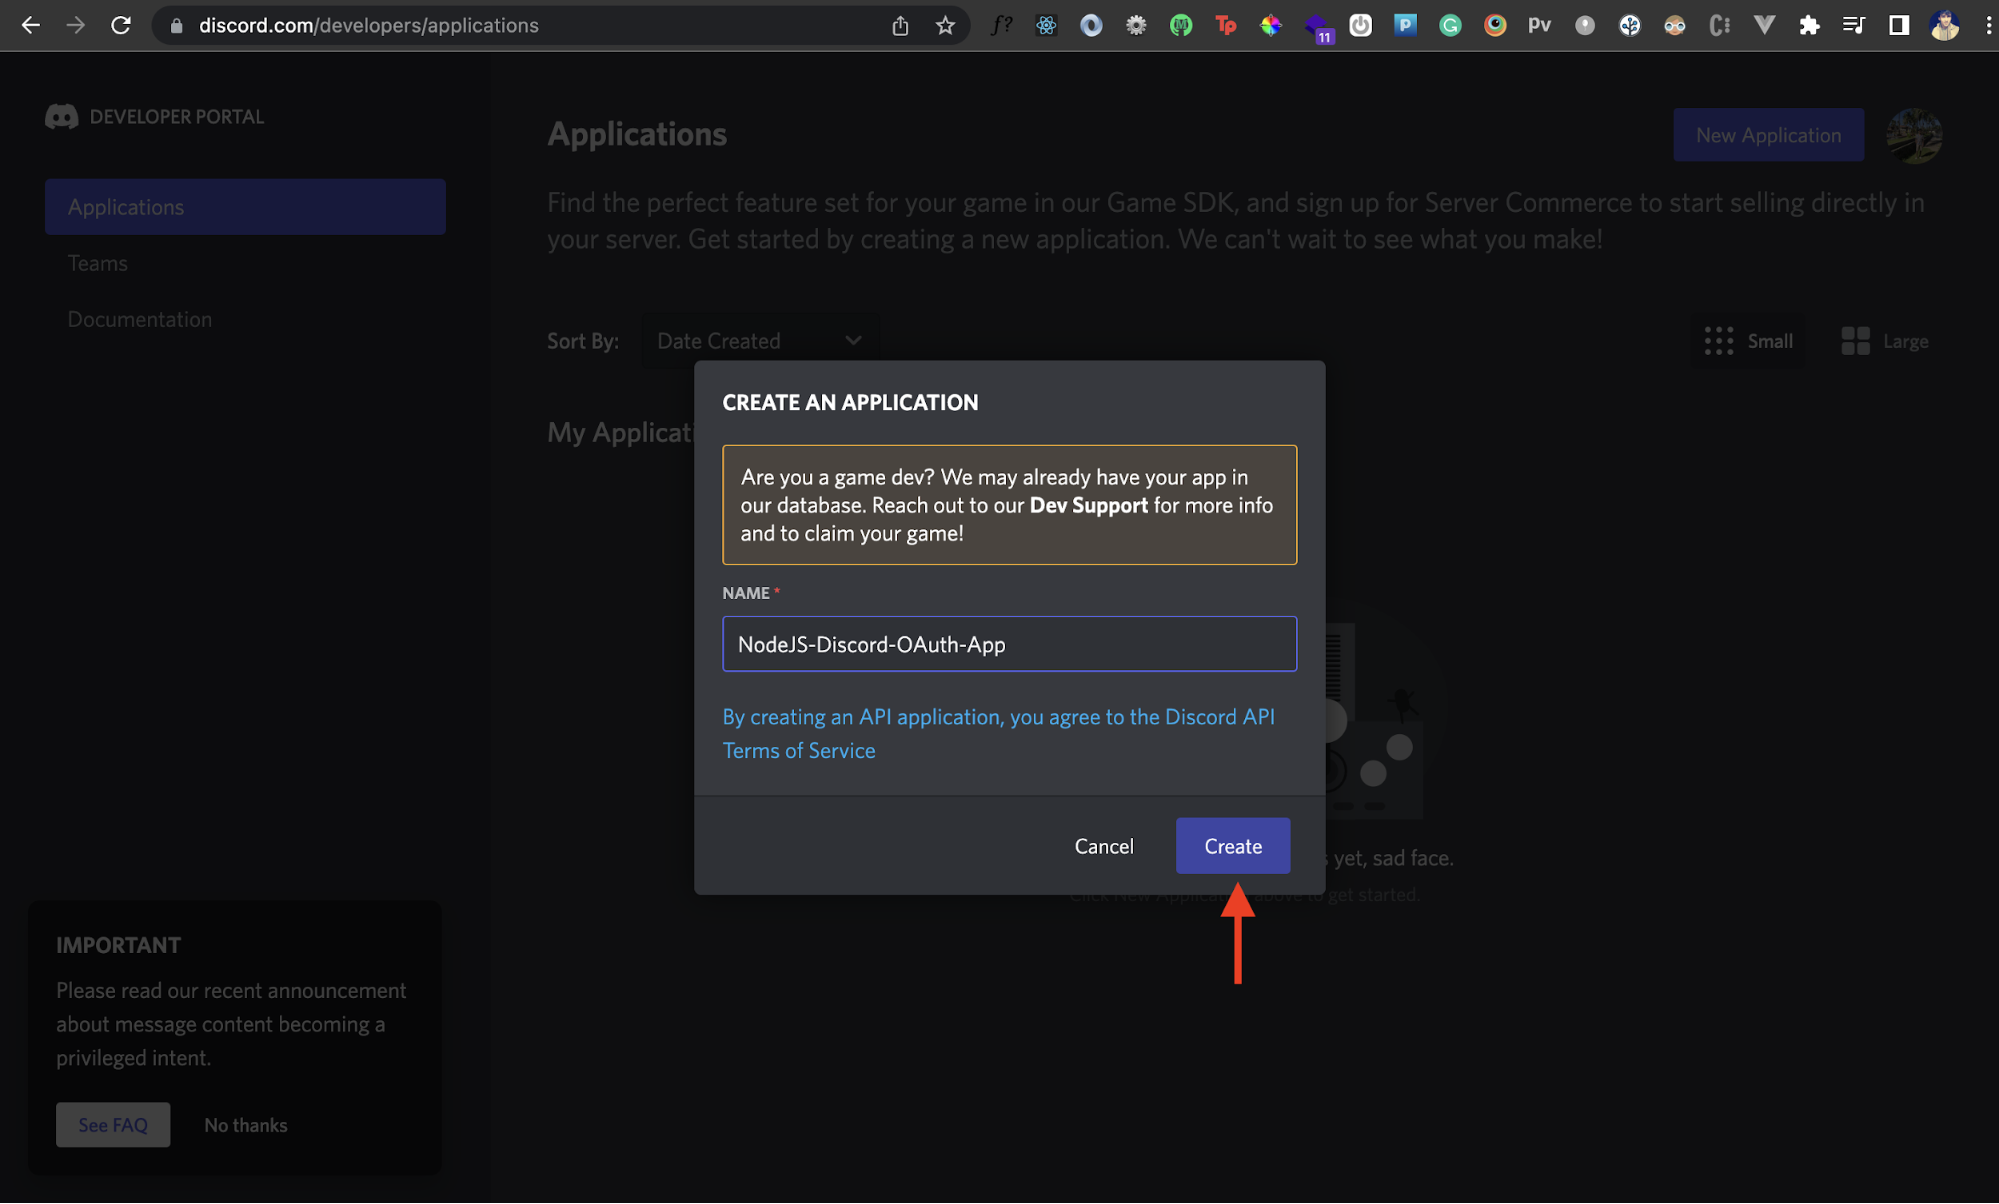
And voilà! You should now have a new Discord application created.
Add Redirect URI
Next, we'll add a redirect URI in our newly created Discord application. This redirect URI will be a URL (or route) of your own Node.js app. Discord will redirect back to this URL after an authentication is completed.
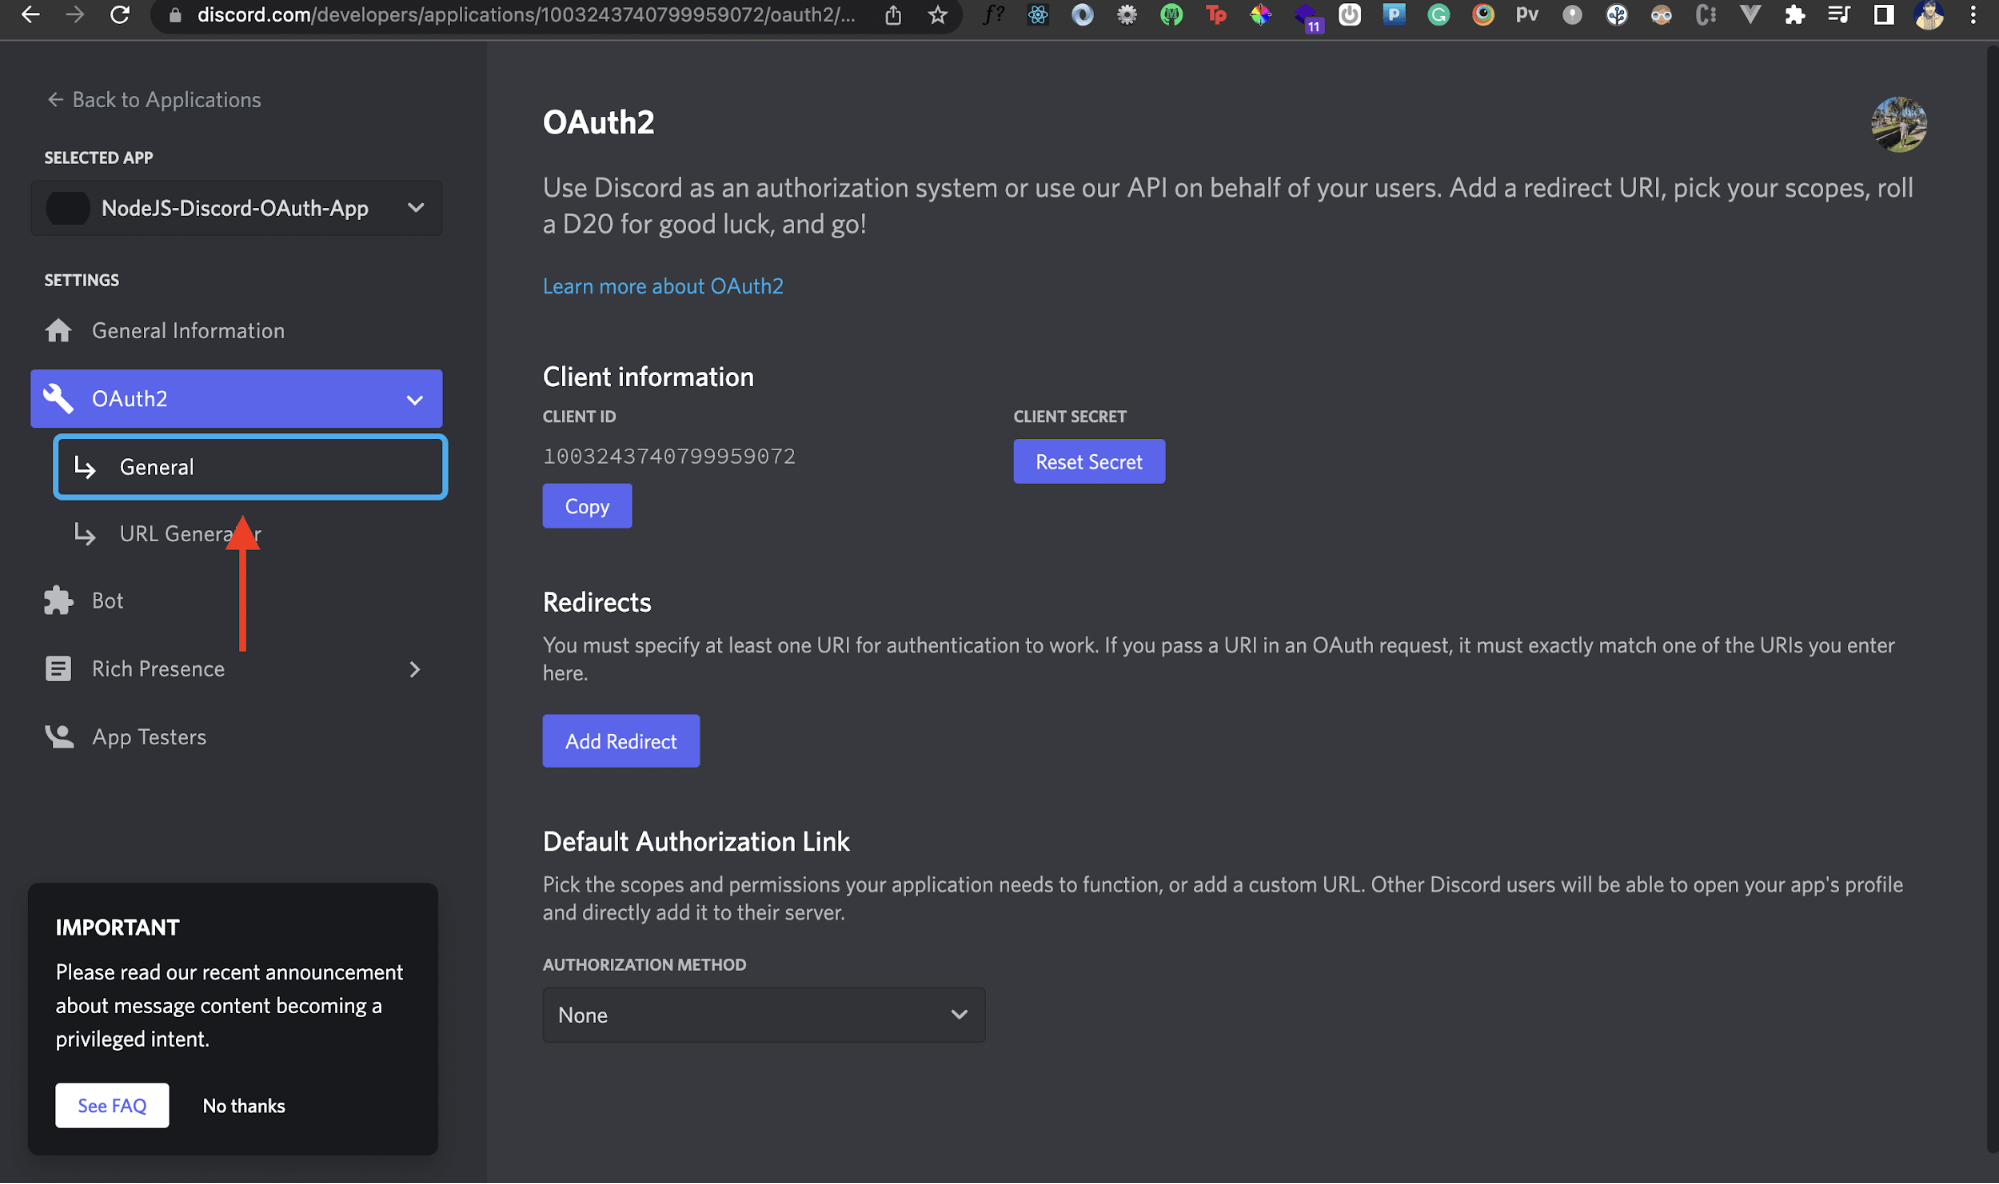
In the left panel, choose OAuth2, then select the General tab.
In the Redirects section, we'll add the following URL: http://localhost:8000/auth/discord. Once you've done that, click on the Save Changes button in the popup.
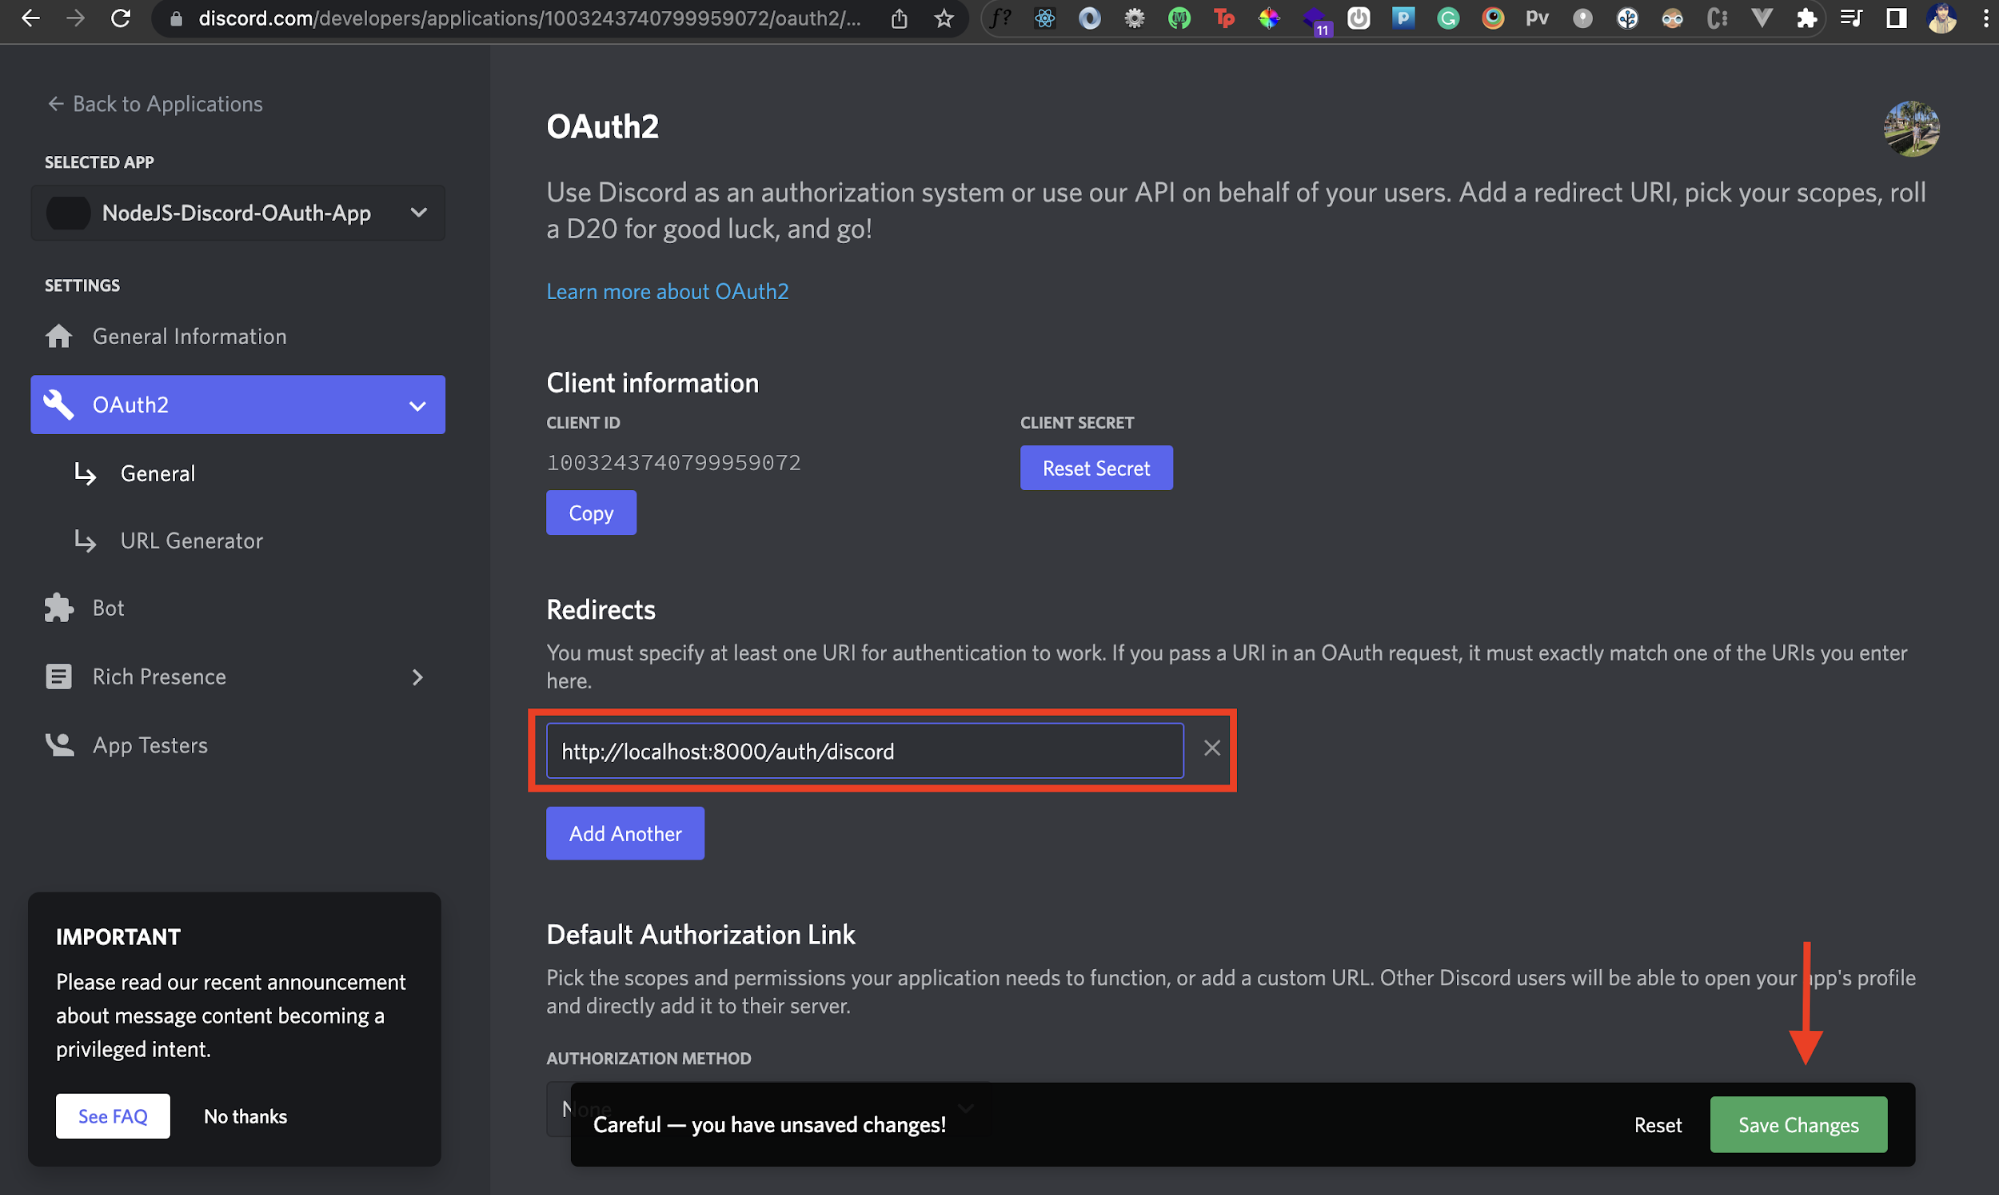
Great! We've added a redirect URI to our Discord app, but we also need an OAuth URL from our Discord app. This is the URL that we'll trigger for the OAuth workflow. Let's see how we can do that.
copes here refer to what data or actions our own application can perform using Discord
Generate Discord OAuth2 URL
We'll select the URL Generator section under the OAuth2 tab from the left-hand side. Here, we'll tell Discord to generate a URL that'll let users authenticate themselves via Discord.
We first need to chose the applicable scopes. Scopes here refer to what data or actions our own application can perform using Discord. For instance, if we select the identity scope as shown below, our app will be able to access identity related information of a user. We'll select the identity and email scopes for now.
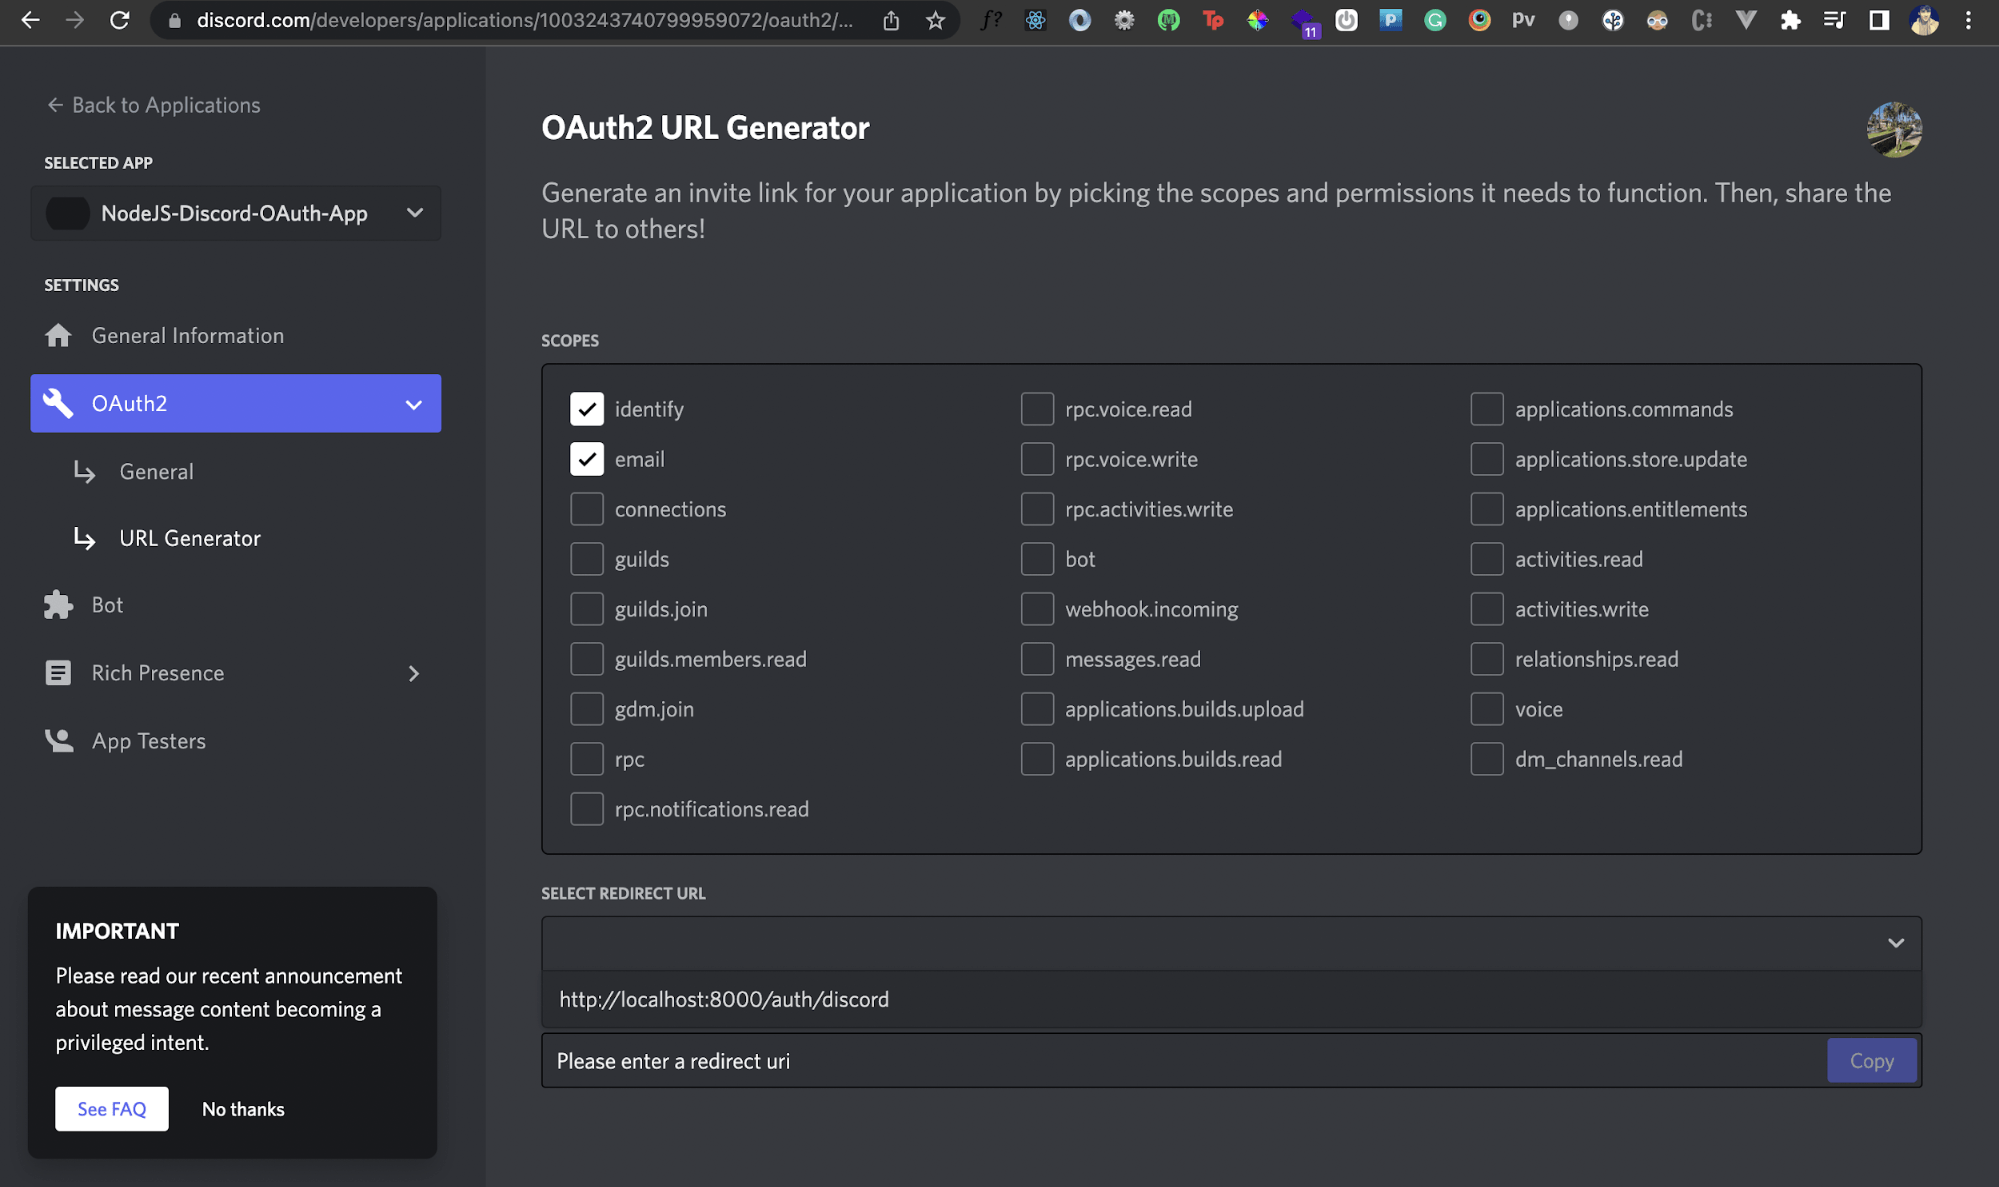
Next, we'll add our Redirect URI that we created earlier in the Redirect URL field right underneath it. Once you do that, you should see a new OAuth2 URL generated by Discord.
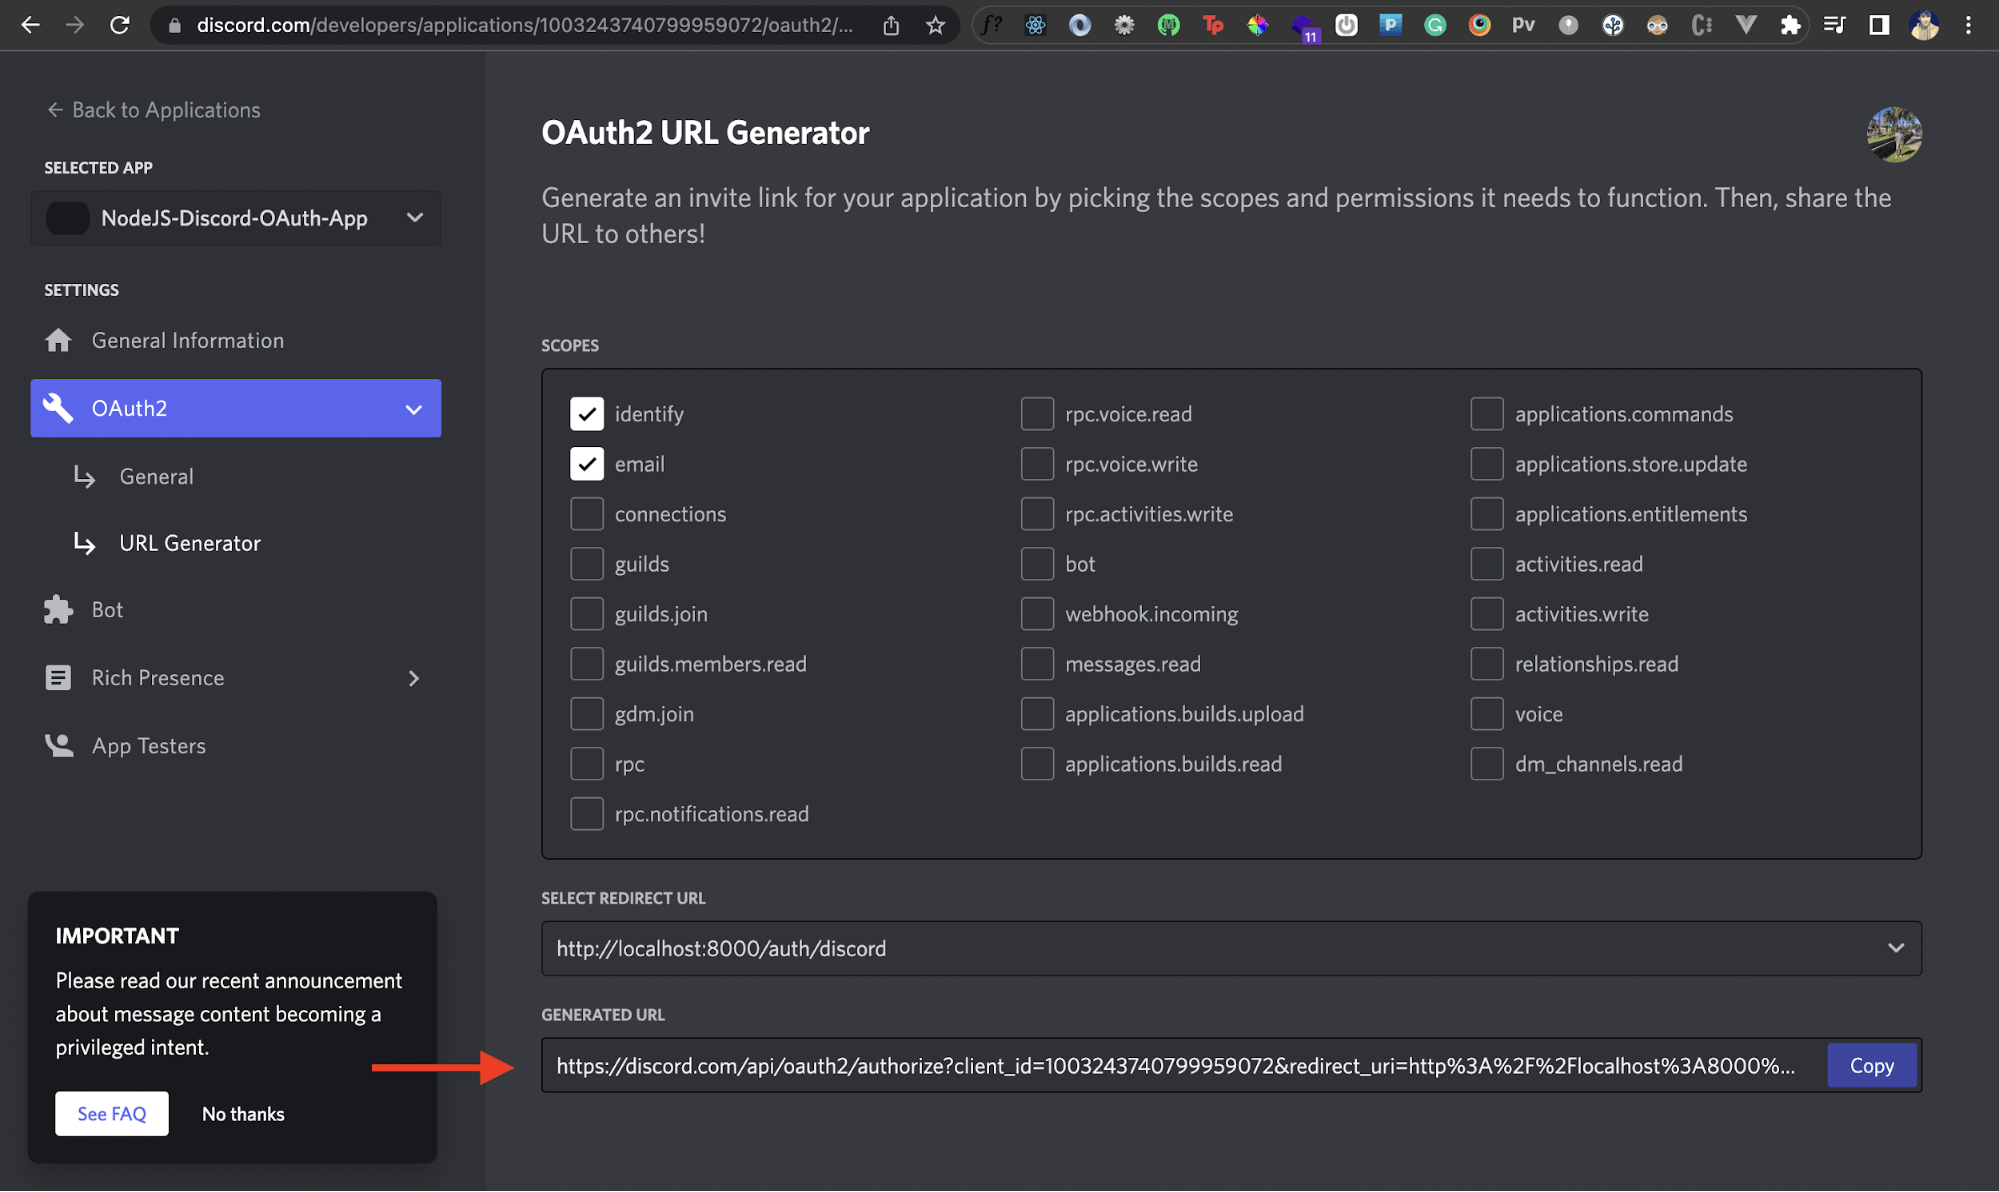
This is the URL we'll invoke from our own Node.js app later. Store this somewhere, as we'll need it later in our Node.js app. Awesome!
Generate Client Secret
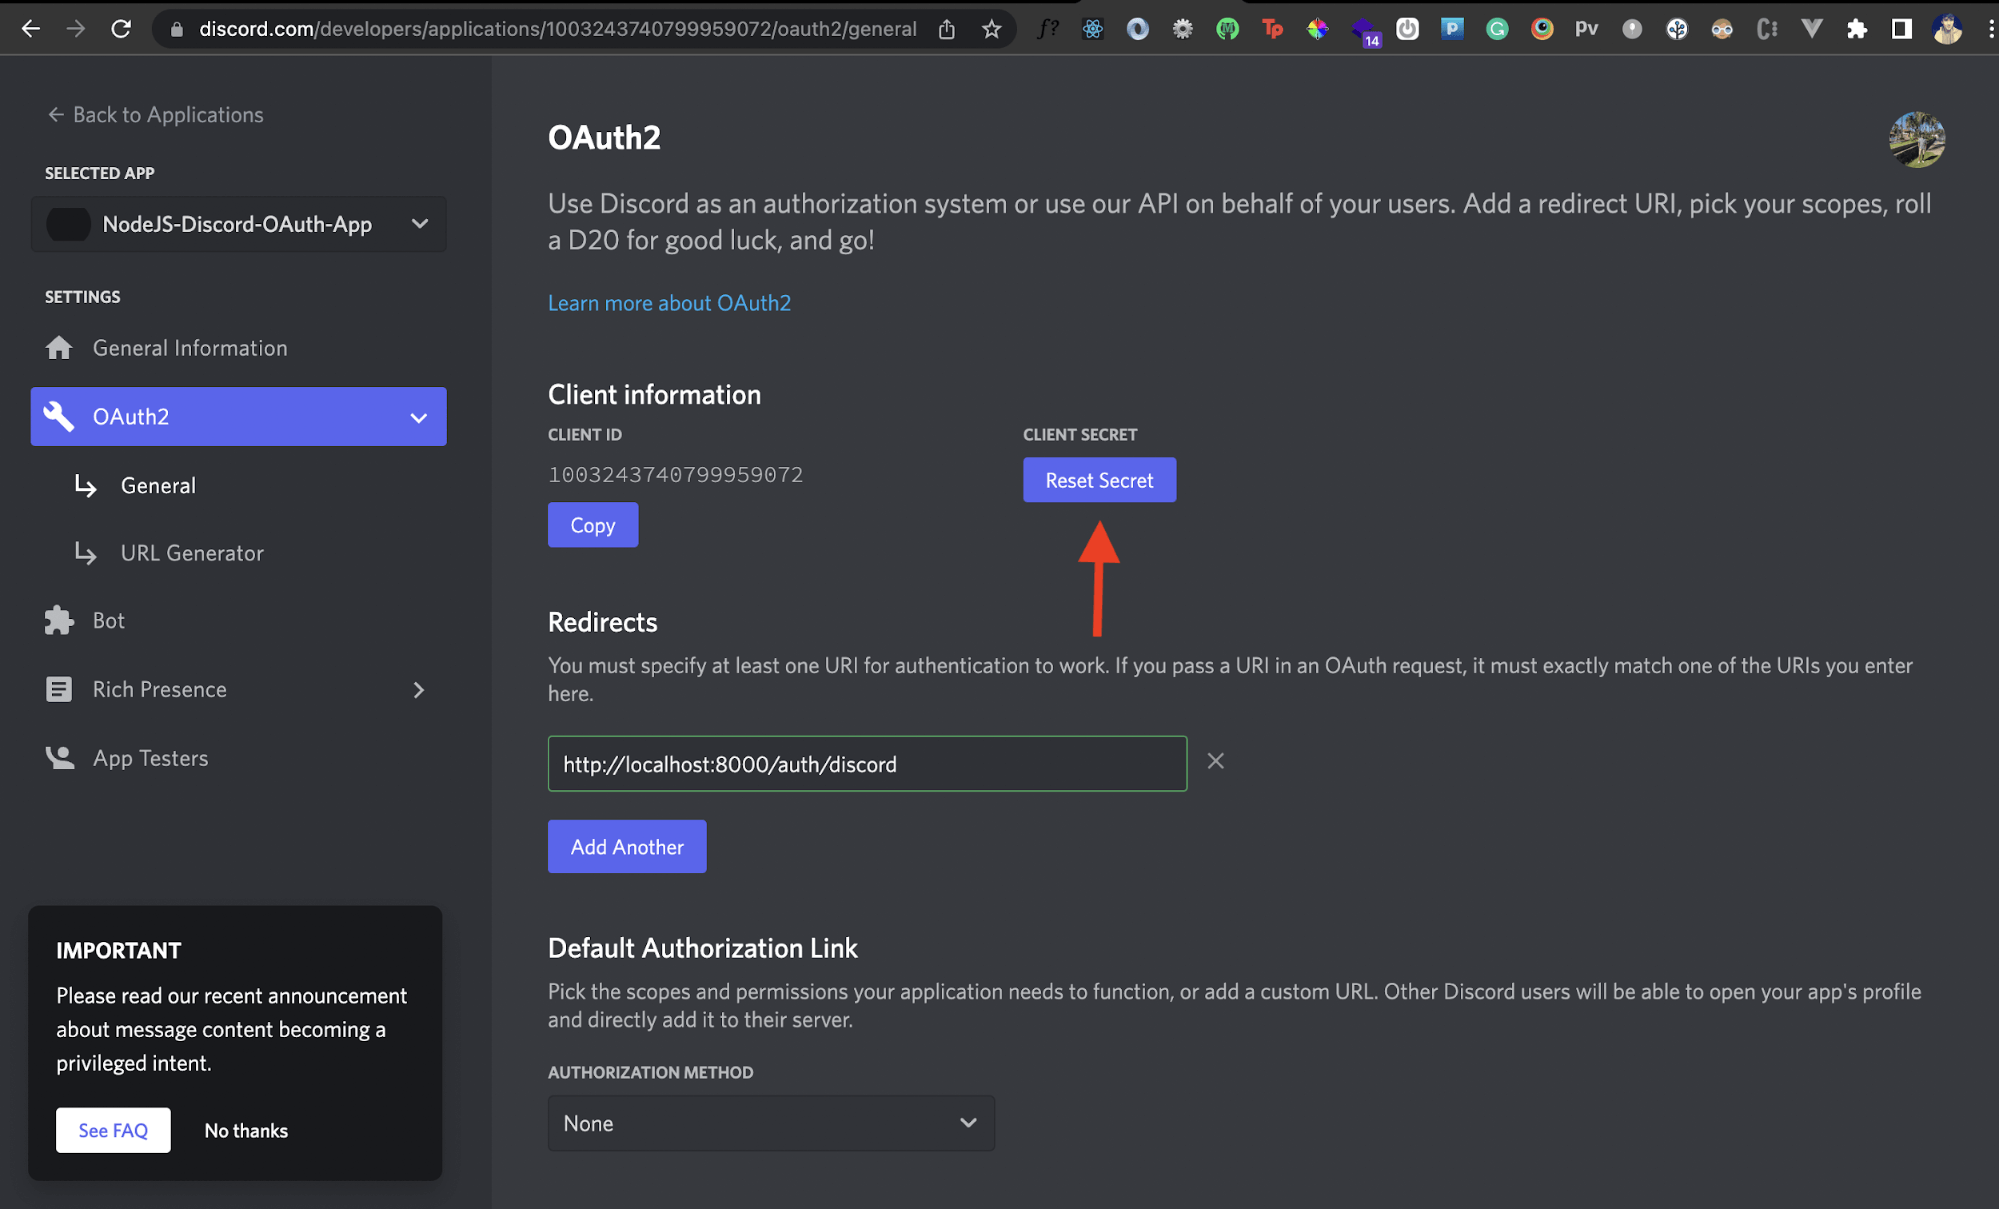
If you go back to your Discord app's General settings, under the Client information section, you'll see a client ID. We'll need this later when we communicate with the Discord API via our Node.js app. We'll also need a client secret.
To generate the client secret, click on the Reset Secret button. Discord will now generate a client secret for your app. Store this somewhere, as we'll need it later in our Node.js app.
Set Up a Node.js Project
We're all done with our Discord app setup. Let's now set up a new Node.js project to kick things off.
Inside a directory of your choice, run the following command:
npm init -y
This will create a new Node.js project inside that directory. Now head inside this directory and install the following dependencies:
npm i express axios dotenv
We'll use Express to create a server and Axios to talk to Discord APIs. We'll now create a file called .env in the root directory. This is where we'll add the credentials, namely, the client ID and client secret from the previous section. Here's how that'll look:
CLIENT_ID=<your-client_id>
CLIENT_SECRET=<your-client_secret>
Then create a file called app.js in the root directory with the following code:
const express=require('express');
const axios=require('axios');

const PORT=8000;
const app=express();

app.listen(PORT, ()=>{
    console.log(`App started on port ${PORT}`);
})
The above code simply spins up an Express server on port 8000. Let's run our Node.js app now. We should get the following message logged on the console:

Great! Let's move ahead.
How Do I Use Discord OAuth
As a first step, we need to integrate Discord OAuth in our Node.js app. This is because we can only access the Discord API for a user once they've authenticated via their Discord account. Doing this is relatively simple because of the OAuth2 URL we generated previously.
First, we'll create a route / that'll render a simple HTML template:
app.get('/',(req,res)=>{
    res.send(`
        <div style="margin: 300px auto;
        max-width: 400px;
        display: flex;
        flex-direction: column;
        align-items: center;
        font-family: sans-serif;"
        >
            <h3>Welcome to Discord OAuth NodeJS App</h3>
            <p>Click on the below button to get started!</p>
            <a
                href="#"
                style="outline: none;
                padding: 10px;
                border: none;
                font-size: 20px;
                margin-top: 20px;
                border-radius: 8px;
                background: #6D81CD;
                cursor:pointer;
                text-decoration: none;
                color: white;"
            >
            Login with Discord</a>
        </div>
    `)
})
If you visit http://localhost:8000, you should see the following page:
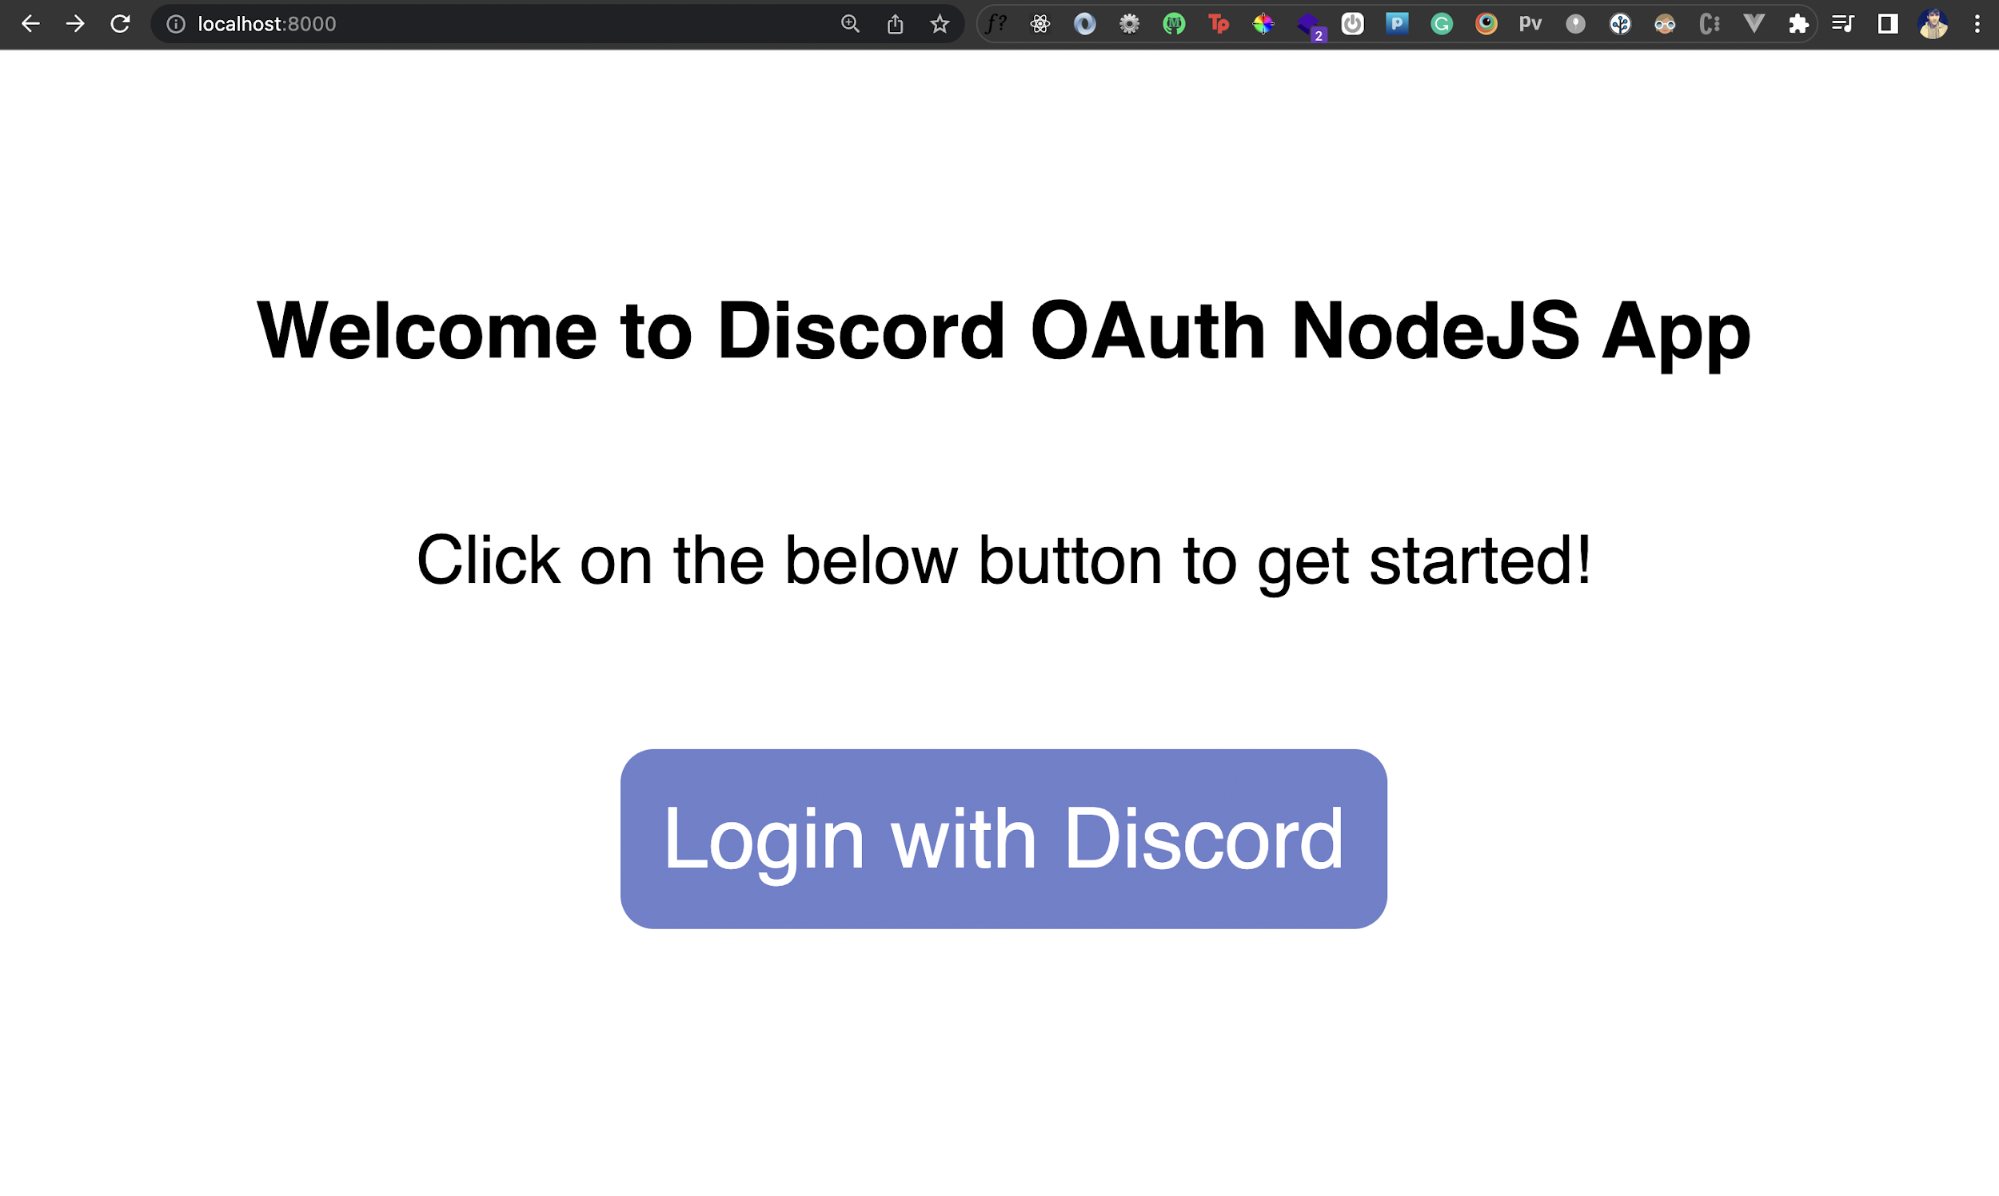
Great! Now when a user clicks on the Login with Discord button, we need to trigger the Discord OAuth workflow. This workflow should allow the user to see a consent screen and authenticate via their Discord account. In the Login with Discord button above, we'll simply redirect the user to the OAut2 URL we generated previously. So add that URL in the href of that button:
app.get('/',(req,res)=>{
    res.send(`
        <div style="margin: 300px auto;
        max-width: 400px;
        display: flex;
        flex-direction: column;
        align-items: center;
        font-family: sans-serif;"
        >
            <h3>Welcome to Discord OAuth NodeJS App</h3>
            <p>Click on the below button to get started!</p>
            <a
                href="https://discord.com/api/oauth2/authorize?client_id=1003243740799959072&redirect_uri=http%3A%2F%2Flocalhost%3A8000%2Fauth%2Fdiscord&response_type=code&scope=identify%20email"
                style="outline: none;
                padding: 10px;
                border: none;
                font-size: 20px;
                margin-top: 20px;
                border-radius: 8px;
                background: #6D81CD;
                cursor:pointer;
                text-decoration: none;
                color: white;"
            >
            Login with Discord</a>
        </div>
    `)
})
That's it! Now when the user clicks on that button, they'll be able to authenticate via their Discord account:
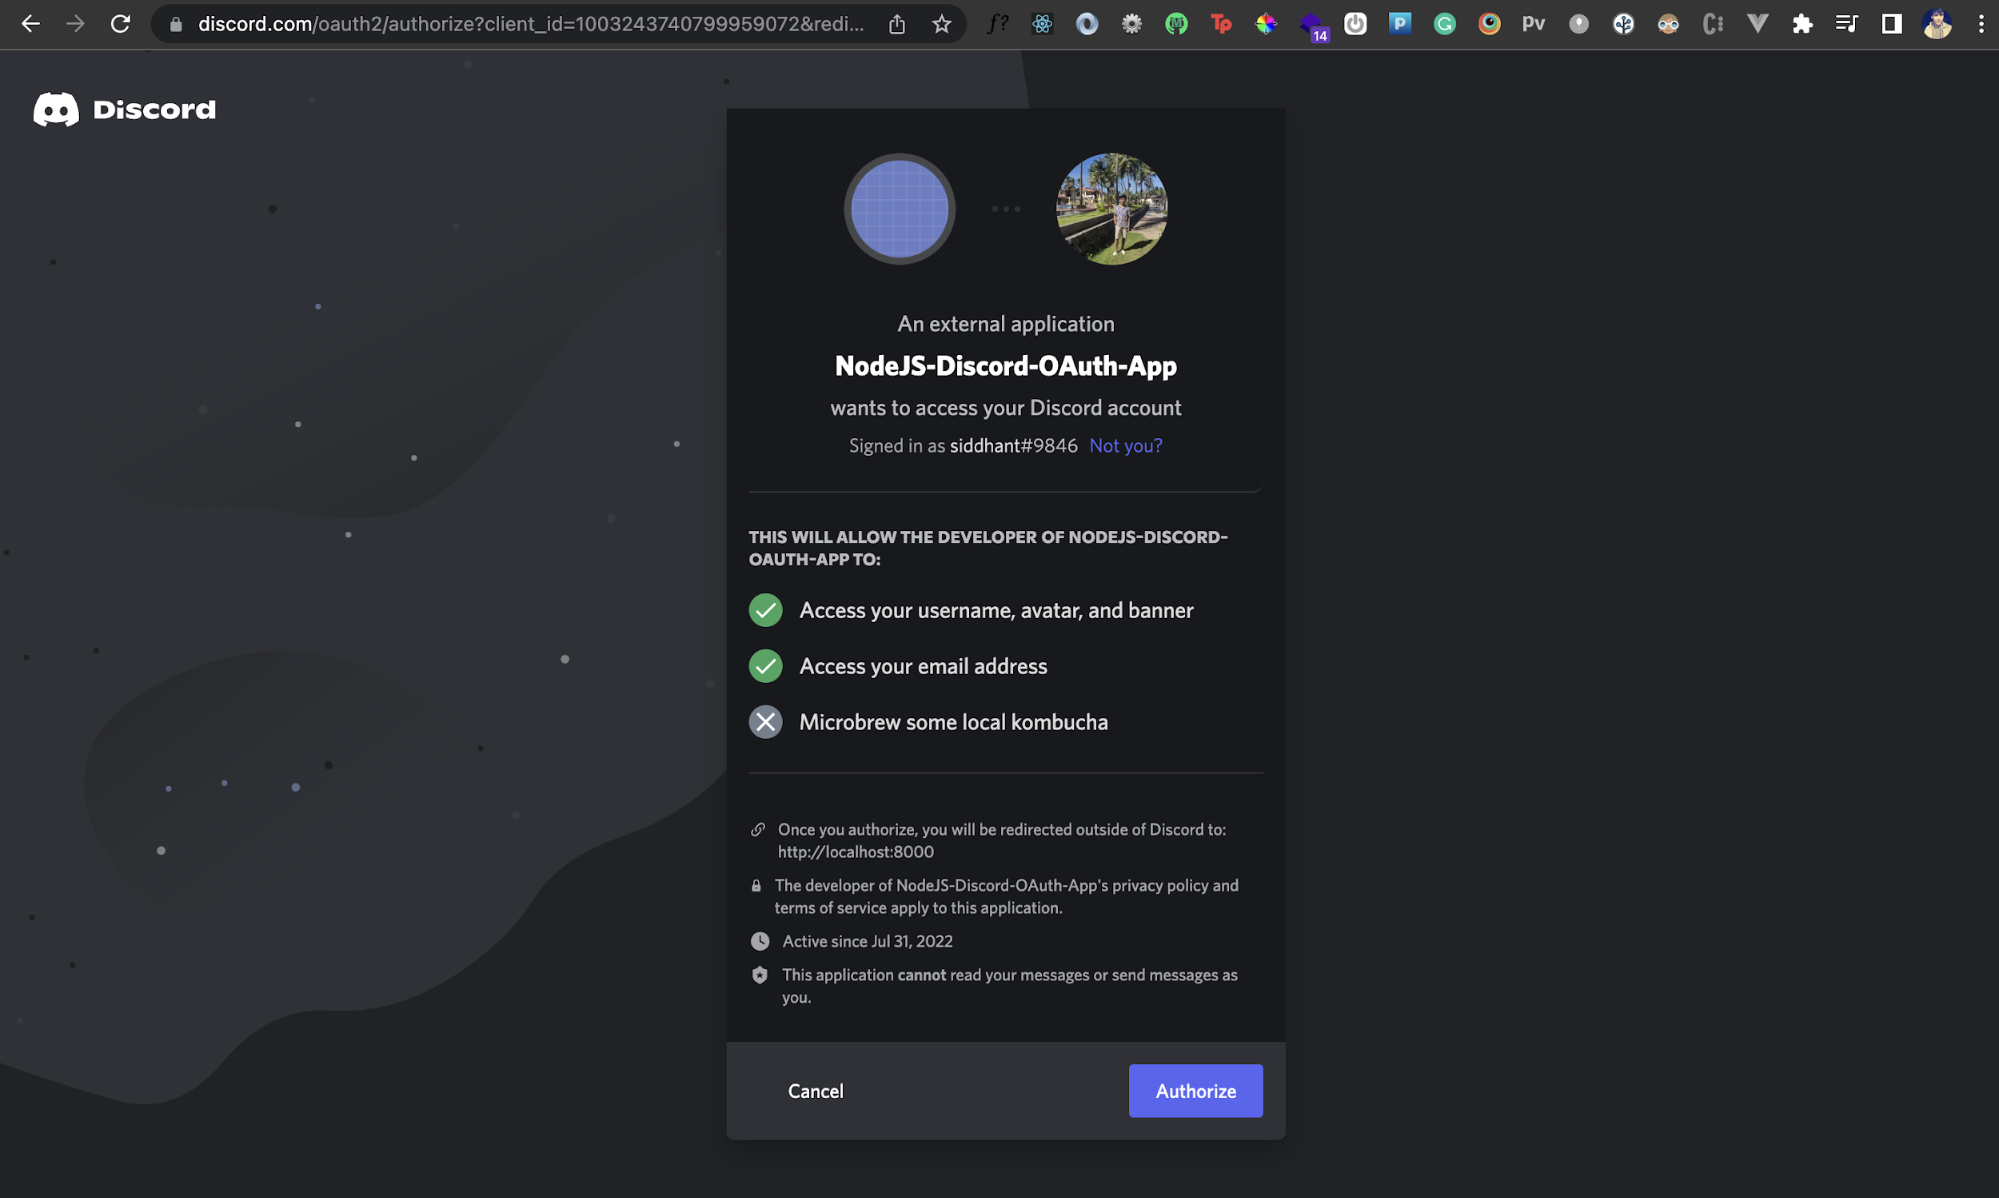
You can test it out by clicking the Authorize button. Notice that the scopes we chose earlier are shown here in terms of what information our app will be able to access. Sweet!
However, after you click the Authorize button, Discord will land you to the page http://localhost:8000/auth/discord. This page doesn't exist right now, but this is where we'll communicate with Discord's REST API to fetch the logged-in user's details. But before we can communicate with any Discord API, we need to understand how to get an OAuth token from Discord. So let's do that.
How Do I Get an OAuth token from Discord?
First, we'll create a handler for the route /auth/discord. Inside the asynchronous callback function, we'll grab the code parameter from the query parameter in the URL. After authentication, Discord appends a code in the redirect or callback URL. We'll need this code to get an OAuth token by making an API call.
Then we'll make a request to the OAuth Token Discord API. In the body of the request, we'll send the client ID, client secret, grant type, the code generated, and the redirect URI.
app.get('/auth/discord',async(req,res)=>{
    const code=req.query.code;
    const params = new URLSearchParams();
    let user;
    params.append('client_id', process.env.CLIENT_ID);
    params.append('client_secret', process.env.CLIENT_SECRET);
    params.append('grant_type', 'authorization_code');
    params.append('code', code);
    params.append('redirect_uri', "http://localhost:8000/auth/discord");
    try{
        const response=await axios.post('https://discord.com/api/oauth2/token',params)
        const { access_token,token_type}=response.data;

    }catch(error){
        console.log('Error',error)
        return res.send('Some error occurred! ')
    }
})
Once we do that, we'll get an access token, or OAuth token and a token type. This is everything we need to talk to Discord APIs from our Node.js app!
For this tutorial, we’ll talk to the user API that will fetch a currently logged-in user’s details
Fetching Authenticated Discord User Information
Now that we've fetched the authentication token (or OAuth token), we can use that to talk to any Discord REST API. For this tutorial, we'll talk to the user API that'll fetch a currently logged-in user's details. All we need to do is add the token and the token type in the authorization parameter in the headers of a GET request.
app.get('/auth/discord',async(req,res)=>{
    const code=req.query.code;
    const params = new URLSearchParams();
    let user;
    params.append('client_id', "1003243740799959072");
    params.append('client_secret', "RR-bl-R2YJYmRVTifAivNo5QtwG1hysy");
    params.append('grant_type', 'authorization_code');
    params.append('code', code);
    params.append('redirect_uri', "http://localhost:8000/auth/discord");
    try{
        const response=await axios.post('https://discord.com/api/oauth2/token',params)
        const { access_token,token_type}=response.data;
        const userDataResponse=await axios.get('https://discord.com/api/users/@me',{
            headers:{
                authorization: `${token_type} ${access_token}`
            }
        })
        console.log('Data: ',userDataResponse.data)
        user={
            username:userDataResponse.data.username,
            email:userDataResponse.data.email,
            avatar:`https://cdn.discordapp.com/avatars/350284820586168321/80a993756f84e94536481f3f3c1eda16.png`

        }
        return res.send(`
            <div style="margin: 300px auto;
            max-width: 400px;
            display: flex;
            flex-direction: column;
            align-items: center;
            font-family: sans-serif;"
            >
                <h3>Welcome ${user.username}</h3>
                <span>Email: ${user.email}</span>

                <img src="${user.avatar}"/>
            </div>
        `)

    }catch(error){
        console.log('Error',error)
        return res.send('Some error occurred! ')
    }
})
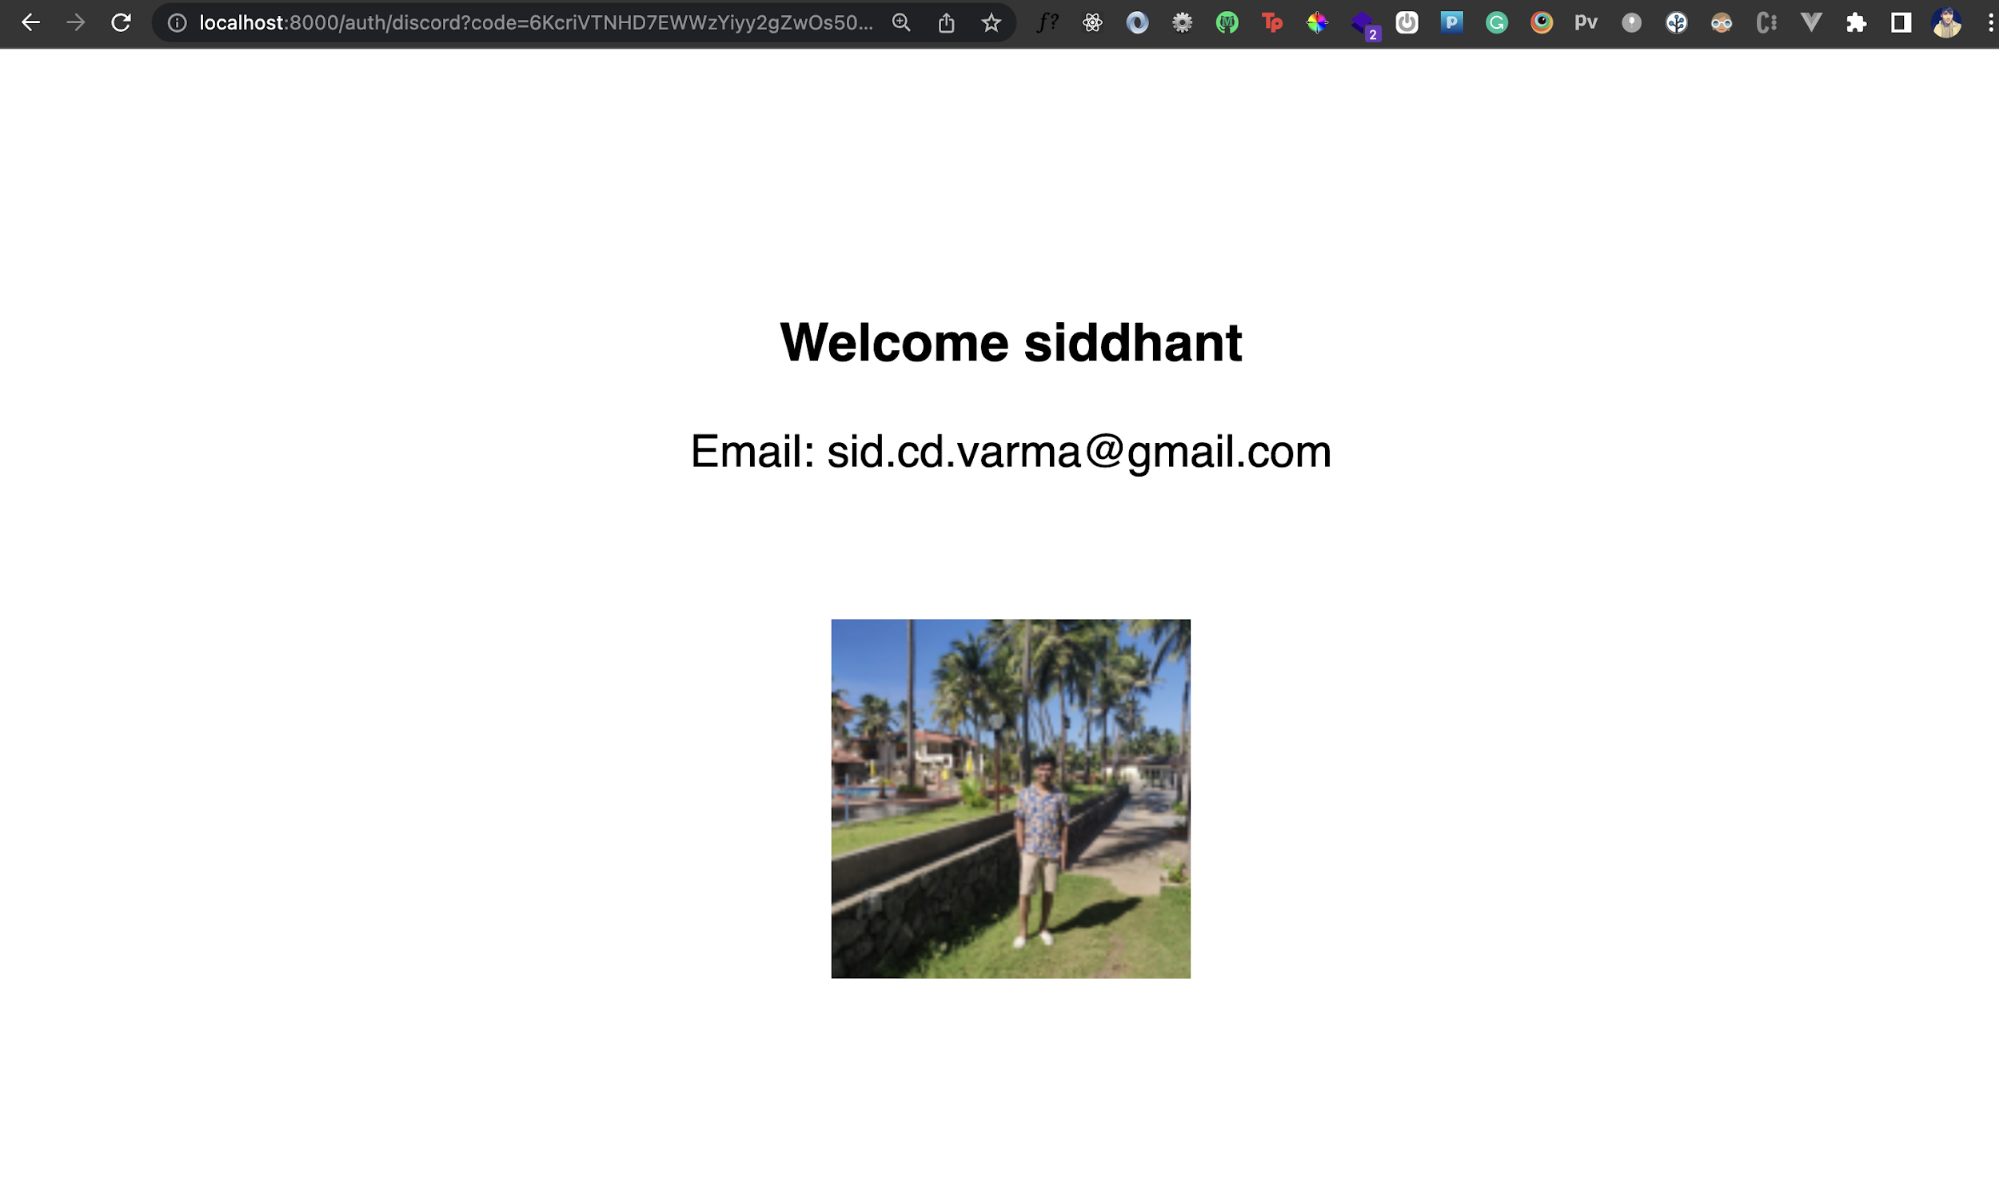
Once we get back the user details, we simply render an HTML template with these details. So now, if you authenticate via your Discord account, you should see some of your details on the page like this:
Conclusion
We've seen how we can integrate Discord OAuth in a Node.js application. We've also seen how to get access tokens and use them to communicate with Discord REST APIs. You can check out the entire code for this tutorial here. You can also build something more interesting now that you have an idea of how to add Discord API access to a Node.js app!
This post was written by Siddhant Varma. Siddhant is a full stack JavaScript developer with expertise in frontend engineering. He’s worked with scaling multiple startups in India and has experience building products in the Ed-Tech and healthcare industries. Siddhant has a passion for teaching and a knack for writing. He's also taught programming to many graduates, helping them become better future developers.
