How to Implement GitHub OAuth in Your Node.js App
OAuth is a standard protocol used for authorization. Nowadays, OAuth is primarily used by every website to allow a user to access their resources by using a third-party login.
For example, you can log in with Google, Facebook (Meta), GitHub, etc.C urrently, we're talking about GitHub and trying to get better insight into what, why, and how you can implement it into your Node.js application.
This post will discuss implementing GitHub OAuth in your Node.js app.
What Is Oauth 2.0, Access Token, Callback URL, Client ID, and Client Secret?
- Oauth 2.0: This is basically authorization workflow and doesn’t mean validating a user’s identity. It only checks whether the user has permission to access the resources. So, basically, Oauth is allowing a user to use the same account for a different web app.
- Access token: This is nothing but a token by which our app will have access to any third-party Oauth (GitHub in this case) on your behalf.
- Callback URL: We have to tell the authorization server where to redirect a user once the process is done.
- Client ID: For any third-party integration, we have to tell the authorization server (e.g., GitHub) to register our app (Node.js). As a result of this, we'll get client ID that we have to send in the future to get an access token, and the authorization server will easily identify the client by that.
- Client secret: In the process of registering the Oauth application with a server, we'll also get client secret. This will be needed to get an access token.
Node.js App and Github Oauth Flow

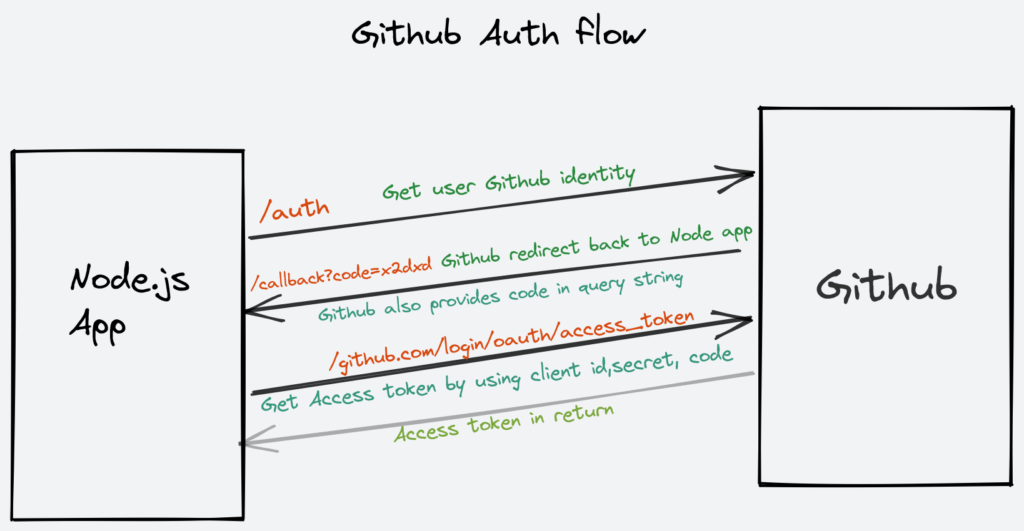
Here is the OAuth flow that we'll perform in today's blog post. There are a total of three requests, including verifying user identity, getting auth code as query, and using that to get access token eventually.
Register With GitHub
For this, GitHub provides three ways to implement authorization using OAuth here.
There are three flows:
- web application flow
- device flow
- non-web application flow
We're currently focusing on web application flow.
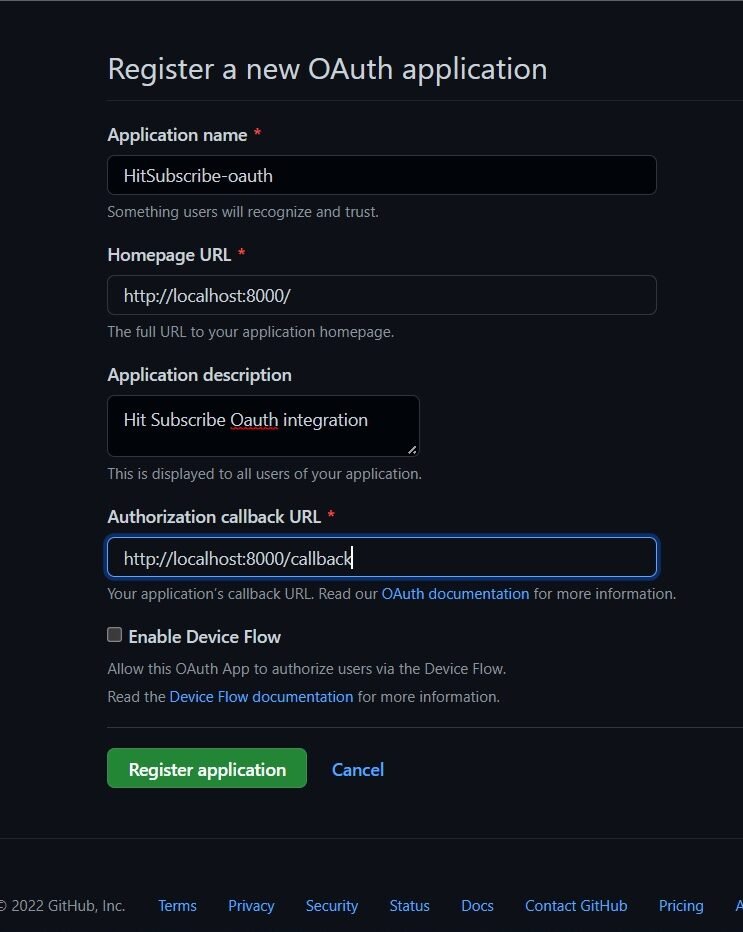
We can use this link to register our app with GitHub.

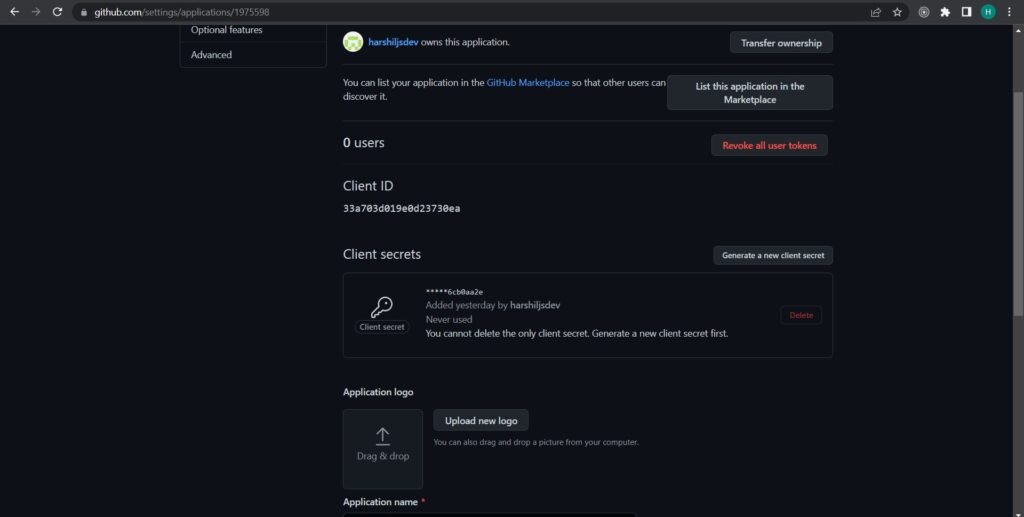
After registration, you'll see all the details with client ID and client secret.
For getting a client secret, you'll see all the registered details.

Once you click on "Generate a new client secret," you'll have a client secret. Please make sure to copy that and put it in a safe place so we can use it in the future.
Make Redirect APIs and Related Endpoints
Now it's time to create API endpoints. Here, we'll use express framework to make APIs.
npm init --y
npm i express axois
This will create an express project with an axois library for fetching data.
const { default: axios } = require("axios");
const express = require("express");
const path = require("path");
const app = express();

app.get("/", (req, res) => {
    res.sendFile(path.join(__dirname, "public/index.html"))
})

app.listen(8000, () => {
    console.log("its running!!!");
})
Now, in the app.js file, we'll create a homepage route that serves index.html.
<!DOCTYPE html>
<html lang="en">
  <head>
    <meta charset="UTF-8" />
    <meta http-equiv="X-UA-Compatible" content="IE=edge" />
    <meta name="viewport" content="width=device-width, initial-scale=1.0" />
    <title>Document</title>
    <style>


      .container {
        display: flex;
        justify-content: center;
        align-items: center;
        height: 10%;
      }
      a {
        border: 1px solid black;
        text-decoration: none;
        border-radius: 10px;
        padding: 10px;
        background-color: aliceblue;
      }
    </style>
  </head>

  <body>
    <div class="container">
      <a href="/auth"> Login with Github </a>
    </div>
  </body>
</html>
We just need an anchor tag that redirects us to GitHub for login or authorizes us to use the app via a GitHub login.
app.get("/auth", (req, res) => {
    res.redirect(`https://github.com/login/oauth/authorize?client_id=33a703d019e0d23730ea`);
})
By clicking on "Login with GitHub," we're redirecting the user to the GitHub authorization page. Here, the client ID is used by GitHub to identify Oauth registration.


Now, once we click on "authorize username," it'll redirect us back to the callback URL that we registered earlier.
app.get("/callback", (req, res) => {
    axios.post("https://github.com/login/oauth/access_token", {
        client_id: "33a703d019e0d23730ea",
        client_secret: "6f52b07d679f6955317a4fe7983d4b3b6cb0aa2e",
        code: req.query.code
    }, {
        headers: {
            Accept: "application/json"
        }
    }).then((result) => {
        console.log(result.data.access_token)
        res.send("you are authorized " + result.data.access_token)
    }).catch((err) => {
        console.log(err);
    })
})
This callback URL will get Auth code, which is required to get access token. So, we have to make a post request to github.com/login/oauth/access_token by providing the client ID, client secret, and code. As a result, GitHub will send back access_token.

Once you're authorized, you'll get the access token that we're currently printing on the screen. Now it's up to you to determine how you want to use that access token to get information about the user.
const { default: axios } = require("axios");
const express = require("express");
const path = require("path");
const app = express();

app.get("/", (req, res) => {
    res.sendFile(path.join(__dirname, "public/index.html"))
})

app.get("/auth", (req, res) => {
    res.redirect(`https://github.com/login/oauth/authorize?client_id=33a703d019e0d23730ea`);
})

app.get("/callback", (req, res) => {
    axios.post("https://github.com/login/oauth/access_token", {
        client_id: "33a703d019e0d23730ea",
        client_secret: "6f52b07d679f6955317a4fe7983d4b3b6cb0aa2e",
        code: req.query.code
    }, {
        headers: {
            Accept: "application/json"
        }
    }).then((result) => {
        console.log(result.data.access_token)
        res.send("you are authorized " + result.data.access_token)
    }).catch((err) => {
        console.log(err);
    })
})

app.listen(8000, () => {
    console.log("its running!!!");
})
OAuth token is revoked whenever it's pushed to a public repository or public gist
Next Topics to Look Into
1. Token expiration: Oauth token can be revoked in the following of ways:
- Pushed publicly: Oauth token is revoked whenever it's pushed to a public repository or public gist.
- Lack of use: If the Oauth token hasn't been used in one year, GitHub will automatically revoke it.
- Revoked by user: An Oauth token revocation from the user account settings will revoke any associated token with a third-party app.
- Revoked by Oauth app: The owner of the Oauth app can revoke authorizations of the app by deleting an app authorization. Additionally, individual tokens can be deleted.
- Issue of excess tokens: If a third-party Oauth app creates more than 10 tokens for the same user/scopes, the oldest tokens with a similar scope/user will be revoked.
2. Scope: Scope allows us to limit access for OAuth tokens. Furthermore, users can control what things they want to share with third-party apps. There are several scopes available, including repo, public_repo, gist, user, project, etc.
If there's no scope specified, the Oauth app can only access public information from the user's profile with read-only access.
In this post, we’ve learned how to implement GitHub OAuth in a Node.js app
Conclusion
In this post, we've learned how to implement GitHub Oauth in a Node.js app. This small tutorial described what, why, and how we can successfully connect our Node.js app to use the GitHub account of our users. I hope this post gives you an initial push to use complex OAuth 2.0 in your application. Now you can connect to any app, such as Google, Facebook, Slack, Apple, and many more, that provides OAuth service.
This post was written by Harshil Parmar. Harshil is a software developer with around 2 years of experience currently studying at Humber College, Toronto. He has worked on Angular, React, Node,Php. He also does open source contributions and freelance. He loves to write about JS technologies and update his knowledge by keep researching and learning new stuff related to anything JS..
