Create an Interactive Image Carousel in Slack
Have you ever wondered how to create a great image slideshow carousel with Slack using Block Kit? This seems like a simple task, but without first class support in Slack’s Block Kit, you’ll need more than just a simple postMessage call. You’ll need to understand Block Kit (Slack's official building blocks for creating user interfaces), configure and create a Slack Application, and support inbound “interactivity” events from Slack on a server somewhere!
By the end of this blog post, you will learn how to create an image carousel like the following in Slack:

Carousel’s are great demonstrations of interactivity within a Slack message. You can use this same approach to build polls, interactive forms, or even play games! We’re still waiting for someone to port Doom to Slack…
Planning our carousel
Let’s understand the basic principles of how an image carousel works by defining the UI elements needed and some basic logic of the system.
Controls
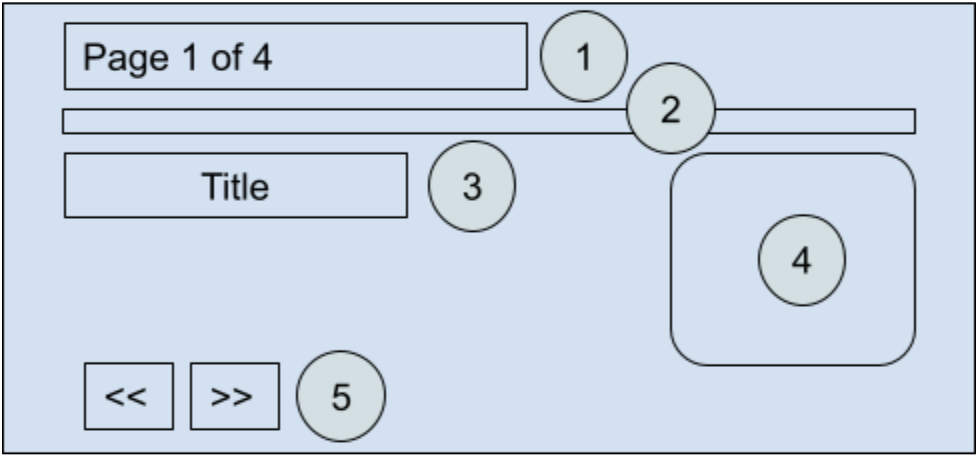
The carousel needs 2 different types of components: Informational and interactive. Let’s review the layout of the carousel from the example above:

- Carousel header: A simple section block used as the page indicator.
- Divider: A content divider between the header and the carousel item.
- Item title: A section block with the item text and an optional content.
- Item image: An image block used to display an image, in our example, dog photos.
- Navigation controls: Two button elements providing back and forth controls.
Let’s see an example of each section in Slack Block Kit! You can copy and paste the code in the online Block Kit Builder to preview the results.
First item
The navigation controls determine the item to display in the carousel. Remember: we show one item at a time, for a carousel of n items, where n >= 2, the previous and next buttons are calculated in the following way:
Next button value = n+1 modulus the number of items
Previous button value = n-1 or number of items if n == 0
Navigation controls keep the memory of the pagination of the carousel; we use the value property to calculate the page all the time:
{
  "type": "button",
  "text": {
    "type": "plain_text",
    "text": "<<"
  },
  "value": "4"
}
{
   "blocks": [
       { "type": "section", "text": { "type": "mrkdwn", "text": "Page 1 of 4" } },
       { "type": "divider" },
       {
           "type": "section",
           "text": {
               "type": "mrkdwn",
               "text": "*Lilly Awaiting her Snoot Boops*"
           },
           "accessory": {
               "type": "image",
               "image_url": "https://i.imgur.com/ypH7AsV.jpeg",
               "alt_text": "Lilly Awaiting her Snoot Boops"
           }
       },
       {
           "type": "actions",
           "elements": [
             {
               "type": "button",
               "text": {
                 "type": "plain_text",
                 "text": "<<"
               },
               "value": "4"
             },
             {
              "type": "button",
              "text": {
                "type": "plain_text",
                "text": ">>"
              },
              "value": "2"
            }
           ]
       }
   ]
}
Let’s define a javascript function that allow us to generate the previous block kit dynamically:
/**
 * Builds an image carousel using Slack block kit elements.
 * @param currentItem {object} The current item to display
 * @param currentPage {number} The currently displayed page
 * @param prevPage {number} The previous page number
 * @param nextPage {number} The next page number
 *
 * @returns {string} A carousel component built with block kit elements.
 */

 const buildCarousel = (currentItem, currentPage, prevPage, nextPage) => {
  return {
    blocks: [
      {
        "type": "section",
        "text": {
          "type": "mrkdwn",
          "text": `Page ${currentPage} of ${ITEMS.length}`
        },
      },
      {
        "type": "divider"
      },
      {
        "type": "section",
        "text": {
          "type": "mrkdwn",
          "text": `*${currentItem.title}*`
        },
        "accessory": {
          "type": "image",
          "image_url": currentItem.thumbnailLink,
          "alt_text": currentItem.title
        }
      },
      {
        "type": "actions",
        "elements": [
          {
            "type": "button",
            "text": {
              "type": "plain_text",
              "text": "<<"
            },
            "value": `${prevPage}`
          },
          {
            "type": "button",
            "text": {
              "type": "plain_text",
              "text": ">>"
            },
            "value": `${nextPage}`
          }
        ]
      }
    ]
  };
};
Each code example that references the ITEMS object, represents the list of the images we display in our carousel:
// The collection of items (dogs) to display in the carousel
const ITEMS = [
  {
    "title": "Lilly Awaiting her Snoot Boops",
    "thumbnailLink": "https://i.imgur.com/ypH7AsV.jpeg",
  },
  {
    "title": "My deaf good boy",
    "thumbnailLink": "https://imgur.com/PtJfPvT"
  },
  {
    "title": "Lloyd & Harry",
    "thumbnailLink": "https://i.imgur.com/SgS1fLo.jpeg",

  },
  {
    "title": "My best pup friend",
    "thumbnailLink": "https://i.imgur.com/hULDSE5.jpeg",
  }
];
Now, using the previous buildCarousel function, let’s build the first carousel item:
const carousel = buildCarousel(ITEMS[0], 1, ITEMS.length, 2);
Configuring your Slack app
Now that we have the building blocks, we need to configure a Slack app in order to display the carousel on a specific channel and handle the navigation controls.
If you don’t have your own Slack application, you can look through these examples to get started.
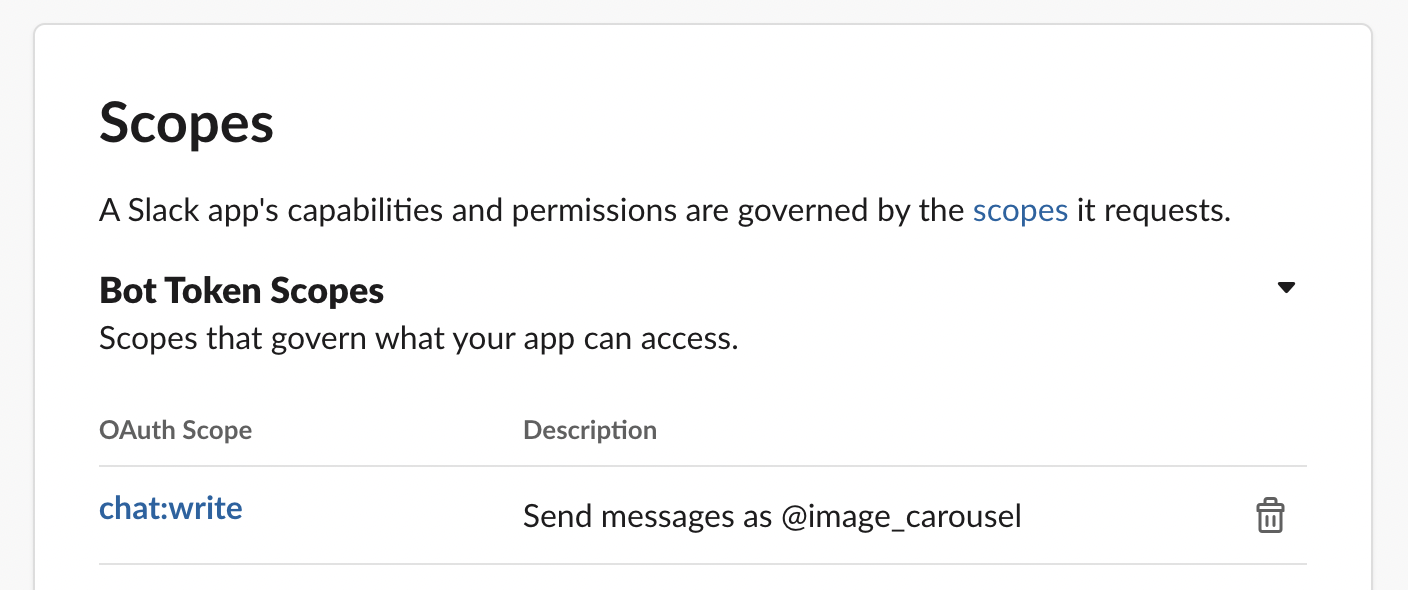
On the application configuration in Slack, navigate to the OAuth & Permissions menu, localize the Scopes section and add the scope chat:write to the bot token scopes.

With your Slack application working correctly, let’s see the next steps in order to handle user interactivity in your carousel:
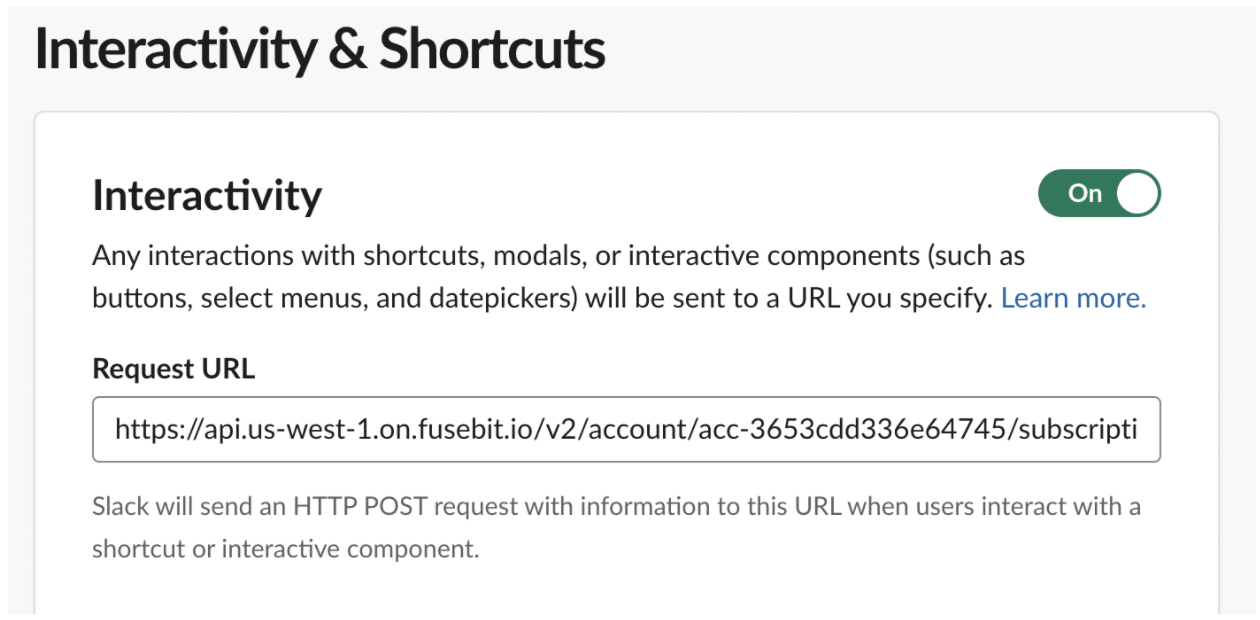
We need to enable interactivity in your Slack application. Navigate to your Slack application’s interactivity and shortcuts section and set up a request URL. Slack will send a POST request to this URL with interactivity details from a specific user action.

You’ll need to configure a POST endpoint at a url, and perform the necessary authentication and authorization of the incoming request before processing the incoming interactivity event. Learn how to do it
Handling interactivity
Now we know how to handle the first element, let’s see how to do it for the other items from the list.
We need to accomplish the following things:
- Update pagination state in each navigation control.
- Update the original slack message with the next or previous item (according to the clicked button).
- Handle the user clicks on each navigation control.
Updating pagination state in each navigation control
Make sure you properly handle that endpoint in your application.
Here is some example code for the KoaJS router in a classic Express app - after you implement the necessary authorization checks on the event, of course.
Parse the payload from the interactivity event and get the button value from the actions array. In our use case, it’s safe to assume that the action will always be an array of a single item.
router.post('/your/api', async (req) => {
  const payload = JSON.parse(req.body.payload);
  const { actions, channel, response_url } = payload;

  // Determine what the new page numbers for navigation should be
  const page = Number(actions[0].value);
  const prevPage = page === 0 ? ITEMS.length - 1 : page - 1;
  const nextPage = page === ITEMS.length - 1 ? 0 : page + 1;

  // Create a new carousel Slack Block Kit message
  const carousel = buildCarousel(ITEMS[page], page, prevPage, nextPage);

  // Update the existing message with the new blocks
  await superagent.post(response_url, { channel: channel.id, ...carousel });
});
The response_url coming from the interaction payload is used to publish messages back to the original Slack message where the interaction happened. Read more about handling message responses.
We also use the great superagent library for our HTTP request. You can replace this with request() if you want to - but why would you?
Conclusion
Hopefully, you have a working Image carousel in your Slack workspace!
Slack block kit provides a powerful mechanism to build custom user interfaces. In this blog post, we covered how to use it to render navigation controls and how to handle user actions via the Slack interactivity feature.
