Can Node.js Send Email? 3 Options and How to Add Them to Your App
If you're looking to send emails from your Node.js application, this blog post is for you. We'll explore three ways to send emails from Node.js applications and how to add them to your app. We'll also provide code samples so you can get started right away.
Reasons to Send Mail from Node.js
There are many reasons why you might want to send an email from a Node.js application. Some everyday use cases include the following:
- Sending confirmation emails when users sign up for your app
- Sending password reset emails when users forget their passwords
- Notifying users of new messages or notifications in your app
- Sending marketing or tutorial series of emails to users
Whatever your reason for wanting to send an email from Node.js, there are a few options available. Let's take a look at four of the most popular ones.
Requirements
This tutorial assumes you have an intermediate to high familiarity with JavaScript and Node.js. We also assume you already have a development environment set up and an instance of Node.js installed and running correctly. You also, we assume, have an email account you can connect to remotely and have the necessary connection details. For simplicity, we're going to use Gmail account in the code below. If you have two-factor authentication, you will need to establish an application-specific password.
Nodemailer Module
Nodemailer is one of the first and the most common options for sending emails in Node.js. It's free and supports HTML and adding attachments.
Install Nodemailer
To install Nodemailer, use npm. Open a command line or terminal window and run the following:
npm install nodemailer
Configure Nodemailer
Configuring Nodemailer is simple. First, add a require statement in any file you wish to use the emailing functionality in as follows:
const nodemailer = require('nodemailer')
Then set up the transporter object with your credentials.
const transporter = nodemailer.createTransport({
    service: 'gmail',
    auth: {
        user: 'yourgmail@gmail.com',
        pass: 'yourapplicationpassword'
    }
});
The code above sends an email using a service called "gmail." It's is a well-known service in Nodemailer parlance. These well-known services have preset configurations that make it easier to set them up in Nodemailer. Other well-known services include but are not limited to GoDaddy, Outlook365, and OpenMailbox. In the auth section, provide your Gmail account username and password for authentication purposes. You will need to provide an application password if you have two-factor authentication turned on.
If your service isn't well-known, you can also use SMTP directly with the transporter configuration example below.
const transporter = nodemailer.createTransport({
    host: 'smtp.mailserver.com',
    port: 2525,
    auth: {
        user: 'youremail@mailserver.com',
        pass: 'yourapplicationpassword'
    }
});
There are also options for pooling and using self-signed certificates.
Once you have the transporter set up, you can validate it using the following code snippet where you request the verify method on the transporter:
transporter.verify(function (error, success) {
    if(error) {
        console.log(error);
    } else {
        console.log('Server validation done and ready for messages.')
    }
});
Sending Email With Nodemailer
Sending an email is simple once the transporter is set up and verified. First, you have to create the email and then call the SendMail function on the transporter object as below.
Set up the email object with the message details as follows:
const email = {
    from: 'yourgmail@gmail.com',
    to: 'myfriend@yahoo.com',
    subject: 'Sending A Simple Email using Node.js',
    text: 'Now is the time for all good men to send Email via Node.js!'
};
Next, you need to call the send mail function on the transporter with the email object and a standard callback.
transporter.sendMail(email, function(error, success){
    if (error) {
        console.log(error);
    } else {
        console.log('Nodemailer Email sent: ' + success.response);
    }
});
That's all you have to do to send a simple email with Nodemailer. The gist of the code is here.
Candymail
Candymail is a free package that allows you to send marketing or tutorial email sequences from Node.js. In addition, it supports the HTML formatting of your email messages in a single JSON file.
Install Candymail
To install Candymail, run the following:
npm install --save candymail
Configure Candymail
To configure Candymail, you first have to require it.
const candymail = require('candymail')
Then you call the init method of candymail to set up the connection. You're using Gmail again here.
//configure candymail with authorization
candymail.init(automation.workflows, {
    mail: {
        host: 'smtp.gmail.com',
        port: 465,
        secure: true,
        auth: {
            user: 'yourgmail@gmail.com',
            pass: 'yourapplicationpassword'
        },
        tls: {
            rejectUnauthorized: true
        },
    },
    hosting: {url: 'stevenlohrenz.com'},
    db: {reset: true},
    debug: {trace: true}
})
.then(() => {
    candymail.start();
});
Sending Email With Candymail
Candymail uses a JSON file for the configuration of the email sequences. Create a file called candymail-automation.json and drop it into your Node.js directory. I'm including two examples below of workflows within the same file. In addition, there's a dynamic field, Firstname, that will be filled in at runtime. Please note that delaying emails requires that a server be running at the scheduled time.
{
  "workflows": [
    {
      "name": "workflow-one",
      "description": "let people know this configuration is working",
      "trigger_name": "working-n-testing",
      "emails": [
        {
          "trigger": "time",
          "sendDelay": 0,
          "subject": "Candymail worked! Workflow-one",
          "body": "<h1>It's time to rise up with Candymail</h1><p>Hey {{Firstname}}, look it has HTML support.</p><p><a href='https://saasbase.dev/candymail'>Find out more here!</a></p>",
          "from": "yourgmail@gmail.com"
        },
        {
          "trigger": "time",
          "sendDelay": 3,
          "subject": "Candymail Email on Day Three from workflow-one",
          "body": "Sending the next mail at just the right time so your new users don't forget about you: {{Firstname}}. ",
          "from": "yourgmail@gmail.com"
        }
      ]
    },
    {
      "name": "workflow-two",
      "description": "Different workflow with a different set of timings",
      "trigger_name": "working-n-testing",
      "emails": [
        {
          "trigger": "time",
          "sendDelay": 1,
          "subject": "Workflow Two Email",
          "body": "Now is the time for all good men to send email with Candymail",
          "from": "yourgmail@gmail.com"
        }
      ]
    }
  ]
}
Over in your calling JavaScript file, you need to require the automation JSON file:
const candymail = require('candymail')
const automation = require('./candymail-automation.json')
To initiate sending emails, call the runWorkflow method in candymail. In order to ensure the init method has been processed before you call it, create an async method and then call it immediately after the candymail.start(); call in then() from above. We're also passing in parameters that get inserted in the placeholders we added in the JSON file earlier.
.then(() => {
  candymail.start();
  testUserSignup();
});

const testUserSignup = async() => {
    params = [{key: "Firstname", value: "Ted"}, {key: "Lastname", value: "Smith"}]
    candymail.runWorkflow('workflow-one', 'yourfriend@yahoo.com', params);
}
If you're using an email sequence, you are legally required to give subscribers the option to unsubscribe.
candymail.unsubscribeUser('myfriend@yahoo.com');
Place that on a dedicated page for the user to opt out of your emails.
That gives you the basics of sending email sequences with Candymail from Node.js. The code is here.
SendGrid
SendGrid is a paid SMTP service that allows you to send marketing emails, transactional emails, and password reset emails. These services are also called transactional email APIs. SendGrid allows you to send up to a hundred emails per month for free, so you can test it or use it in production if you have a limited number of emails you need to send.
Install the SendGrid Module
To install SendGrid, run the following:
npm install --save @sendgrid/mail
SendGrid Configuration
To configure SendGrid, you need to go to SendGrid and sign up for the SendGrid service.
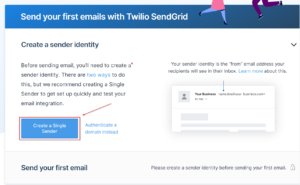
Once logged into the account, you must create a sender identity so that the email service complies with all email laws. You should see the prompt below after signing up and verifying your email. Select 'Create Single Sender'.
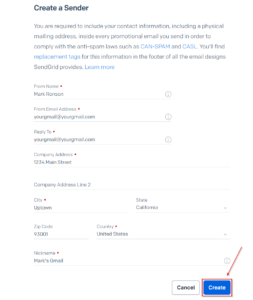
Next, enter your information and hit 'Create'.
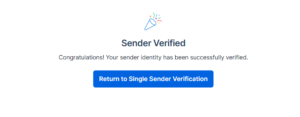
You're all done setting up the sender.
Once you have a sender identity, you must create an API key.
Go to 'Settings > API Keys' in the dashboard.
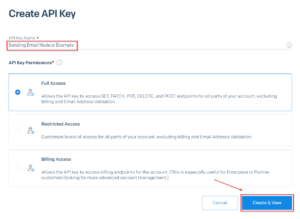
Click 'Create API Key'.
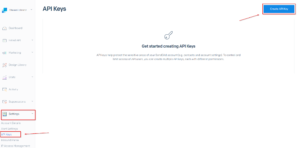
Fill in the name for this API key (here we're using 'Test Sending Email Via Node.js') and click 'Create.'
You should see the key on the next screen.
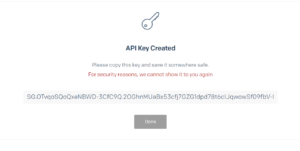
Copy the generated API key and keep it safe. You only see it once, but if you lose it, you can come back and generate a new one.
To configure your Node.js application to use SendGrid, you need to require it in your JavaScript files.
const sendgrid = require('@sendgrid/mail')
Sending Emails With SendGrid
Now you have everything you need to start sending emails in your Node.js application.
In the code below, paste in the API key you obtained earlier in between the single quotes on the line setting the const SENDGRID_API_KEY.
The following line of code sets the API key in SendGrid. Then you build your email, specifying the from, to, subject line, text, and HTML fields.
const SENDGRID_API_KEY = ''

sendgrid.setApiKey(SENDGRID_API_KEY)

const email = {
    from: 'yourgmail@yourgmail.com',
    to: 'myfriend@yahoo.com',
    subject: 'Sending A Simple Email using Node.js',
    text: 'Now is the time for all good men to send Email via Node.js!',
    html: '<h1>SendGrid Test</h1><p>Now is the time for all good men to send Email via Node.js!</p>'
}
Next, send the email as follows:
sendgrid.send(email)
.then((response) => {
    console.log('SendGrid Email sent: ' + response)
})
.catch((error) => {
    console.error(error)
})
That's it. Now you can send emails with SendGrid. The full code is here.
SendGrid also supports adding attachments.
Which to Choose?
If you're looking for a fast, simple, proven solution that's free and allows the most flexibility about how your email messages are structured, you should use Nodemailer.node
Candymail is good if you want to send email sequences as it makes it easy to configure and add new emails to the series. Candymail is also free and gives you a great deal of flexibility in how your emails are structured. The downsides are the need to maintain and scale your SMTP servers and monitor your sender's reputation.
SendMail or any transactional email API service is a good choice if you're worried about running afoul of the regulations. They keep abreast of any changes and automatically include all the information required in the emails you send without you having to maintain the email formatting. Furthermore, they also manage the scaling of their servers. It's simple to set up and develop against but can lead to vendor lock.
No matter which route you choose, we hope this tutorial has helped demystify the process of sending emails from Node.js and gives you the tools you need to get started.
Before your go..
This post was written by Steven Lohrenz. Steven is an IT professional with 25-plus years of experience as a programmer, software engineer, technical team lead, and software and integrations architect. They blog at StevenLohrenz.com about things that interest them.
