Implement Webhooks with Google Forms API in Node.js
Google Forms API introduces a new watch API to subscribe to changes in form settings or responses. We already covered the form API basics in another blog post
This blog post will use the RESTful interface to interact with the watch API. We will update the content once the Node.js SDK is officially released.
Once Generally Available, the Google Forms API SDK will be available as part of the official Google APIs Node.js package.
Use cases
Before understanding how to implement push notifications with Google Forms API, let’s first review some use cases so you can uncover the potential of using this powerful feature.
- Slack bot that notifies a specific channel when a new response is submitted.
- Send Google form response data to an external party to be analyzed, e.g. tableau
- Slack bot that notifies in a specific channel when a Form question has been changed (deleted, removed, updated)
- Implement custom code solutions based on specific responses, e.g., store top scores from a Google Form Quiz in a DataBase.
How it works
Events are published using Google Cloud Pub/Sub to guarantee at-least-once deliverability.
Delivery of notifications is through a Cloud Pub/Sub topic, usually within minutes of the change.
To receive notifications, you need to set up a Cloud Pub/Sub topic and provide that topic's name when creating a watch for the appropriate event type.
There are two event types:
EventType.SCHEMA, which notifies edits to a form's content and settings.EventType.RESPONSES, which notifies when form responses (both new and updated) are submitted.
Create a new watch event
Before creating a new watch, ensure you have made a Pub/Sub Topic
When creating a new event, you need to provide the following information:
- Form Id: The Google Form unique identifier you want to receive notifications.
- Target: It contains the topic name. It needs to be a fully qualified Pub/Sub topic name.
- eventType:
SCHEMAandRESPONSE
Watch form schema changes
If you want to subscribe to events related to changes to your form settings, you can create a watch for SCHEMA changes.
Send a POST request to https://forms.googleapis.com/v1beta/forms/{form-id}/watches.
With the following Body
{
  "watch": {
    "target": {
      "topic": {
        "topicName": "projects/root-lotus-340203/topics/forms-demo"
      }
    },
    "eventType": "SCHEMA"
  }
}
After creating the event you will get a response like this:
{
  "id": "822498b4-6ff1-443e-aee3-14e6d86ff921",
  "target": {
    "topic": {
      "topicName": "projects/root-lotus-340203/topics/forms-demo"
    }
  },
  "eventType": "SCHEMA",
  "createTime": "2022-02-26T06:20:16.708Z",
  "expireTime": "2022-03-05T06:20:16.532Z",
  "state": "ACTIVE"
}
Watch for new form responses
If you want to subscribe to events related to new form responses, you can create a watch for RESPONSE changes.
Send a POST request to https://forms.googleapis.com/v1beta/forms/{form-id}/watches
{
  "watch": {
    "target": {
      "topic": {
        "topicName": "projects/root-lotus-340203/topics/forms-demo"
      }
    },
    "eventType": "RESPONSES"
  }
}
After creating the event you will get a response like this:
{
  "id": "2abfc065-1160-4206-8f08-b5d4a8d5a2f7",
  "target": {
    "topic": {
      "topicName": "projects/root-lotus-340203/topics/forms-demo"
    }
  },
  "eventType": "RESPONSES",
  "createTime": "2022-02-26T07:16:06.088Z",
  "expireTime": "2022-03-05T07:16:05.271Z",
  "state": "ACTIVE"
}
Troubleshooting watch events failures
If the watch creation fails, ensure you have appropriately configured the following:
- Verify that the Pub/Sub topic exists in your Google Cloud project.
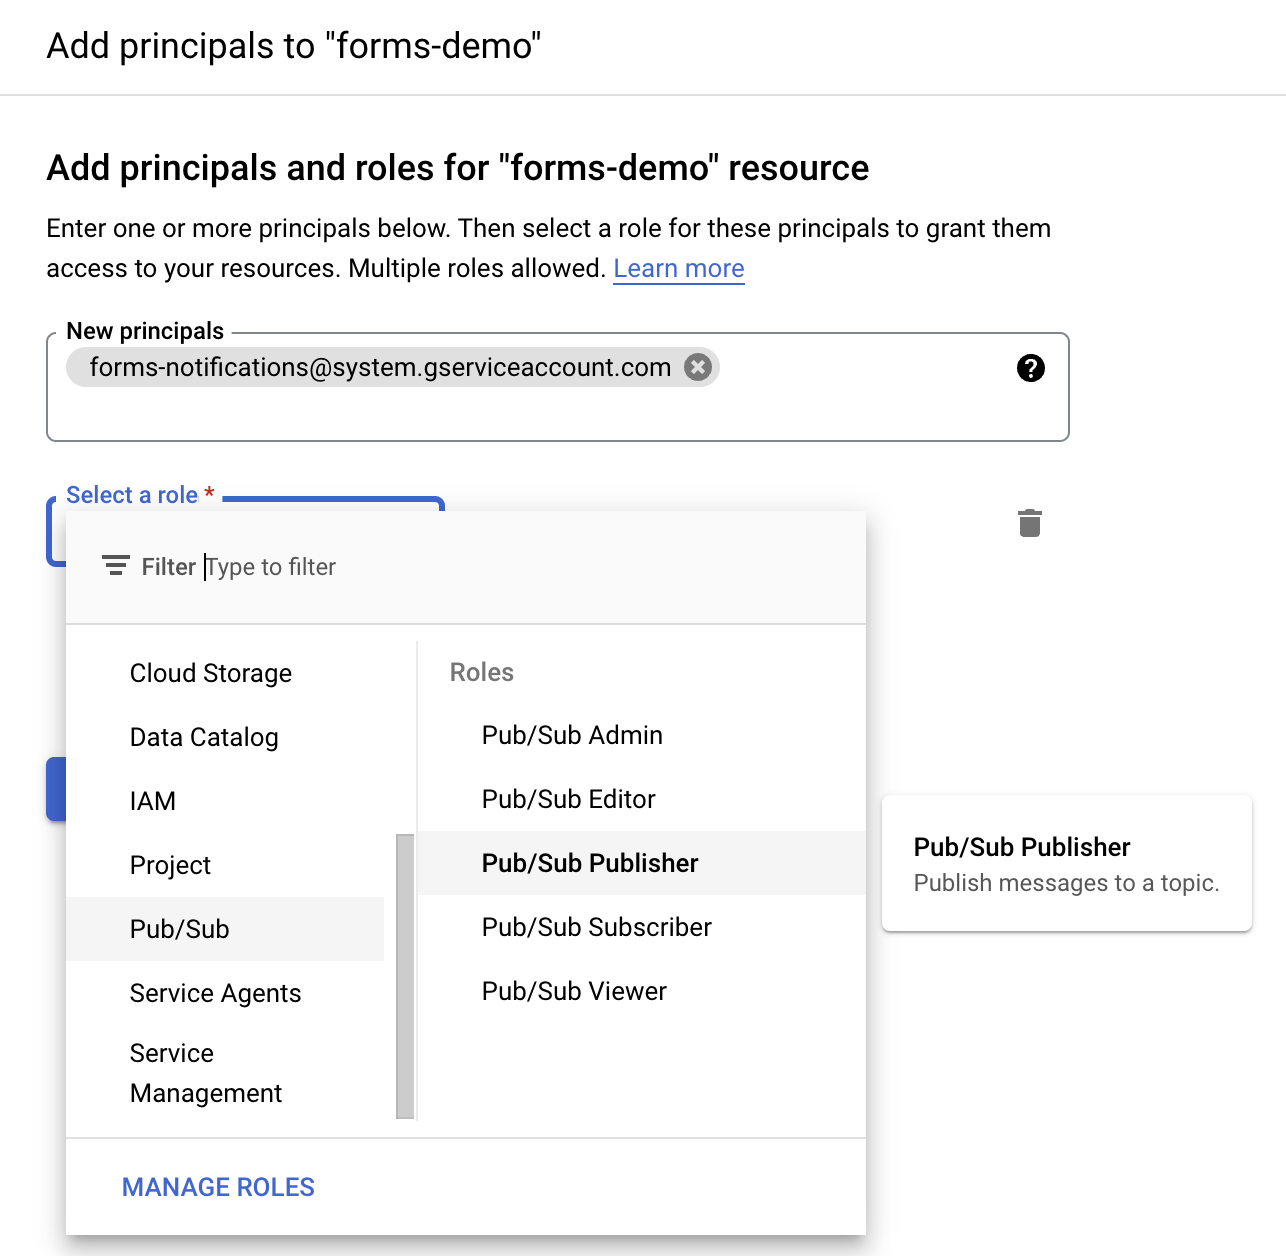
- Add permissions. The calling project must own this topic already in Pub/Sub. The topic must grant publish privileges to the Forms service account
serviceAccount:forms-notifications@system.gserviceaccount.com. Only the project that owns a topic may create a watch with it (see the Add permissions section to learn how to do it). - Ensure a new service account with the role Cloud Pub/Sub Service Agent; there are several ways to authenticate as a service account; it depends if you are deploying your application in Google Cloud or a different service, read more about it here
Add permissions
- Inside the Google Cloud Console navigate to the PubSub section
- Once you have created a new topic, check the topic and localize the permissions tab
- Click add principal
- Search for
serviceAccount:forms-notifications@system.gserviceaccount.com - Assign the Pub/Sub publisher role

Learn more about form watches and Pub/Sub topics here
Subscribe to watch events
Pub/Sub supports both push and pull message delivery.
Pull subscription
Your subscriber application initiates requests to the Pub/Sub server to retrieve messages in pull delivery. To listen to messages from the watch events, you will need to interact with Google Cloud Pub/Sub. The synchronous pull is the recommended approach since it provides higher throughput. Learn more about pull messaging here
An example implementation using the official Node.js package
const { PubSub } = require('@google-cloud/pubsub');

const pubSubClient = new PubSub({
  projectId: '<Your project Id here>',
});

const timeout = Number(60);

function listenForMessages() {
  const subscriptionNameOrId = '<Your subscription name or id here>';
  // References an existing subscription
  const subscription = pubSubClient.subscription(subscriptionNameOrId);

  // Create an event handler to handle messages
  let messageCount = 0;
  const messageHandler = (message) => {
    console.log(`Received message ${message.id}:`);
    console.log(`\tData: ${message.data}`);
    console.log(message.attributes);
    console.log(`\tAttributes: ${message.attributes}`);
    messageCount += 1;

    // "Ack" (acknowledge receipt of) the message
    message.ack();
  };

  // Listen for new messages until timeout is hit
  subscription.on('message', messageHandler);

  setTimeout(() => {
    subscription.removeListener('message', messageHandler);
    console.log(`${messageCount} message(s) received.`);
  }, timeout * 1000);
}

listenForMessages();
Push subscription
Pub/Sub initiates requests to your subscriber application to deliver messages in push delivery.
- The Pub/Sub server sends each message an HTTPS request to the subscriber application at a pre-configured endpoint.
- The endpoint acknowledges the message by returning an HTTP success status code. A non-success response indicates that the message should be resent.
- Multiple topics can reuse the endpoint.
- The endpoint is secured with an access token generated by the Pub/Sub server.
Learn more about push messaging here
Creating a new push notification
- Ensure you have a topic created
- Create a new subscription or select an existing one
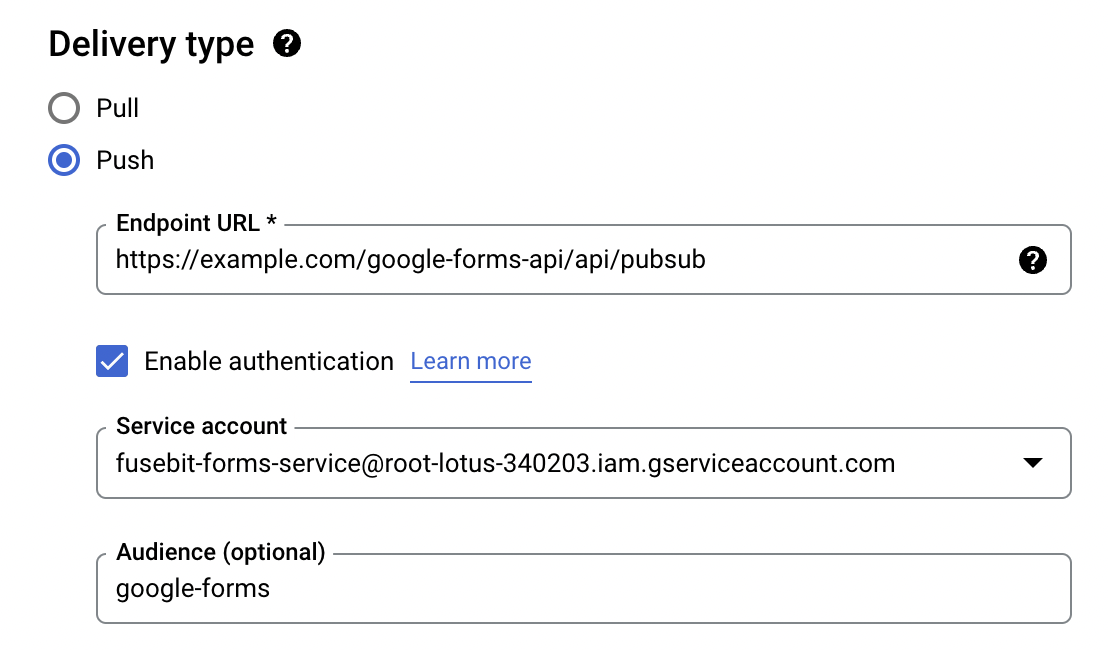
- Set the delivery type to push
- Specify an endpoint URL

Creating a new push notification with authentication
It’s a recommended good practice to secure your webhook by enabling authentication. The Pub/Sub service signs a JSON Web Token (JWT) and sends the JWT in the authorization header of the push request. The JWT includes claims and a signature. An audience is optional, but it’s worthwhile since it identifies the recipients that the JWT is intended for, in this case, your application.
The endpoint URL should implement the following validation using the official google-auth-library package:
const { OAuth2Client } = require('google-auth-library');

async function validateToken(req) {
  const bearer =  req.header('Authorization');
  const [, token] = bearer.match(/Bearer (.*)/);
  const clientId = '<Your Client Id>';

  const client = new OAuth2Client(clientId);

  await client.verifyIdToken({
    idToken: token,
    audience: 'google-forms',
  });
}
Read more about token validation here
The push notification will trigger a POST request to the configured endpoint URL, you can implement that endpoint in the Node.js framework of your choice, e.g Express, Fastify, NestJS Hapi.
Let’s see an example implementation using the following Express code:
  const express = require('express');
  const { OAuth2Client } = require('google-auth-library');
  const app = express();
  const port = 3000;

  async function isTokenValid(req, clientId, expectedServiceAccountEmail) {
    const bearer = req.header('Authorization');
    const [, token] = bearer.match(/Bearer (.*)/);
    const client = new OAuth2Client(clientId);

    try {
        const ticket = await client.verifyIdToken({
        idToken: token,
        audience: 'google-forms',
      });
      const claim = ticket.getPayload();
      return claim.email === expectedServiceAccountEmail && claim.email_verified;
    } catch (error) {
      return false;
    }
  }

  app.post('/pubsub', async (req, res) => {
    const clientId = '<Expected client id>';
    const expectedServiceAccountEmail = '<Expected service account email>';
    const isValid = await isTokenValid(req, clientId, expectedServiceAccountEmail);
    if (!isValid) {
      return res.sendStatus(403);
    }
    res.sendStatus(200);
  });

  app.listen(port, () => {
    console.log(`Example app listening on port ${port} test`);
  });
After you receive a push request, return an HTTP status code. To acknowledge the message, return one of the following status codes: 102,200,201,202,204. To send a negative acknowledgment for the message, return any other status code, like 403 in our previous example. If you send a negative acknowledgment or the acknowledgment deadline expires, Pub/Sub resends the message.
The push request contains a message as part of the body with the following information:
{
   attributes: {
    eventType: 'RESPONSES',
    formId: '1g8WglHbmOH-l30H-jMdzwdcdLoNYEcIkDnqPz7YN5Xo',
    watchId: '4126a46c-caff-4ad1-bf29-a3a9cab6a412'
  },
  messageId: '4174496286900599',
  message_id: '4174496286900599',
  publishTime: '2022-03-09T23:53:05.995Z',
  publish_time: '2022-03-09T23:53:05.995Z'
}
Conclusion
Google forms watch API opens lots of possibilities as you can see in our use cases. We’re looking forward to seeing yours!
