Using the GitHub API in Node.js: A Comprehensive Tutorial
You've probably used GitHub tons of times, be it for work or for personal projects. But did you know there is a more interesting way to use GitHub besides its intuitive web interface and CLI?
GitHub provides loads of utility-rich APIs that you can use to do literally everything. From searching for users to finding repository details to getting commit history for a repository to creating pull requests, there's an API for almost every workflow!
So in this post, I'll walk you through how you can use the GitHub API in Node.js. You'll understand how to store your GitHub API keys, set up a Node.js app with relevant libraries, and build some simple GET APIs to pull some information from GitHub APIs.
GitHub provides loads of utility-rich APIs that you can use to do everything
Generate GitHub API Key
As a first step, you need a private API key to access the GitHub APIs as an authorized user. This enables you to make 5,000 API calls or requests in an hour as opposed to 60 requests per hour when using the API without authentication. So let's go ahead and generate a private API key for authenticating our API requests.
Generate Personal Access Token
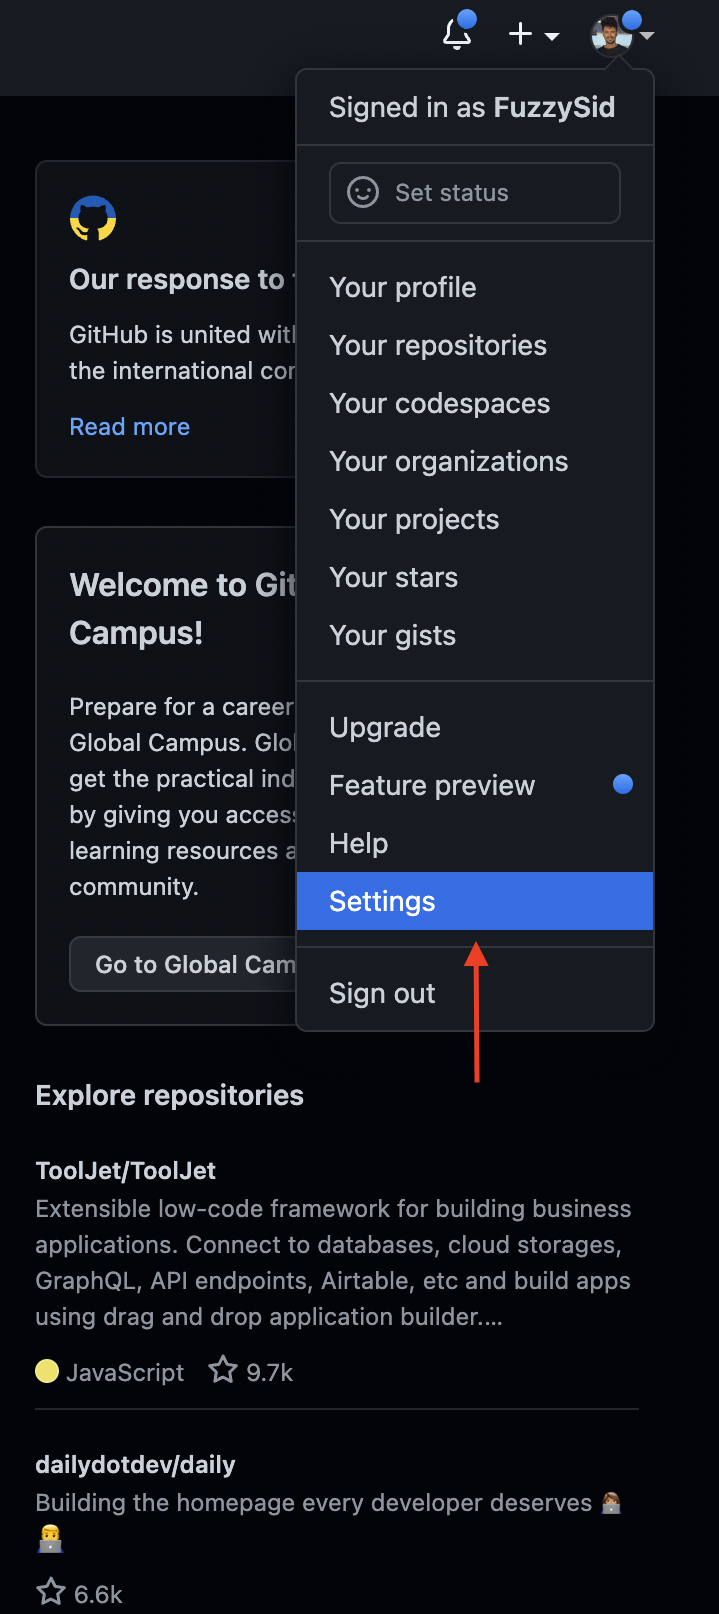
Your GitHub API's private key is a personal access token that you can generate from your GitHub account. First, log in to your GitHub account and go to the Settings section on your homepage.
Then, go to Developer Settings from the Settings page.
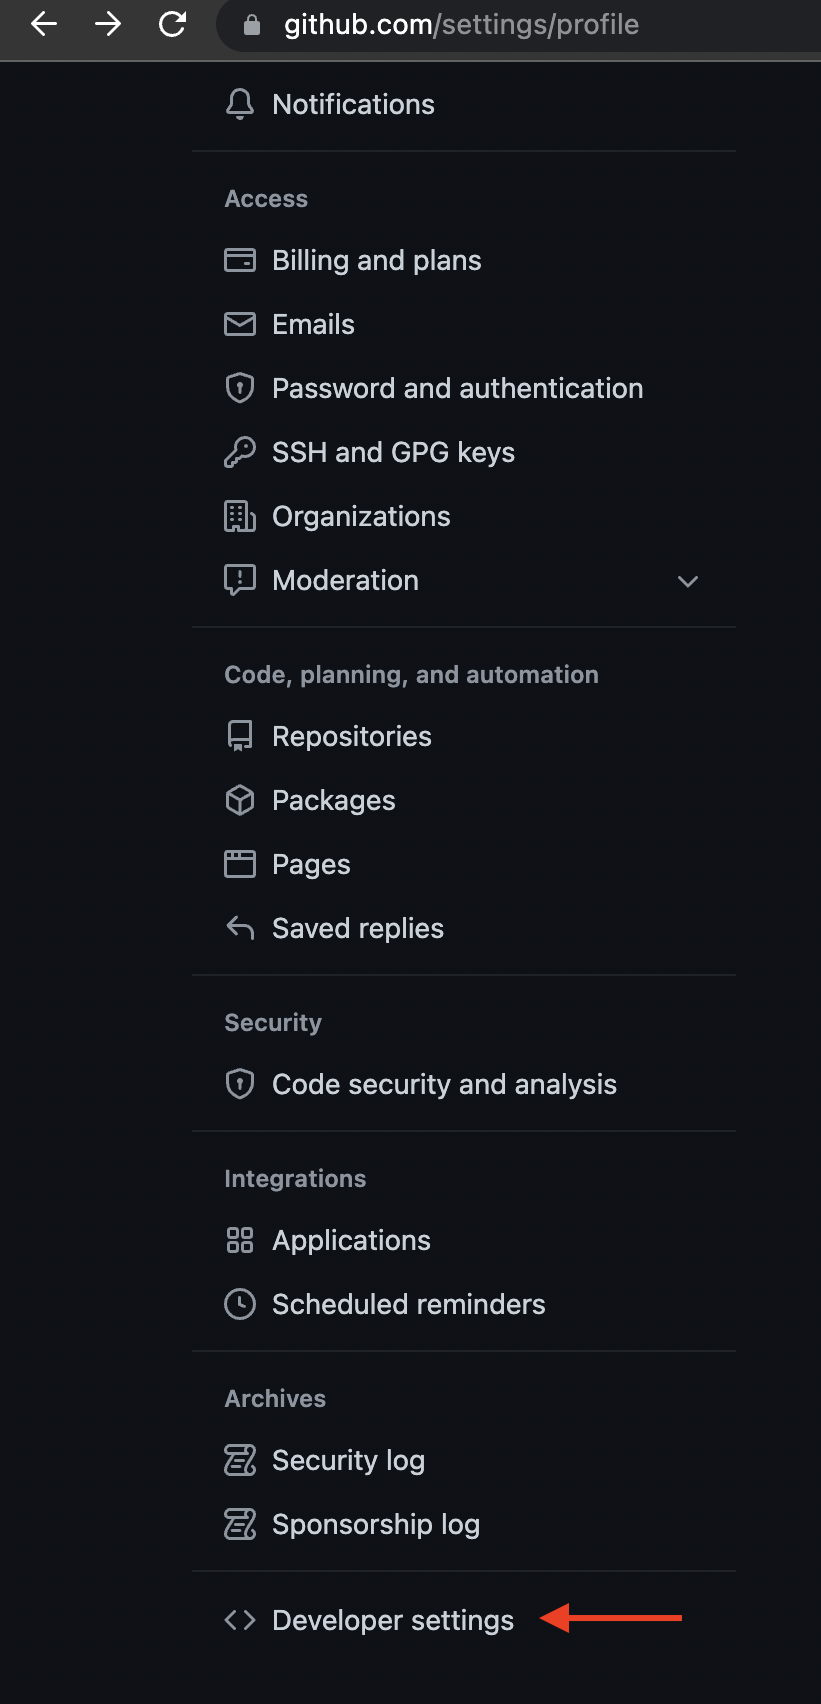
Next, select the Personal Access Tokens section from the left panel of Developer Settings.

Then click on Generate New Token. After that, you can select all the privileges you want to enable for this access token. For brevity, you can select all of them. Set an expiry on the token and click on Generate. You'll now have a personal access token generated for you. Copy this and save it somewhere—we'll be using this as our API key inside our Node.js app.

Create and Set up a Node.js App
We'll now create and set up a Node.js app. Create a new directory called github-api-nodejs-app:
mkdir github-api-nodejs-backend
Then move inside this directory and create a new npm project:
cd github-api-nodejs-backend && npm init -y
Once that's done, open your project in a code editor like VS Code. Now, let's go ahead and install a few packages.
Install Dependencies
We'll use Express, a Node.js library, for creating our server and routing easily. Install Express by running the following command inside the root directory:
npm i express
We'll also install cors which allows us to set a cors policy for our response headers. That way we can easily use the APIs we create in this tutor ial in a front-end app if needed.
npm i cors
I'm also using nodemon for hot reloading, so you can install it globally by running:
npm i -g nodemon
Create Constants
We'll create a constants.js file in the root directory to store some common constant strings that we'll use in the API. Create the file with the following code:
const constants={
    hostname: 'api.github.com',
    user_agent:'Mozilla/5.0 (Macintosh; Intel Mac OS X 10_8_2) AppleWebKit/537.36 (KHTML, like Gecko) Chrome/29.0.1521.3 Safari/537.36',
    error_message:'Oops! Something went wrong!'
}

module.exports=constants
We store the hostname (i.e., the base URL for GitHub's API) alongside the user agent and a custom error message inside it.
Store GitHub Access Token in .env File
We generated a personal access token previously as our API key. But where do we store it securely?
Your GitHub personal access token is highly sensitive data that you should not hardcode in your requests. You should also not store it in a file that's accessible from your public GitHub repository. Instead, we'll store it inside a .env file and leverage the system's environment variables to extract it at runtime.
Your GitHub personal access token is highly sensitive data that you should not hardcode in your requests.
First, we need to install the dotenv package that allows us to use environment variables inside our project. Install it by running the following command inside your root directory:
npm i dotenv
Next, create a .env file in the root of your project. Then add the following code inside it:
GITHUB_ACCESS_TOKEN=<Your_Personal_Access_Token_Here>
Paste your personal access token in the file. We're good to go now!
Create Express Server
Let's now kick-start our application by creating a root route and an express server.
Inside the root directory, create a file app.js with the following code:
const express = require('express');
const cors = require('cors');

const app = express();
const PORT=8080;

app.use(express.json());
app.use(cors());

app.get('/', (req,res)=>{
    res.send('Welcome to Github NodeJS API app!')
})

app.listen(PORT,()=>console.log(`Server started on port ${PORT}...`))
We import express, body-parser, and cors that we installed earlier. We then create a new Express app by invoking the express() method. Then, we pass the relevant middlewares to it for using body-parser and cors.
We then create a root route (/), which will simply return a message on the browser. Finally, we kick-start our application on PORT 8080 and run our app using the following command:
nodemon app
Once you do that, here's what your terminal should look like:

And if you now visit http://localhost:8080, you should see the following page:

Awesome! Let's move ahead.
Create Custom Middleware for Setting Headers
In order to use the GitHub APIs, we'll set some custom headers in our response object. This will allow us to use any API type (such as GET, PUT, POST, DELETE, etc.) on the API and also tell the GitHub API we're using some type of authentication to access the API.
We'll create a custom middleware to do this. Create a file called middlewares.js inside the root directory with the following code:
//This middleware simply sets some required headers for using the Github APIm

const setHeaders=function (req, res, next) {
    res.setHeader('Access-Control-Allow-Origin', '*');
    res.setHeader('Access-Control-Allow-Methods', 'GET, POST, OPTIONS, PUT, PATCH, DELETE');
    res.setHeader('Access-Control-Allow-Headers', 'X-Requested-With,content-type');
    res.setHeader('Access-Control-Allow-Credentials', true);
    next();
}

module.exports = { setHeaders }
The setHeaders function simply sets some desired headers on the response object. To use this, we'll import it inside our app.js file:
const middlewares = require('./middlewares');
And use it like any other middleware we use (ex cors, body-parser, etc.) as shown:
app.use(middlewares.setHeaders);
Awesome! Let's now create a utility function that generates some request options for us.
Create Utility Function for Generating Request Options
All our APIs will need some common request options. We will create a central function that can be invoked to generate and return those options.
Inside the root directory, create a file called util.js with the following code:
const constants=require('./constants');

const generateOptions=(_path)=>{
    return options = {
        hostname: constants.hostname,
        path: _path,
        headers: {
            'User-Agent': constants.user_agent
        },
        OAUth: process.env.GITHUB_ACCESS_TOKEN
    }
}

module.exports ={ generateOptions }
We add our API key, hostname, and user agent from earlier created constants. Additionally, we also take a _path string that represents the relevant GitHub API's endpoint.
Anyway, let's now create our API routes for different API endpoints.

Add API Routes
Now that we have our boilerplate code up, let's start creating our routes. We'll use Express to create a router and a few API endpoints. Create a file called routes.js inside the root directory with the following code:
const express = require('express');
const controllers=require('./controllers');

const router = express.Router();

router.get('/user/:user', controllers.getUser)

router.get('/repo/:user/:reponame', controllers.getRepo)

router.get('/commit/:user/:reponame', controllers.getCommit)

module.exports = router;
Here's what each endpoint represents:
- /user/:user: This fetches information about a user from the GitHub API.
- /repo/:user/:reponame: This fetches information about a user's repository from the GitHub API.
- /commit/:user/:reponame: This fetches the commit history for a user's repository from the GitHub API.
To use these routes in our app, we'll add the following line inside the app.js file:
const routes = require('./routes');
app.use('/github_api', routes);
Notice how each endpoint invokes a controller from a controllers.js file. It's not there yet, so let's go ahead and create it.
Create Controllers
Inside controllers.js, add the following code:
const { generateOptions } = require('./utils');
const https = require('https');

const getUser= async function (req, res) {
    const user = req.params.user;
    const options = generateOptions('/users/' + user)


    https.get(options, function (apiResponse) {
        apiResponse.pipe(res);
    }).on('error', (e) => {
        console.log(e);
        res.status(500).send(constants.error_message);
    })
}

const getRepo= async function (req, res) {
    const user = req.params.user;
    const reponame = req.params.reponame;
    const options = generateOptions('/repos/' + user + '/' + reponame)

    https.get(options, function (apiResponse) {
        apiResponse.pipe(res);
    }).on('error', (e) => {
        console.log(e);
        res.status(500).send(constants.error_message);
    })
}

const getCommit= async function (req, res) {
    const user = req.params.user;
    const reponame = req.params.reponame;
    const options = generateOptions('/repos/' + user + '/' + reponame + '/commits')

    https.get(options, function (apiResponse) {
        apiResponse.pipe(res);
    }).on('error', (e) => {
        console.log(e);
        res.status(500).send(constants.error_message);
    })
}

module.exports = { getUser, getRepo, getCommit }
We have defined a controller for each of our routes. Each controller first extracts some data from the request object. This includes the username or the repository name. It then passes a relevant GitHub API endpoint's path to the generateOptions function.
After that, it makes its own request to that API endpoint, brings back the data, and sends it to the response from its own endpoint. So our Node.js API interacts with GitHub APIs to retrieve some information, and then it sends back that information to the caller.
Testing the APIs
We can directly test these APIs in our browser since all of them are GET APIs. First, let's test the endpoint /user/:user. This endpoint will give us some information about the user. We need to pass the user's username after /user. To test things quickly, I'll add my own username to see if it brings back my data or ghosts me out!
Visit the endpoint http://localhost:8080/github_api/user/fuzzysid> and you should get back the following:
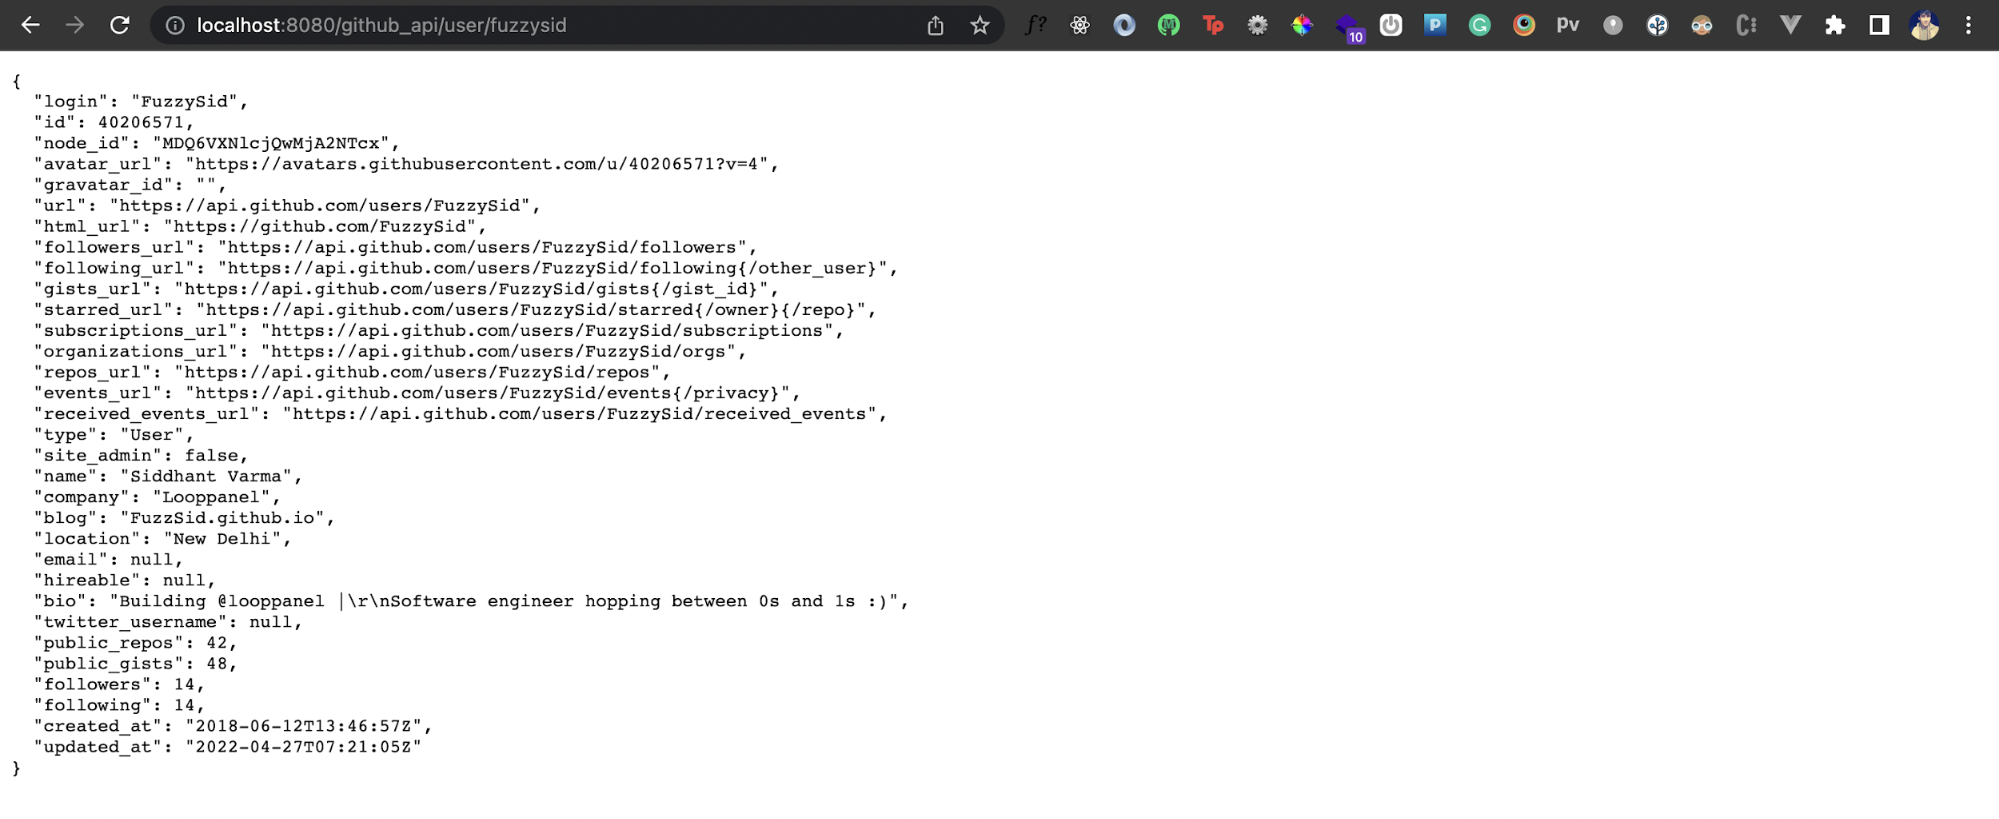
Looks like that's me! Alright, now let's test the endpoint /repo/:user/:reponame. This endpoint will take the username and a repository name to fetch the information. I'll put in my own username and my react-todo repository's name.
So now if you visit the endpoint http://localhost:8080/github_api/repo/fuzzysid/react-todo>, you should get back the following response:
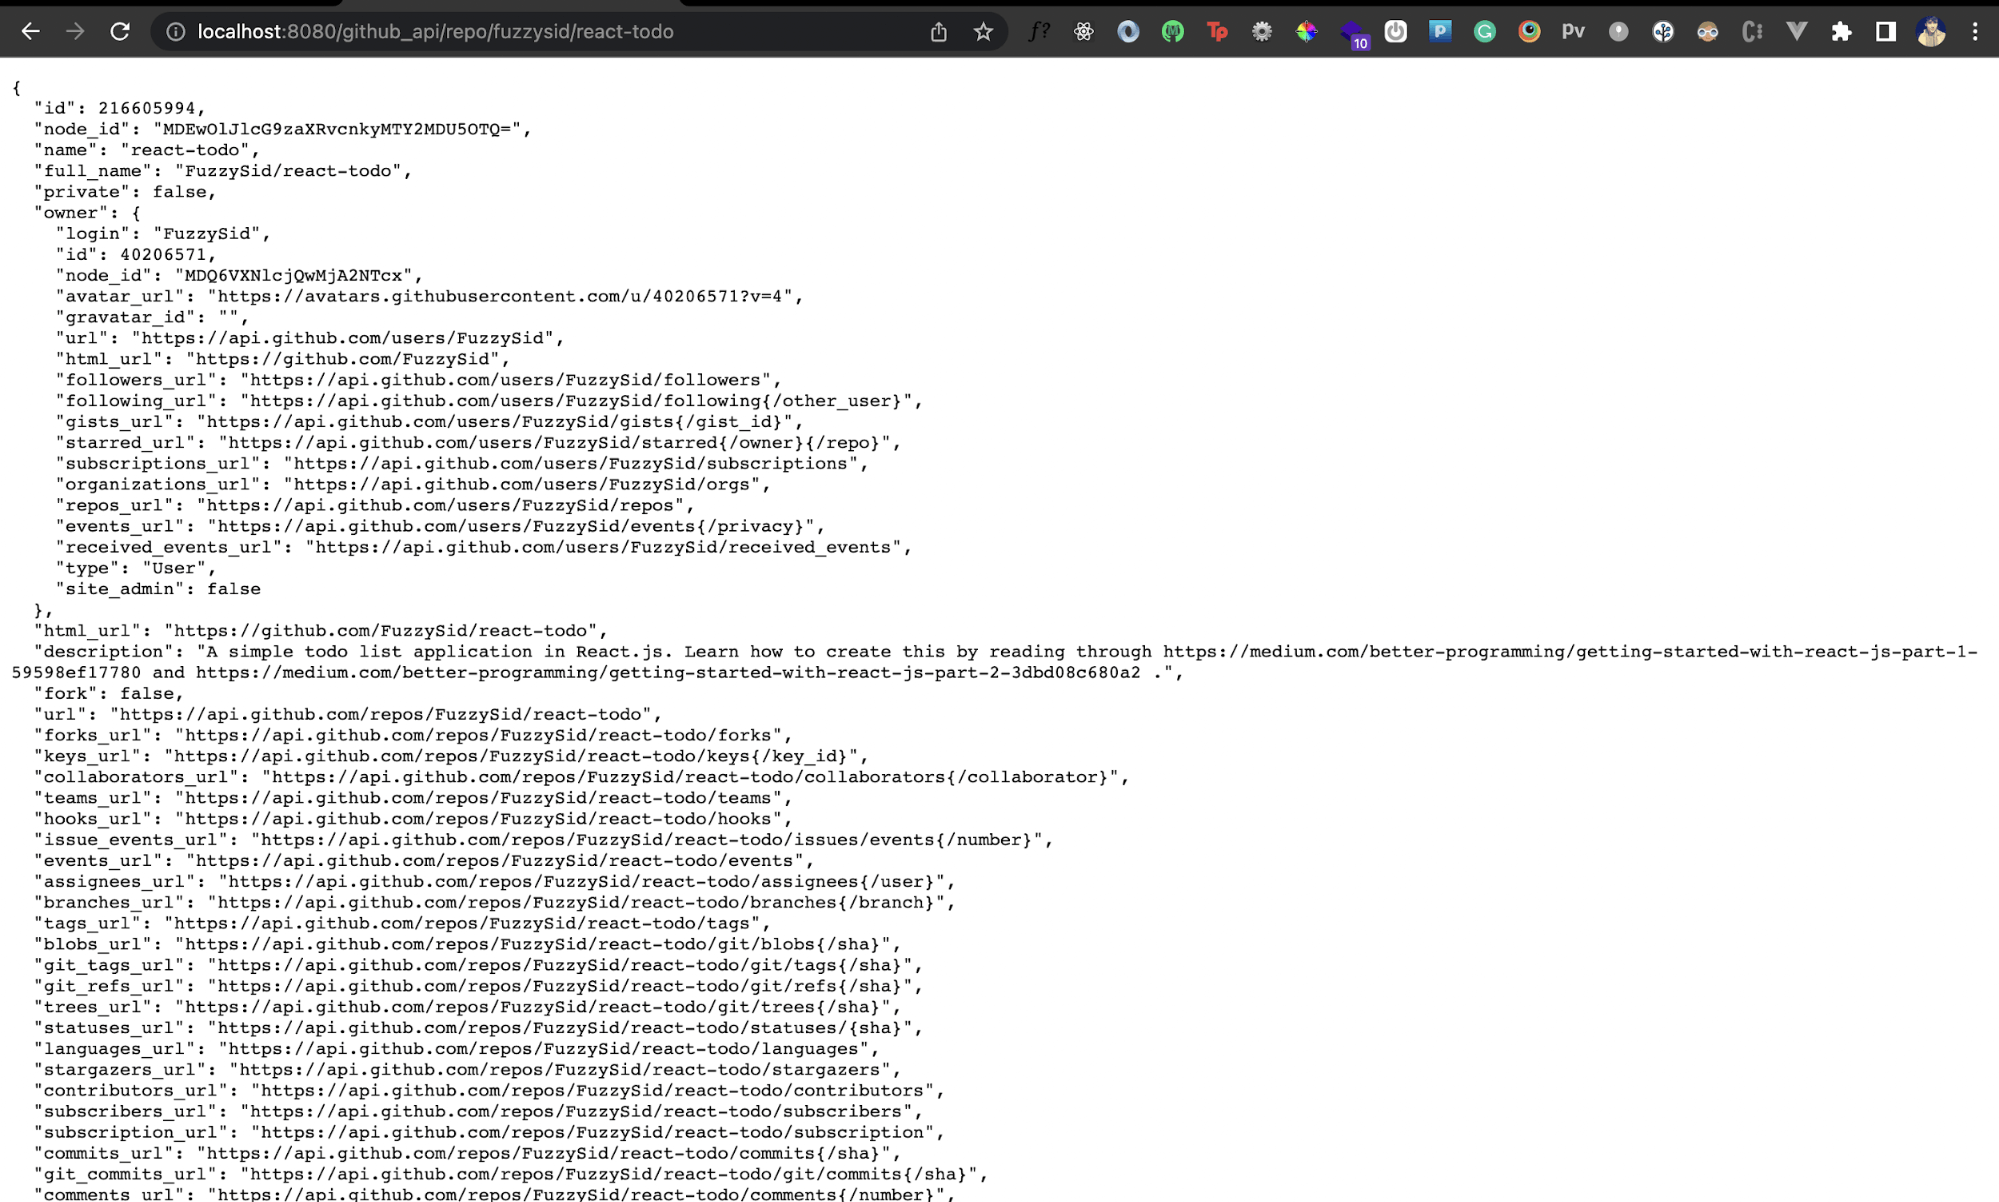
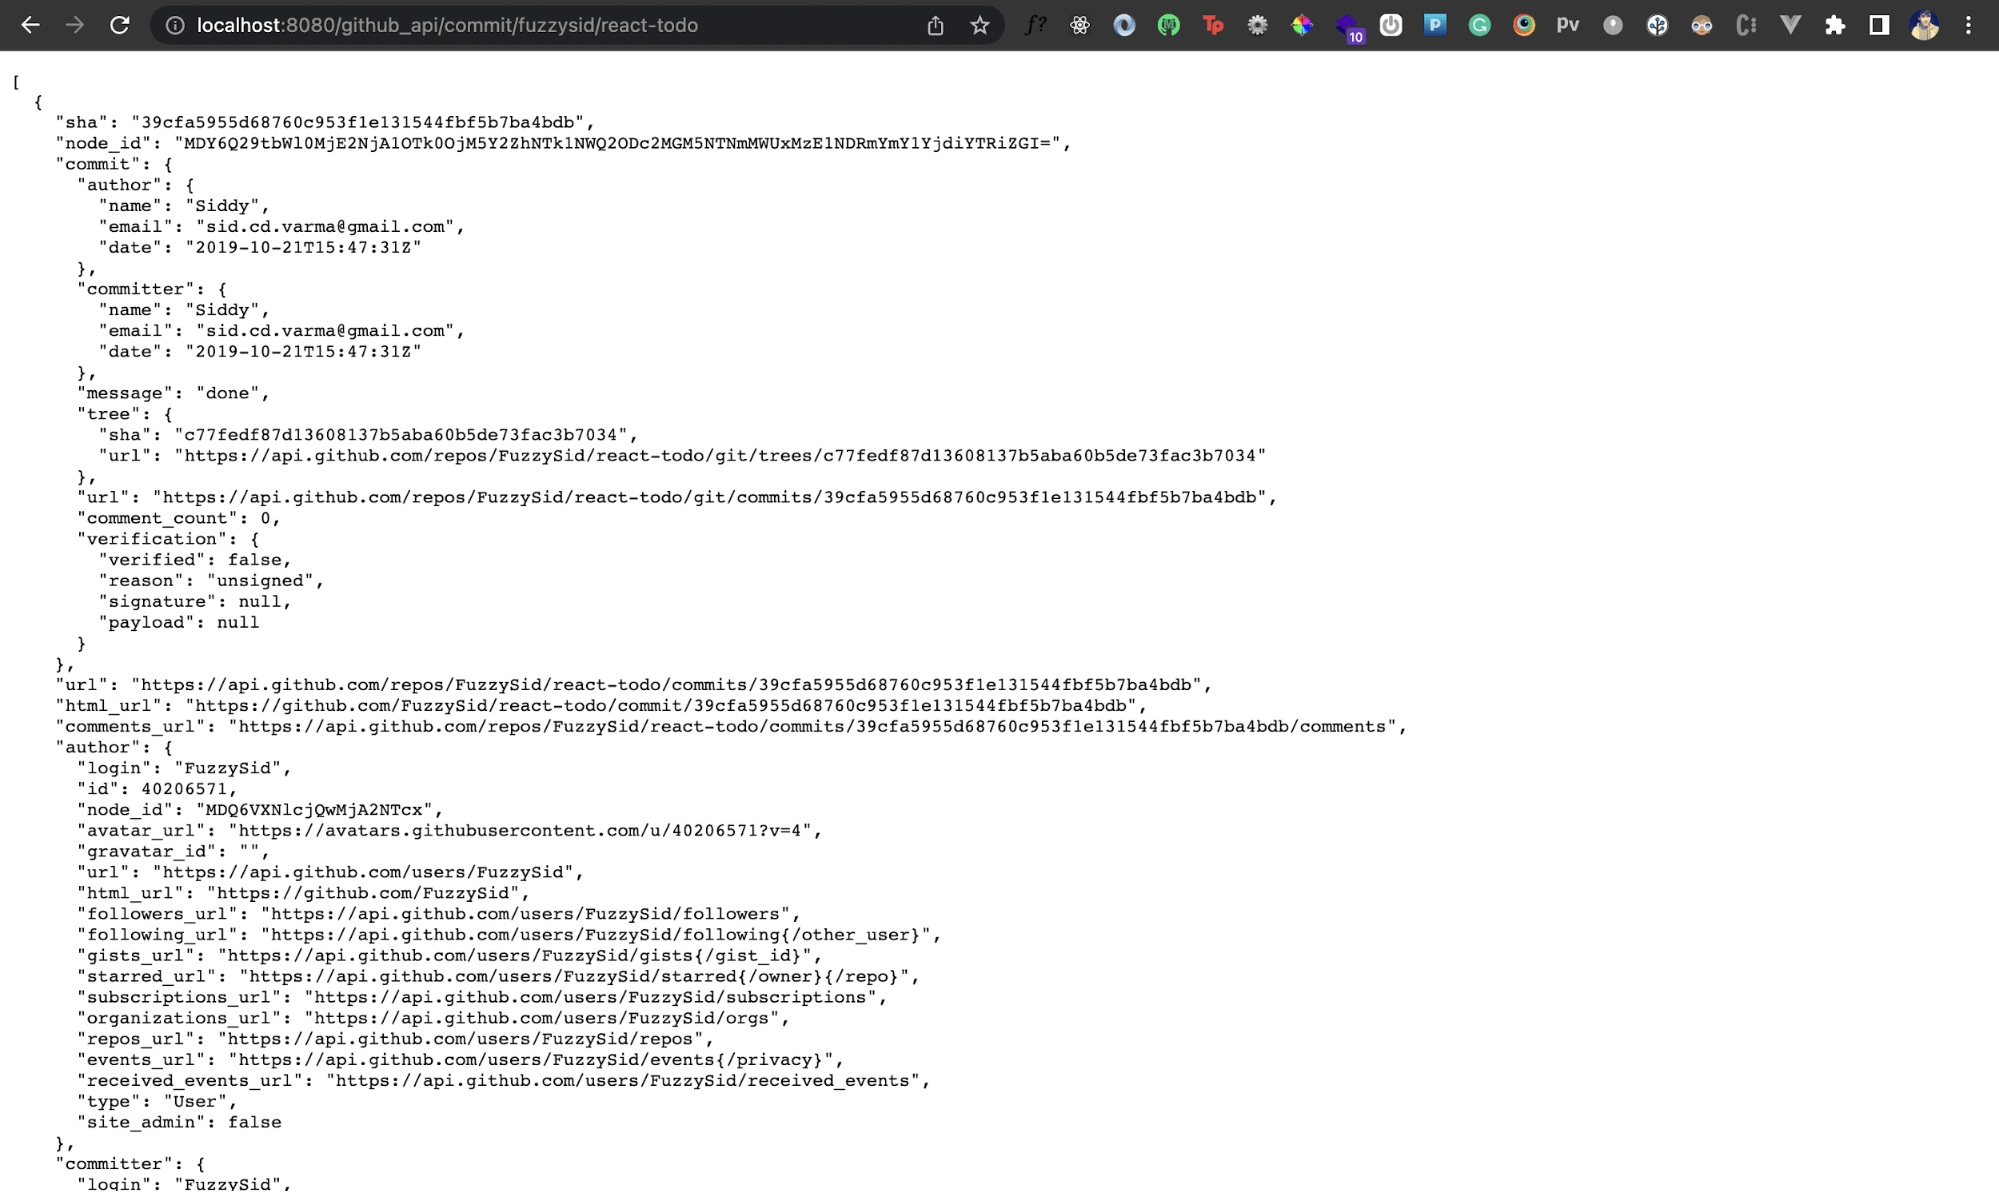
That works as well! Finally, let's test the endpoint /commit/:user/:reponame. It takes the same route parameters as the previous one and gives back the commit history of that repository. Let's use this to check the commit history of my react-todo repository:
Next Steps
It was fun working with GitHub APIs and building our own APIs with Node.js on top of it! If you wish to look at the entire code for this tutorial, you can check that out on GitHub. How about you now take a real-life problem and create an automated GitHub workflow via its APIs? You can also explore some other cool APIs that GitHub offers, as well as read the official docs to understand these APIs and their usage in depth.
This post was written by Siddhant Varma. Siddhant is a full stack JavaScript developer with expertise in frontend engineering. He’s worked with scaling multiple startups in India and has experience building products in the Ed-Tech and healthcare industries. Siddhant has a passion for teaching and a knack for writing. He's also taught programming to many graduates, helping them become better future developers.
