A Guide To Events In The Google Calendar API
Google Calendar is one of the most popular calendar apps out there. There are also very useful Google Calendar APIs, through which we can programmatically generate events. This is helpful in many scenarios, in which we can create, delete, and get events for Google Calendar.
In this post, we are going to show you how to set up a Google Calendar API through the Google developer console. Next, we will do the setup in Google Calendar. After that, we will create a Node.js API, which will allow us to create, delete, and get events in Google Calendar.
Initial API Setup
We need to first do the setup for the API through the Google developer console. So, log in to Google Cloud Platform, and it will take you to the last created project.
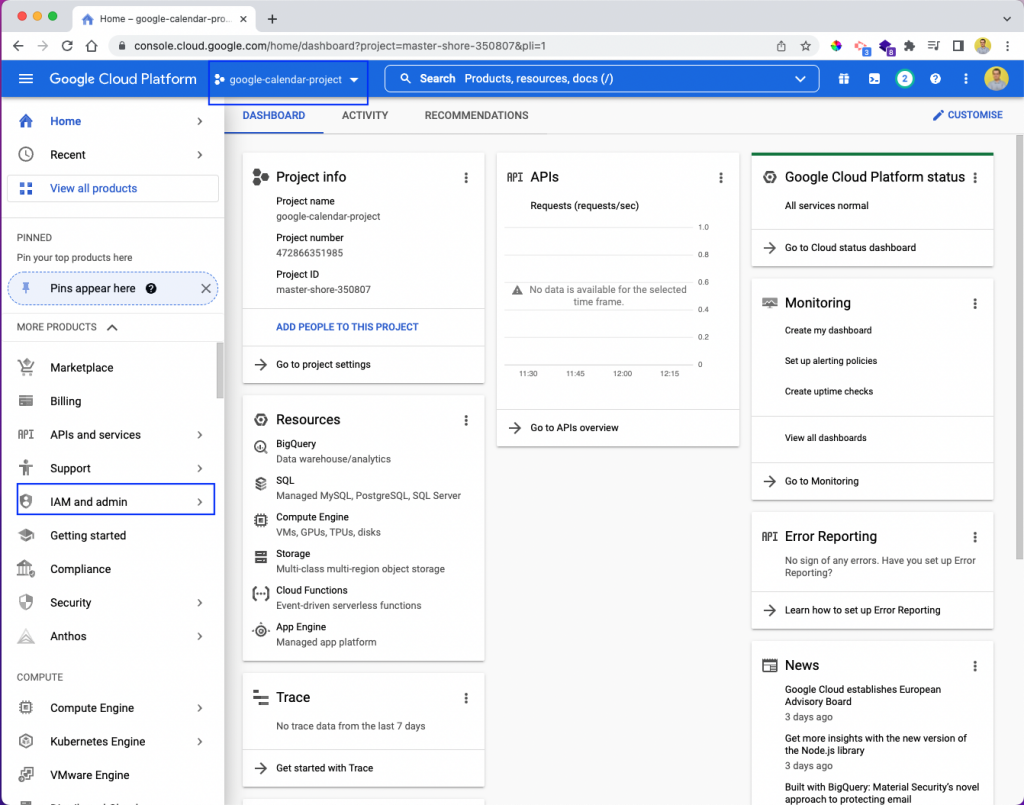
Here, click IAM and admin.
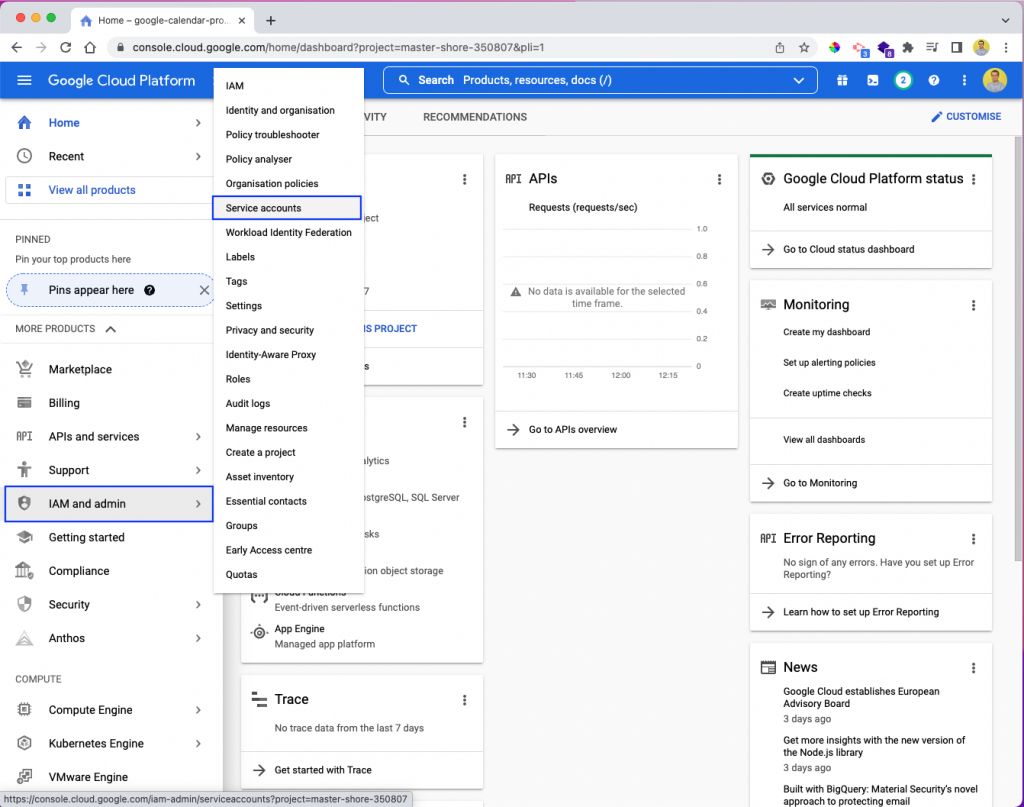
It will open a tab. In it, click Service accounts.
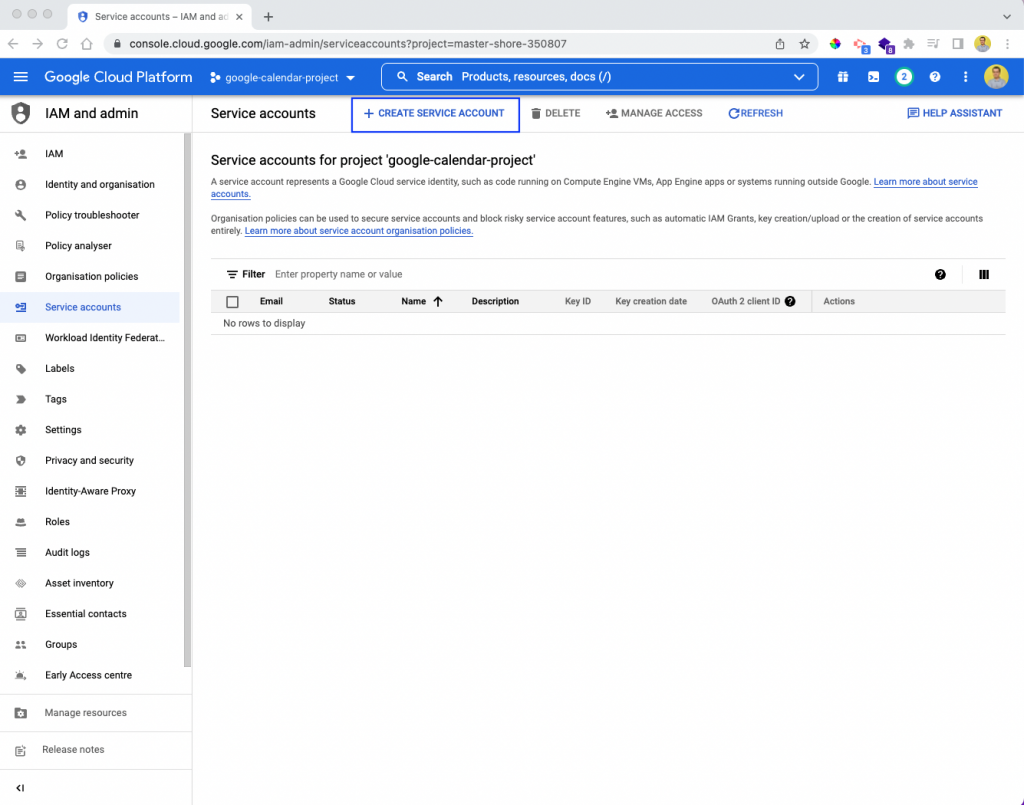
On the next page, click + CREATE SERVICE ACCOUNT.
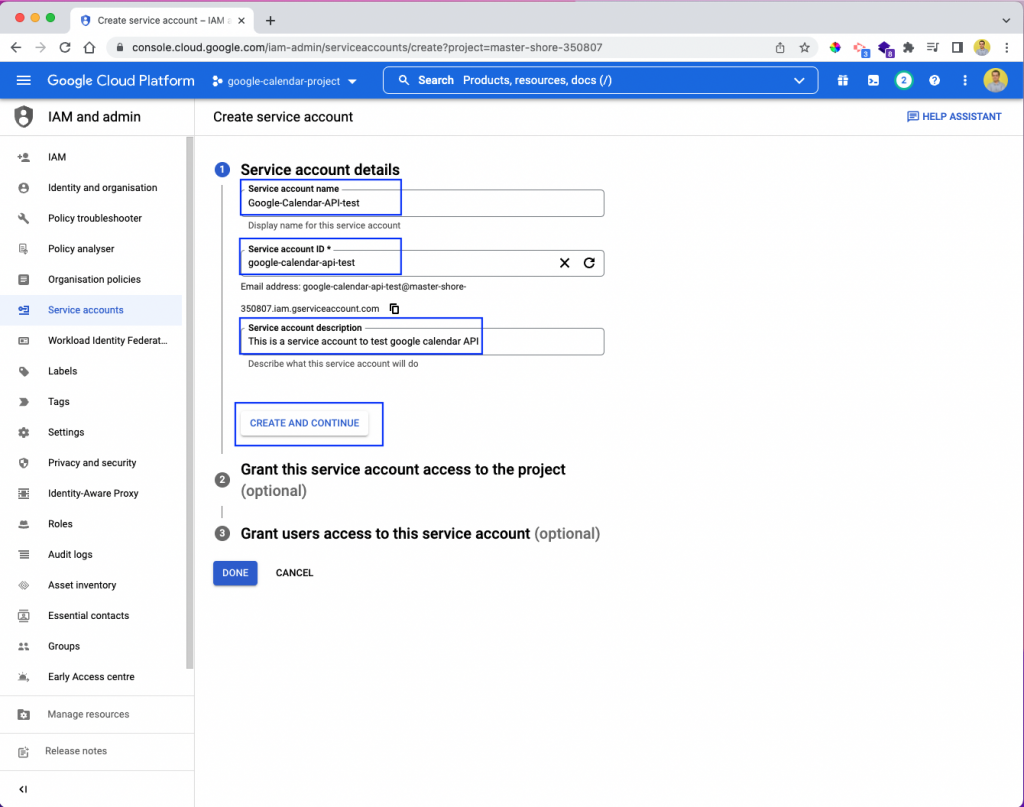
Now we have to put in the service account name, service account ID, and service account description. Then, click CREATE AND CONTINUE.
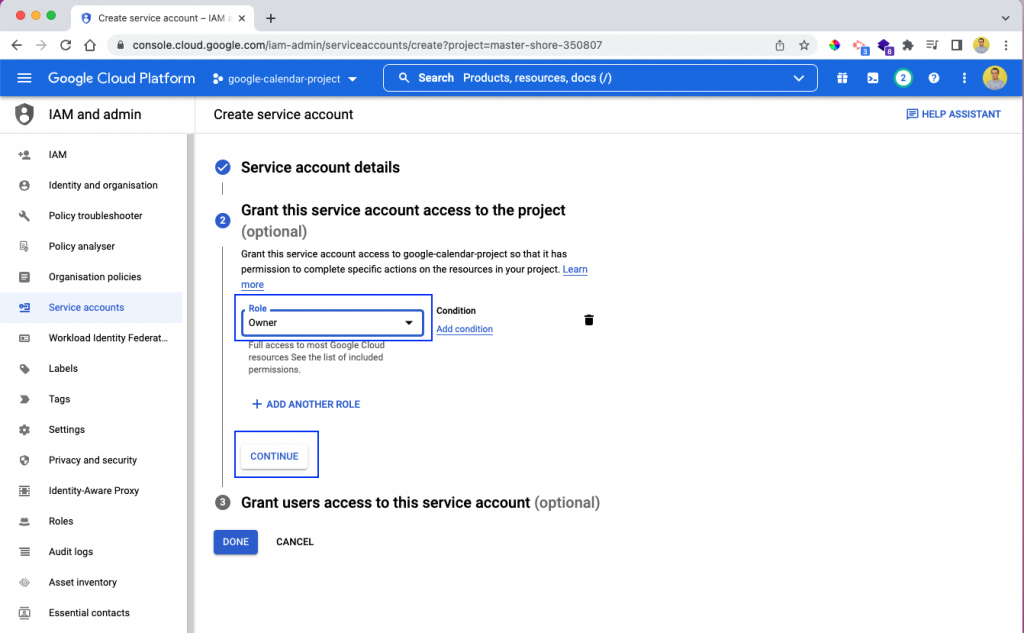
In the next step, we need to select Owner as the role and then click CONTINUE.
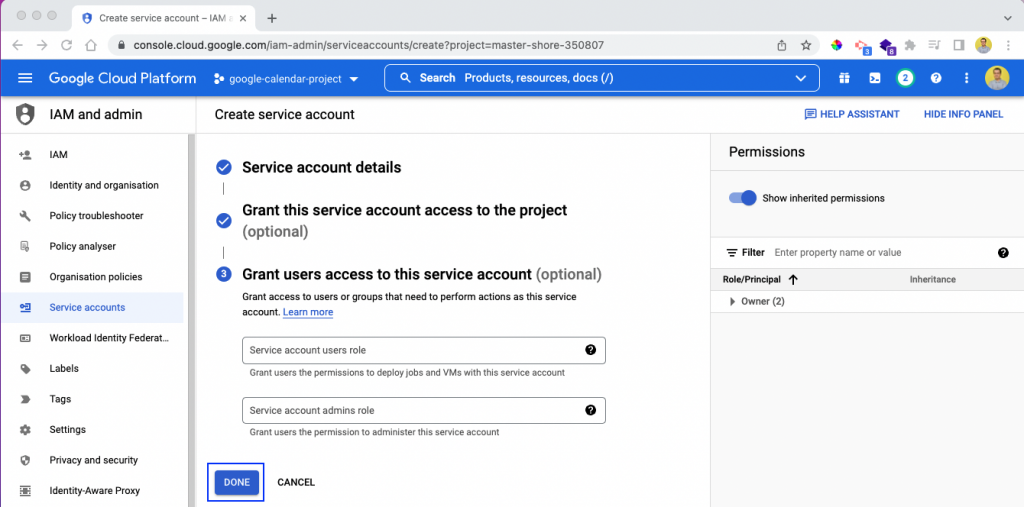
The last step is optional, so just click on the DONE button.
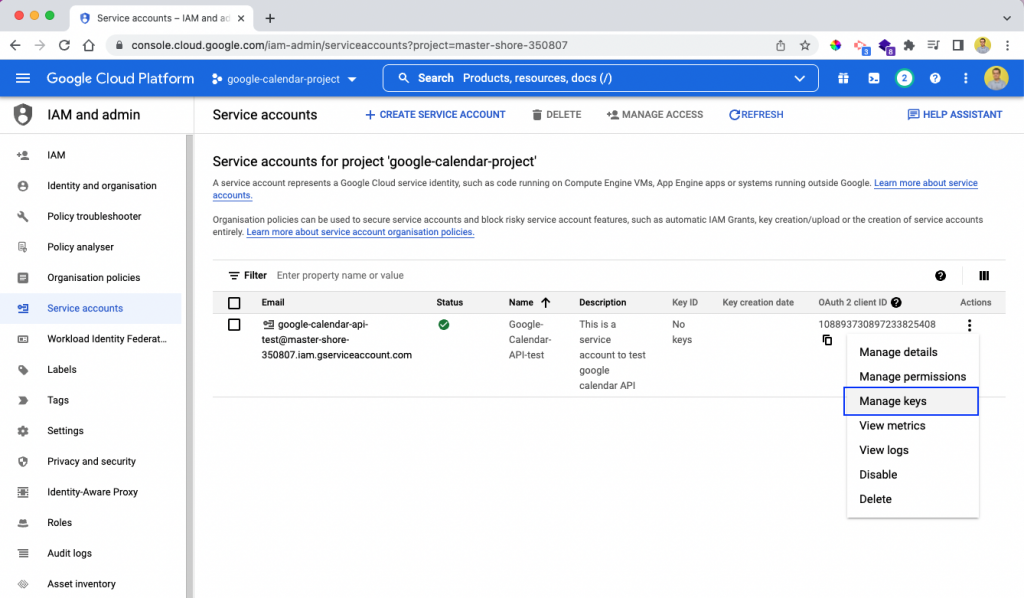
It will take us back to the Service accounts page. Here, click on the three dots under Actions and then click Manage Keys.
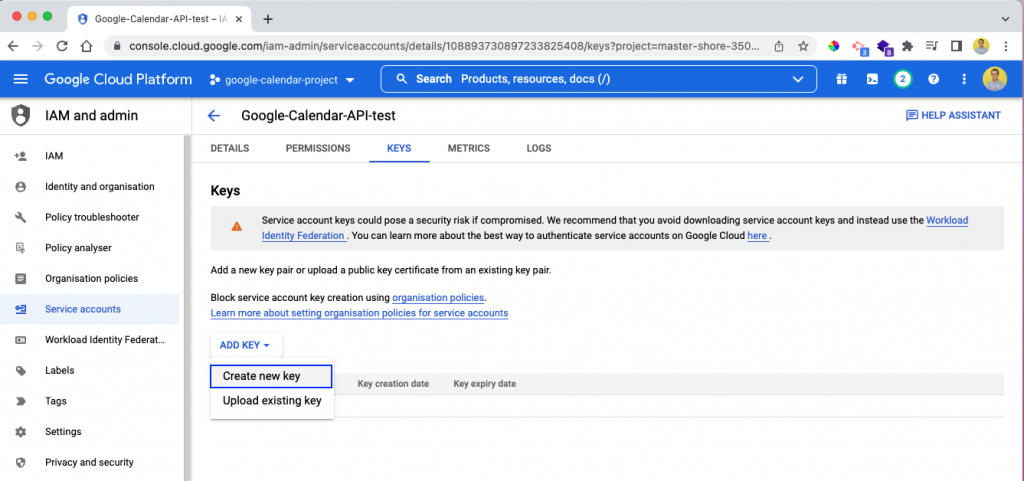
On the next page, click on the ADD KEY dropdown and then select Create new key.
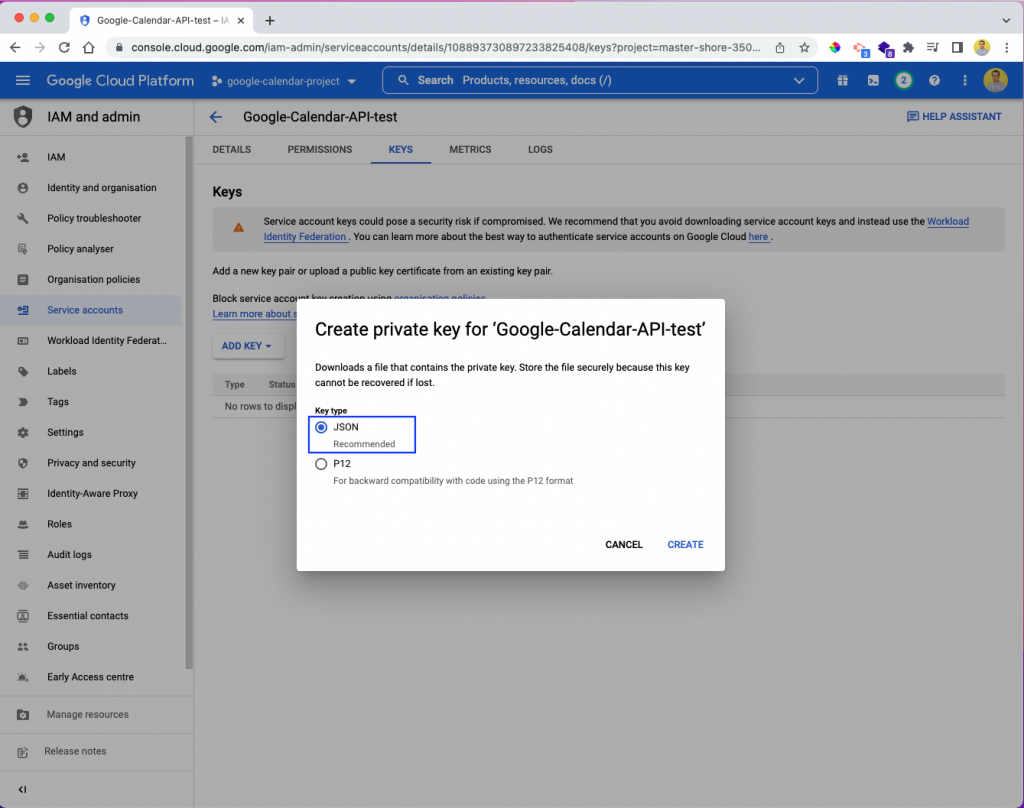
In the pop-up, select the JSON radio button and then click on the CREATE button.
Enabling the API
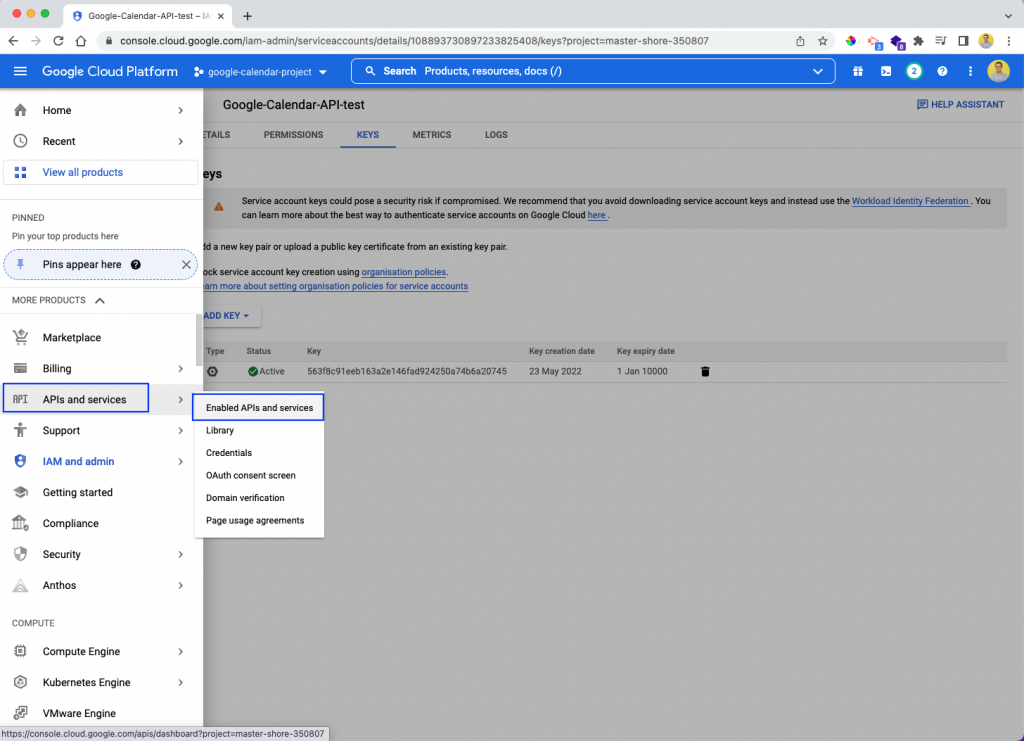
We need to go back to the dashboard and click on APIs and services. After that, click on the Enabled APIs and services link.
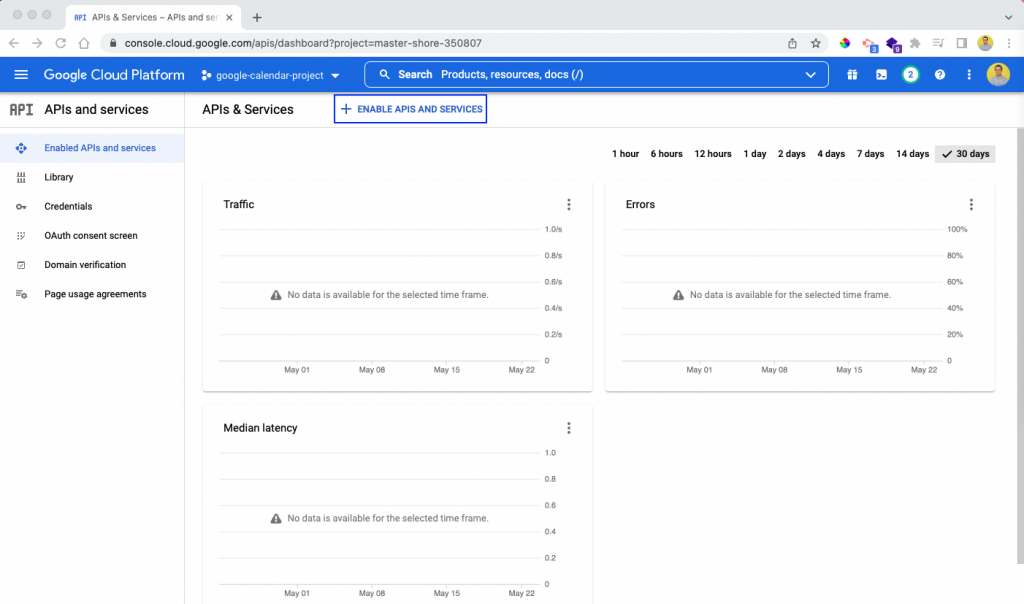
On the next screen, click + ENABLE APIS AND SERVICES.
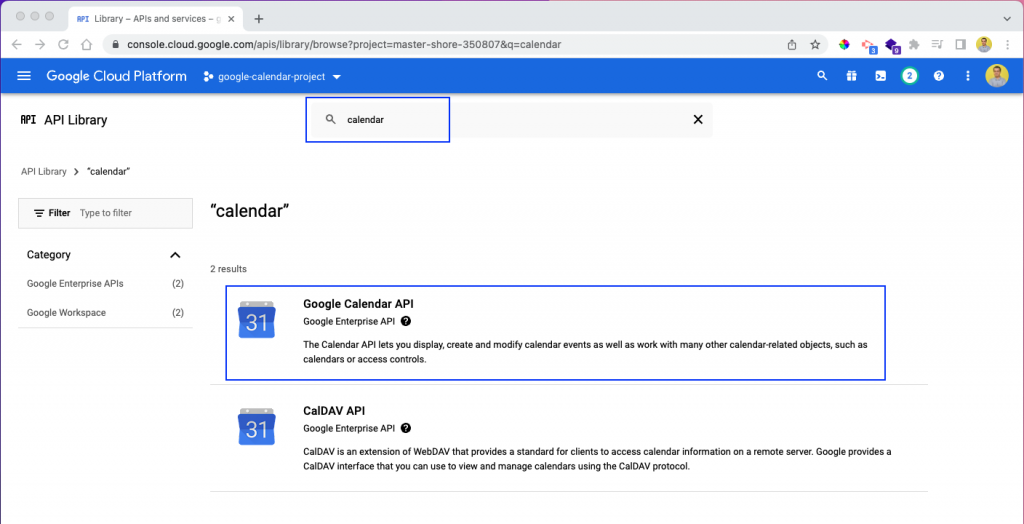
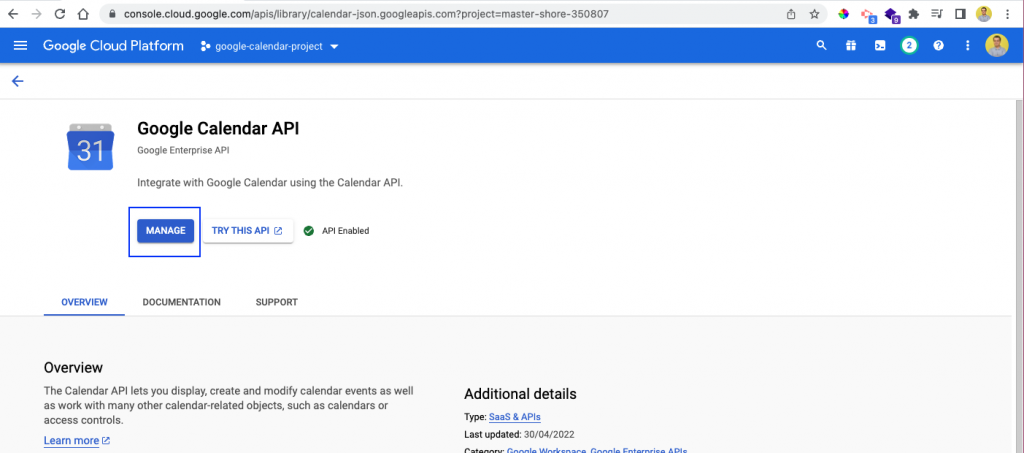
In the search bar, type "calendar," and we will get the Google Calendar API as shown below.
On the next screen, we will get the ENABLE button if this is not already enabled. Or we will get the MANAGE button if the API was enabled earlier.
Google Calendar Setup
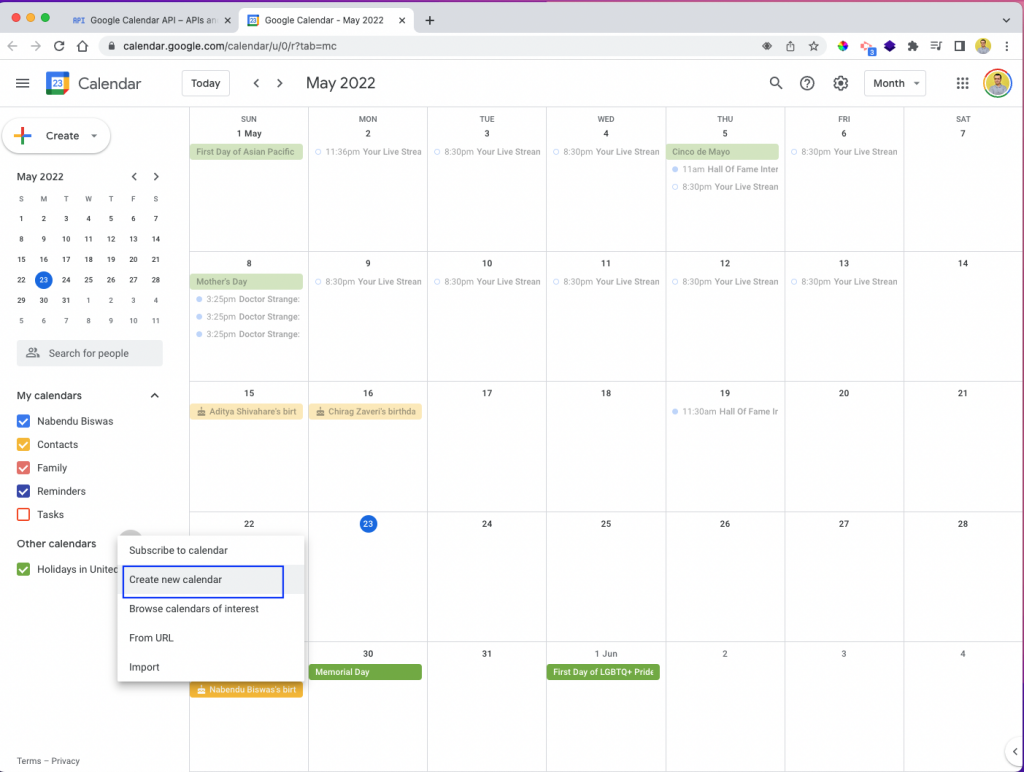
Now we will set up a new Google Calendar for our API. Open Google Calendar and then click on the + beside Other calendars. After that, click on Create new calendar.
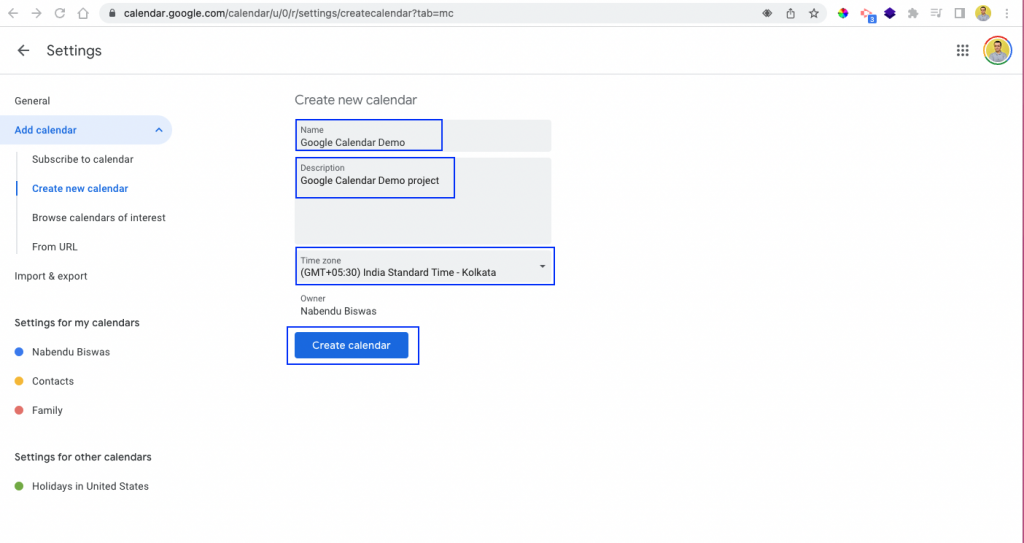
Next, we need to give the new calendar a name and description. By default, it will show the time zone of the user, which can be changed. Click on the Create calendar button to create this calendar.
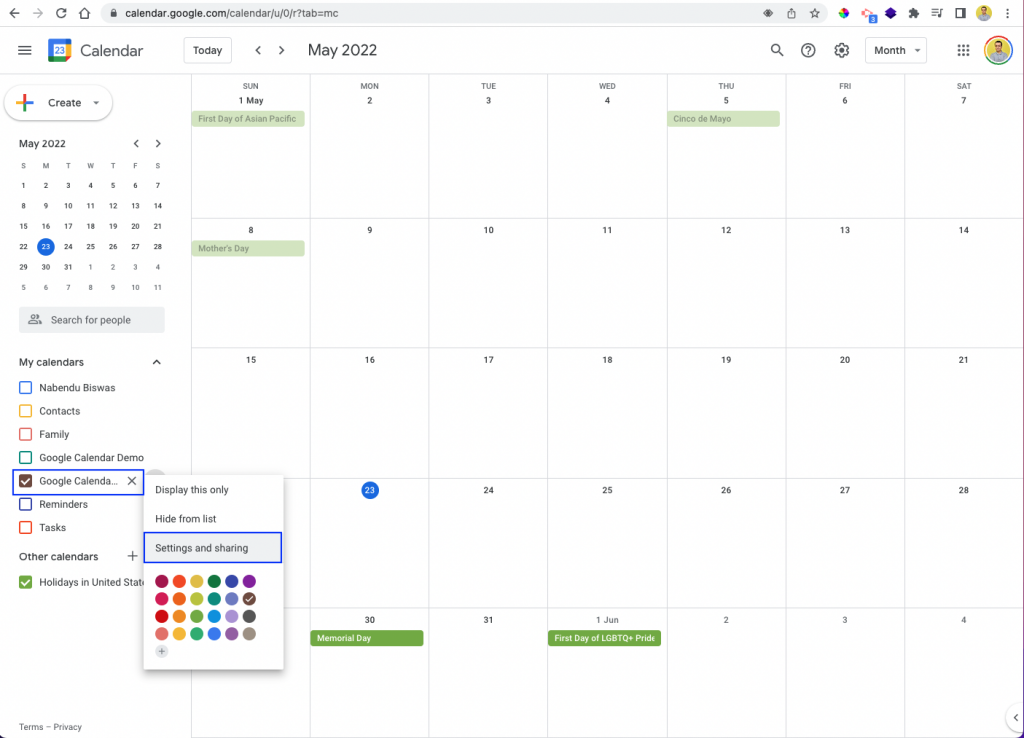
Now we will see the new calendar. Again, click on the + beside the new calendar, and it will open a pop-up menu. Click the Settings and sharing link.
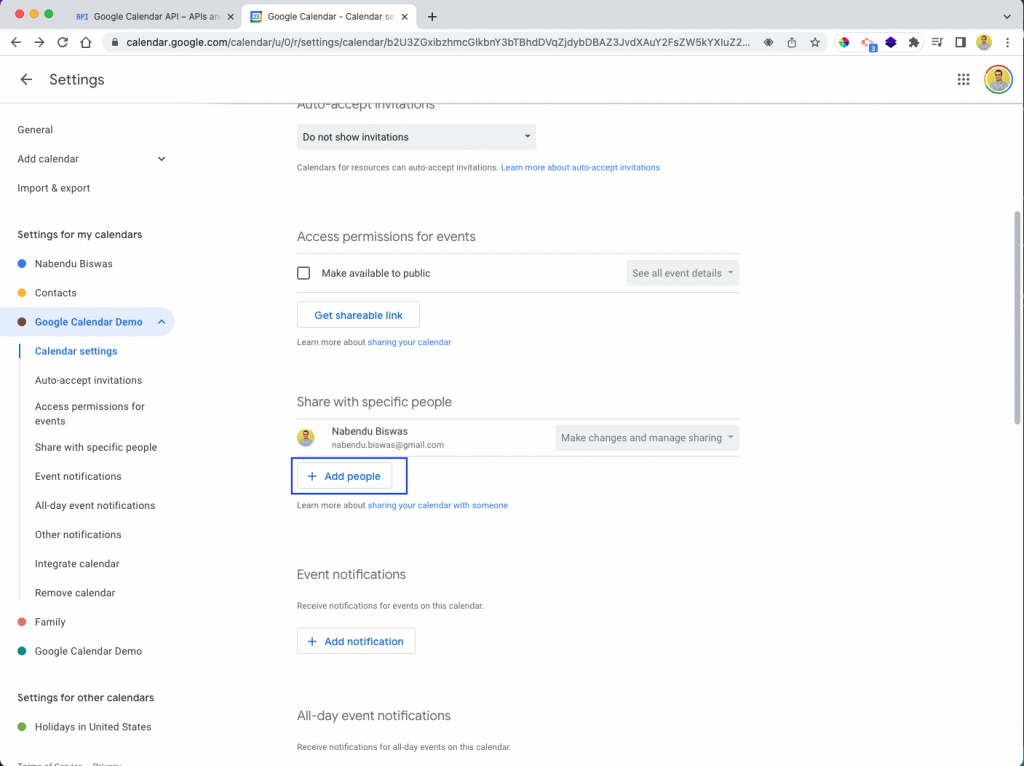
Here we need to click on the + Add people button. We need to add the client_email, which is stored in our JSON file. You will need this file in a later step. Ensure you download it.it.
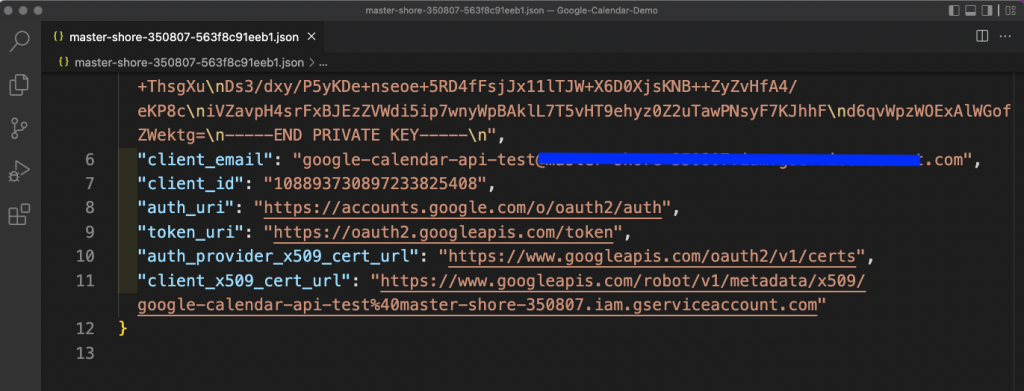
Now, from the JSON file that we saved earlier, take the client_email.
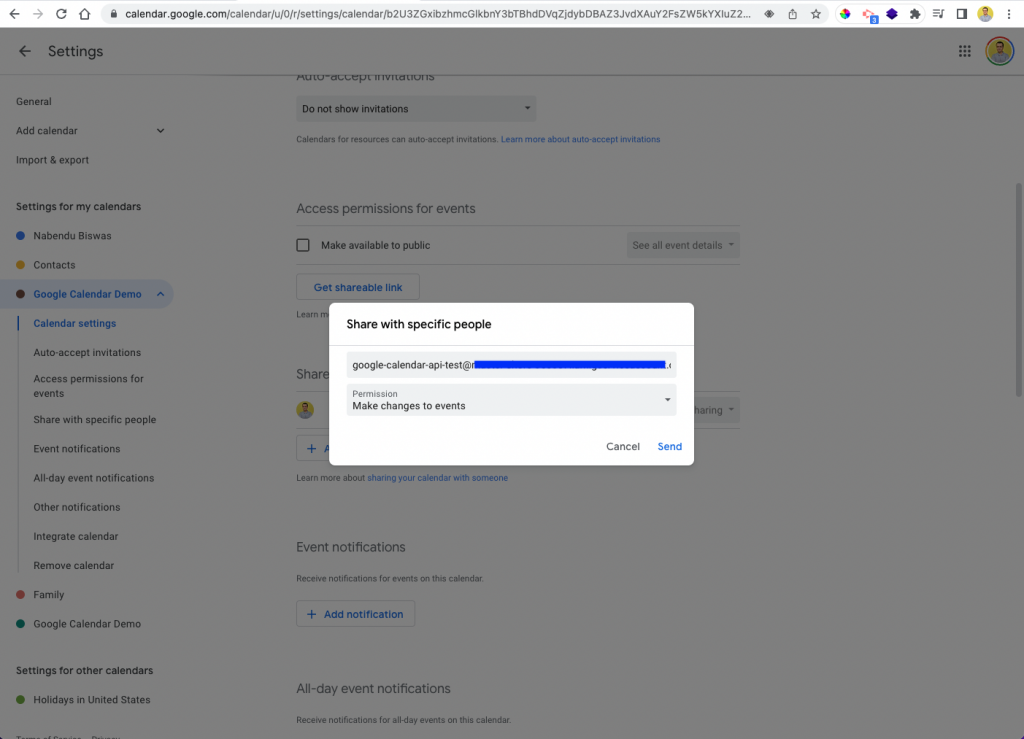
We will get a pop-up after clicking the + Add people button. Here, put the client_email from the above JSON file.
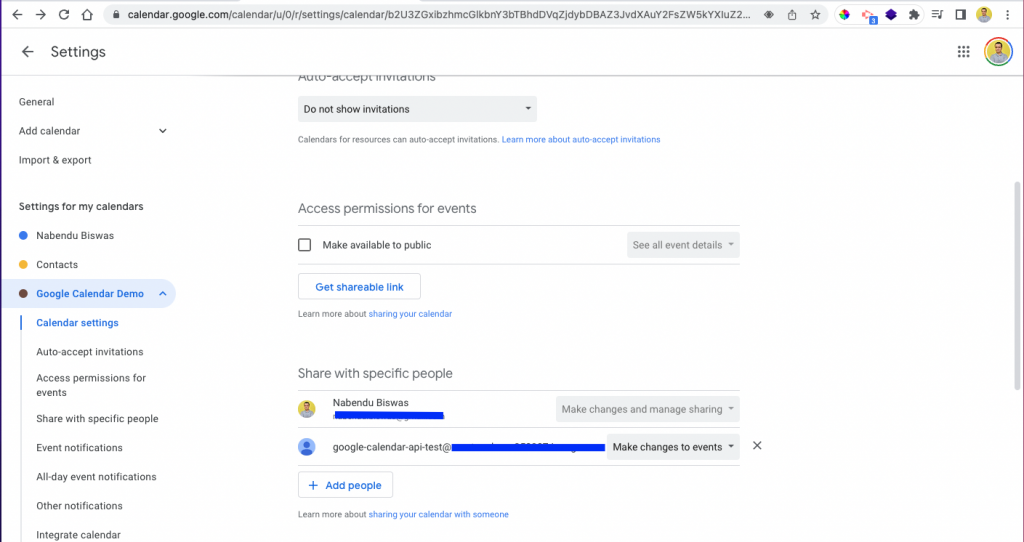
Now the new email will be shown beside our logged-in email.
Node.js Setup
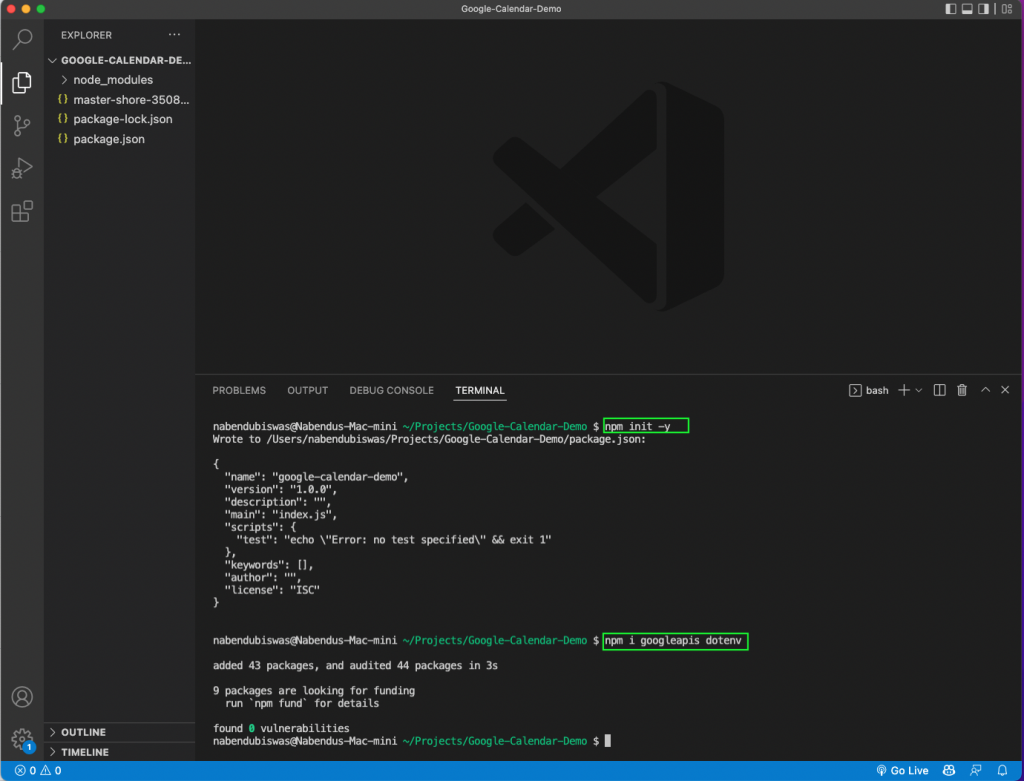
All of our setup is done, and now we will create a folder called "Google-Calendar-Demo." From the integrated terminal, give the command npm init -y to create a Node.js application. Also, install the googleapis and dotenv packages in it.
Google Calendar is one of the most popular calendar apps out there.
We will use the official googleapis package to access the Google Calendar API in our project. For security reasons, to prevent exposing your secrets to the public, it's recommended to load them via environment variables. During development, you can use dotenv package. It will load your Google secrets stored in a .env file.
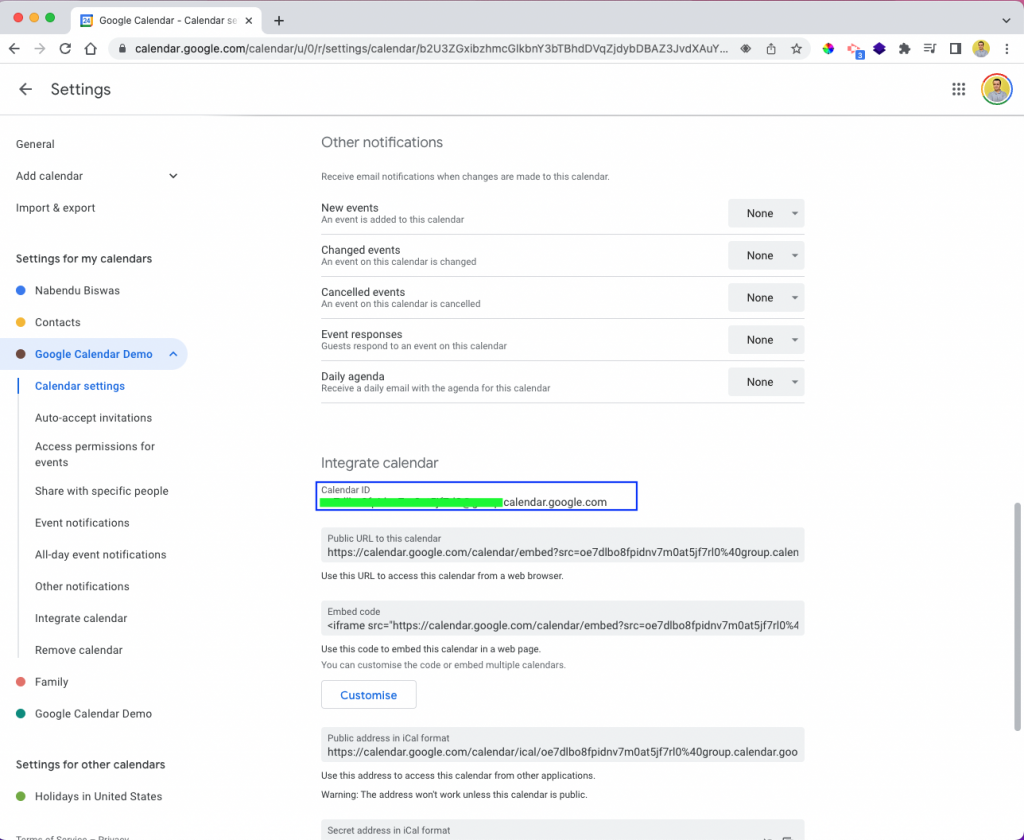
Before creating the .env file, we will also require the calendar ID. We will get this from the calendar settings.
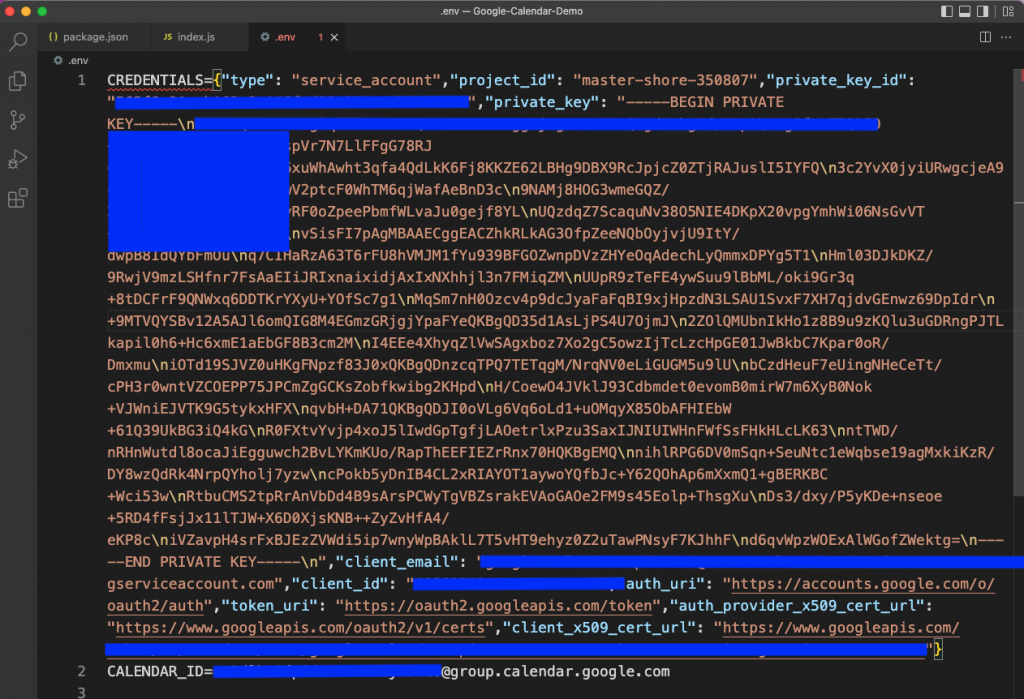
Now create a .env file in the root directory. In the CREDENTIALS variable, put the object from the JSON file. The variable CALENDAR_ID will have the value from the above step.
The Initial Code
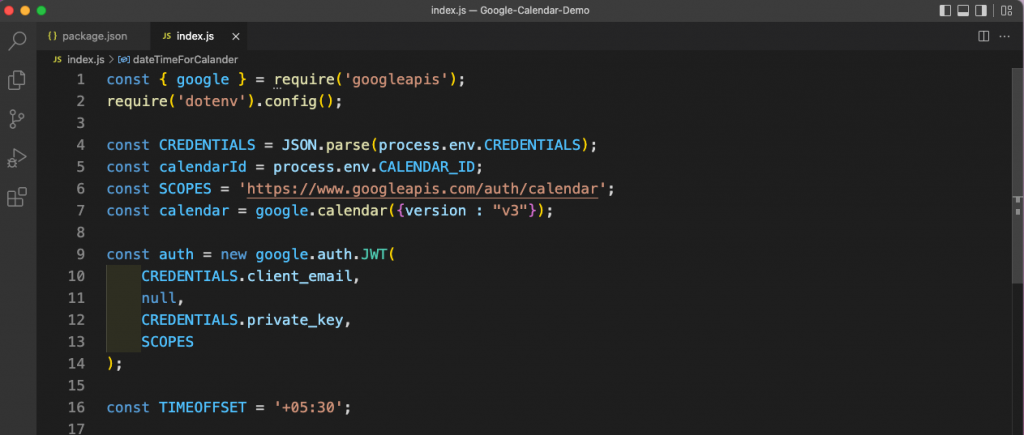
Now create an index.js file in the root directory. Here we will first do the required imports from googleapis and dotenv. After that, we will get CREDENTIALS and calendarId from the .env file.
Next, we are giving the SCOPES, which represent the permissions granted by the user from the OAuth consent screen. In our example, we will be using the scope https://www.googleapis.com/auth/calendar which means the following permissions: See, edit, share, and permanently delete all the calendars you can access using Google Calendar.
In case you need more restrictive scopes, you can check them out here https://developers.google.com/identity/protocols/oauth2/scopes#calendar. In the following line, we are using version three of the calendar.
To authorize, we will pass CREDENTIALS, private_key, and SCOPES to the Google auth function, with JWT.
Lastly, we are creating a TIMEOFFSET variable, which will contain the time offset for your region.
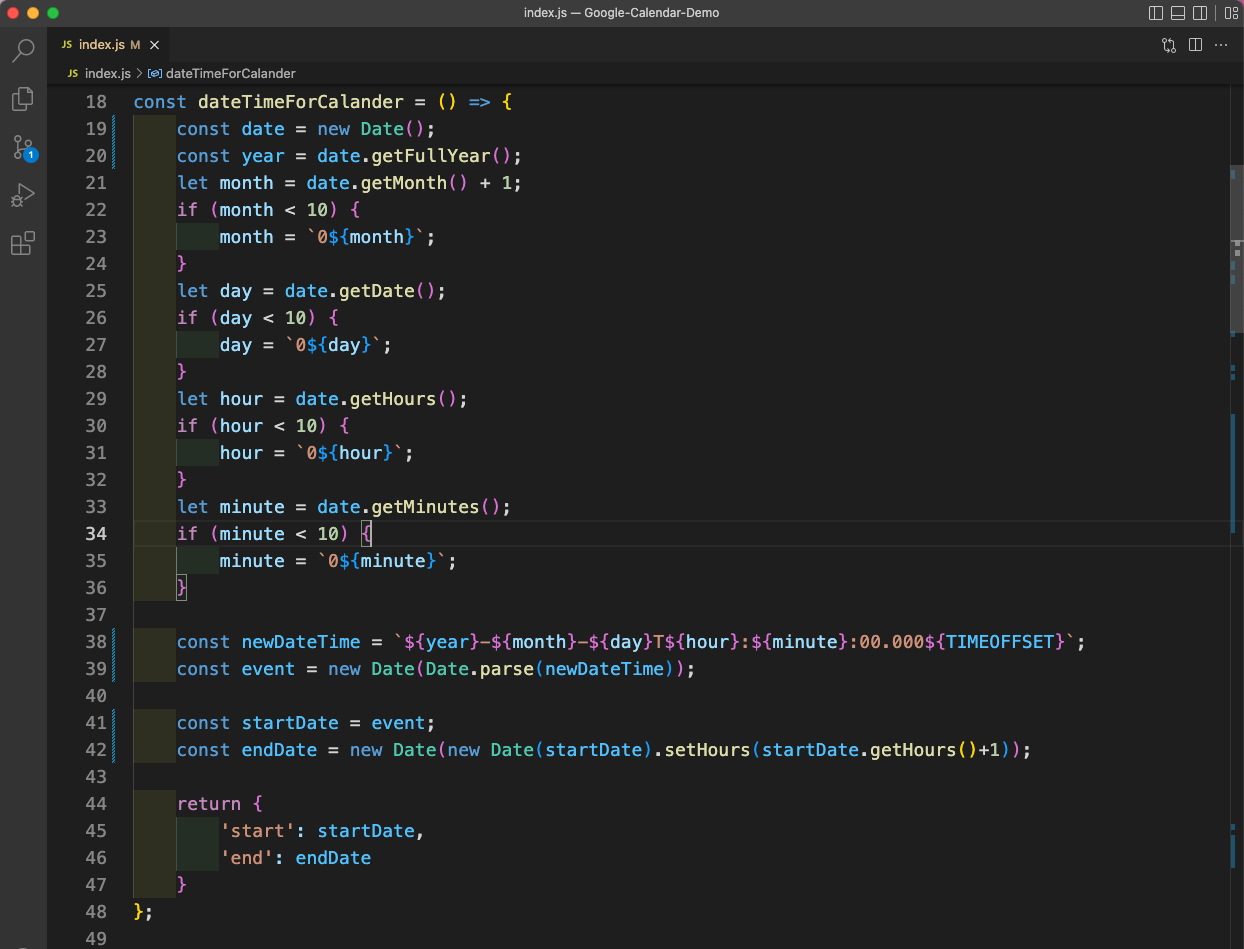
Next, we are creating a function called dateTimeForCalendar. This function converts the date into the format that Google Calendar API needs. We are also creating the startDate and endDate, where the endDate is one second after the startDate.
Insert Event
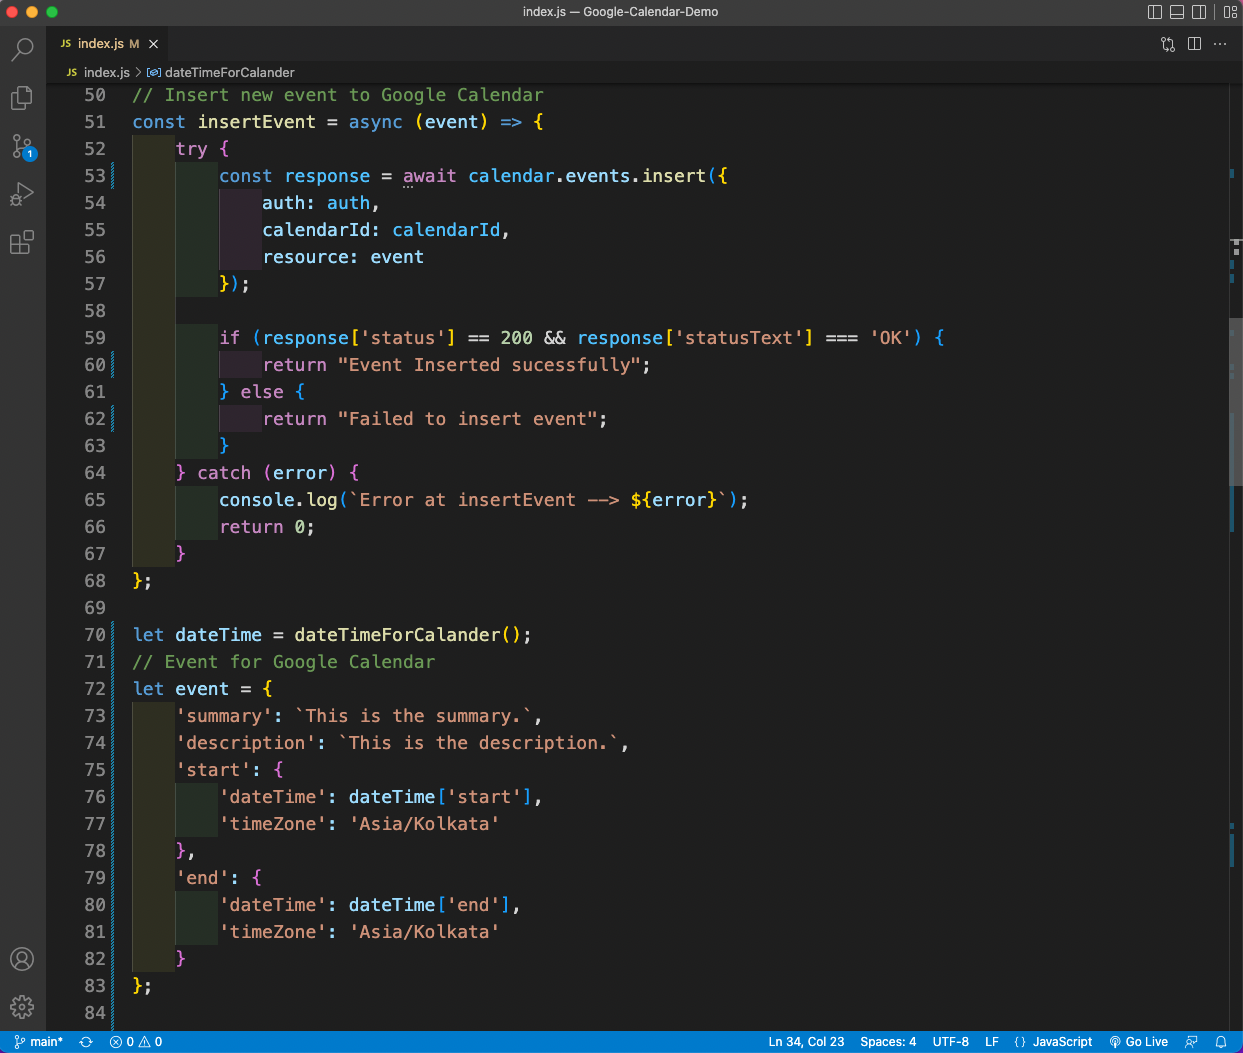
Now we will create a function called insertEvent. This function takes an event and inserts it into the calendar with the calendar.events.insert() function from Google Calendar API.
It takes the auth, calendarId, and the event as parameters. If the event is inserted successfully, we will get a response of "1" back.
After that, we are calling the dateTimeForCalendar function and storing it in a variable called dateTime. Next, we are creating an event object that contains the summary, description, start parameters, and end parameters. In the start and end, we are giving the dateTime variable and getting the start and end time from it. We are also passing the timeZone in it.
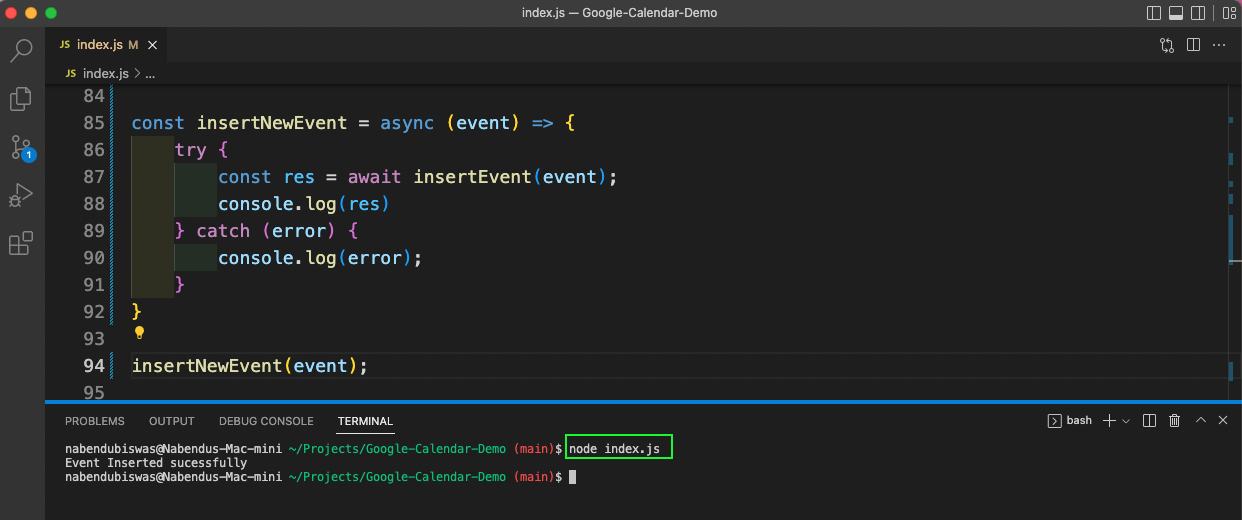
Lastly, we will call the insertEvent function. Here, we are calling it from inside another function insertNewEvent, using async-await. From the integrated terminal, we are running the Node.js code with the node index.js command.
Here we get the success message of "Event Inserted successfully"
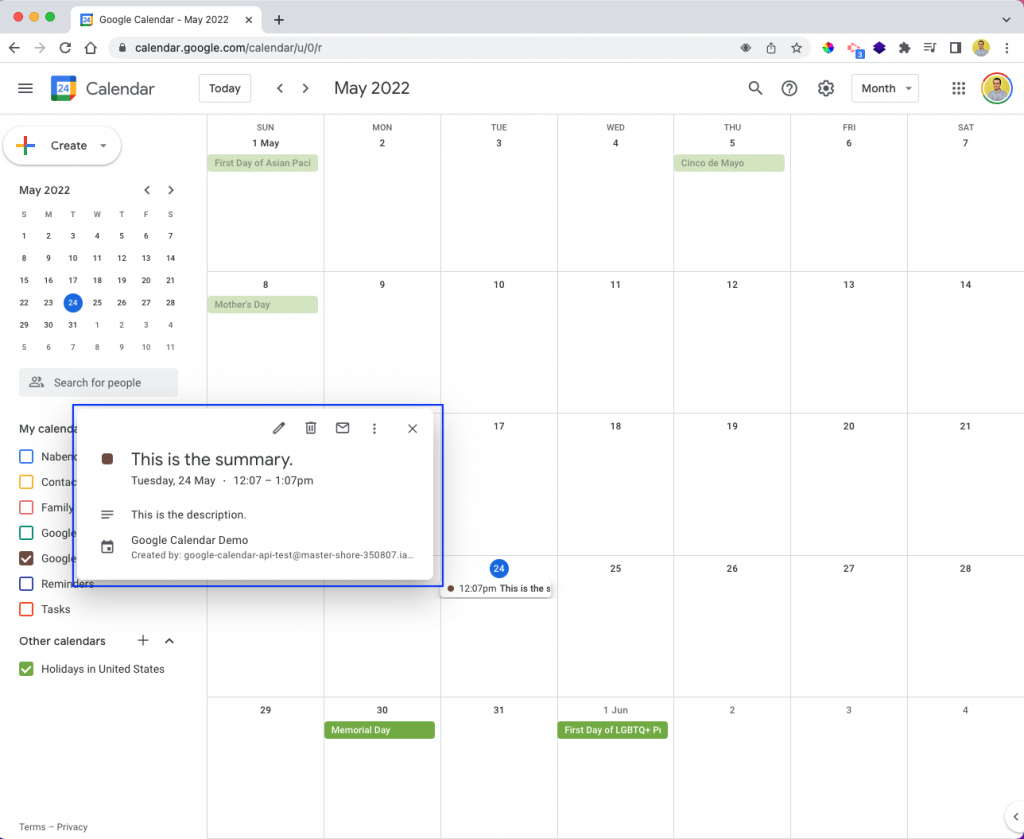
In the Google Calendar, we can now see that our new event has been inserted for the current date.
Get Events
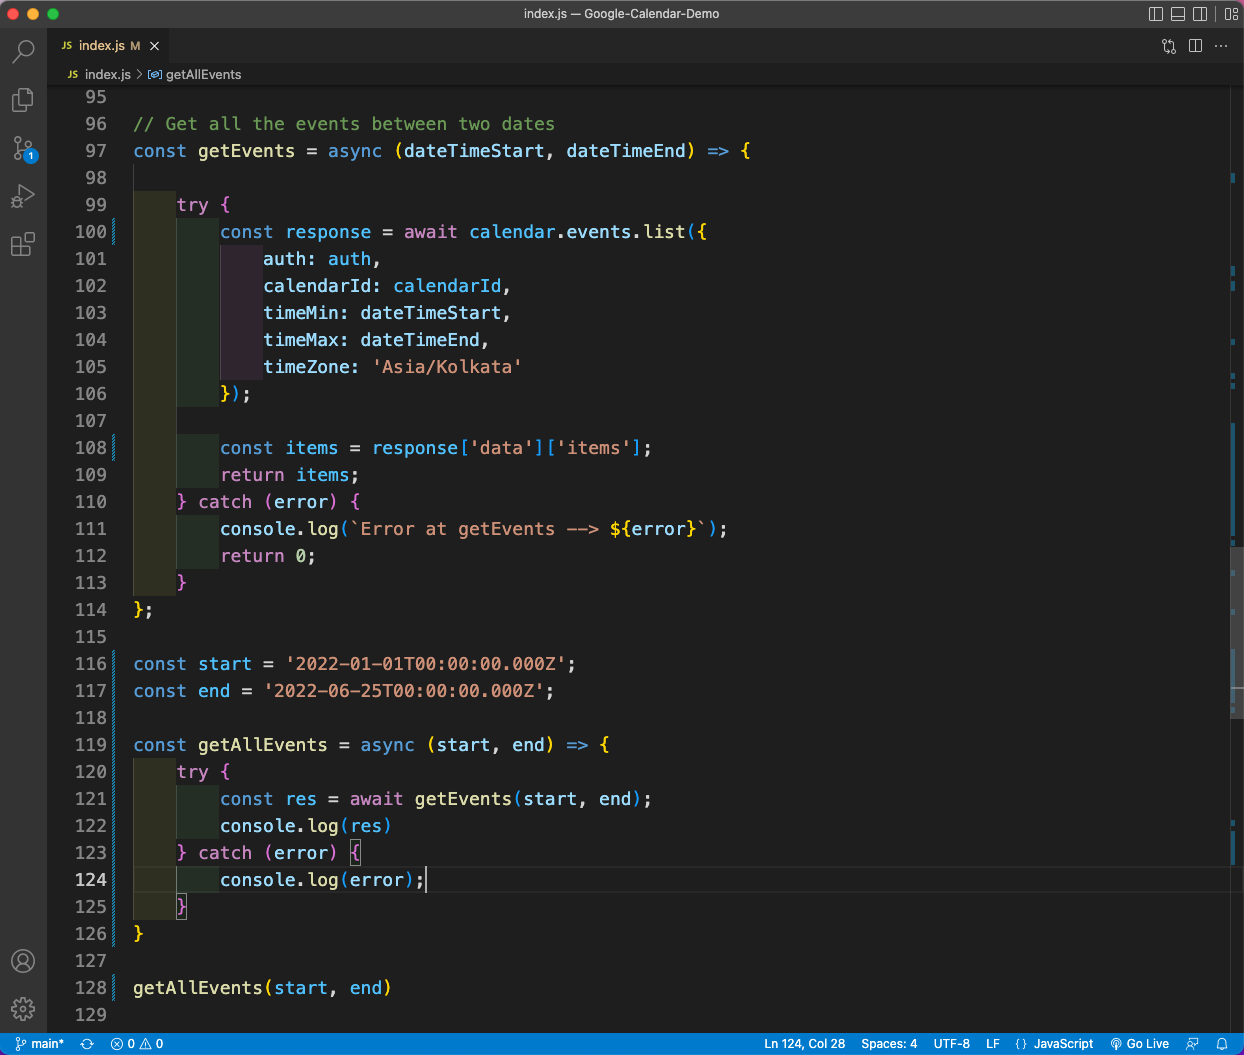
Now we will write the code to get all the events. Here we have a function called getEvents, which is taking two parameters: start time and end time. Next, we are using the calendar.events.list function from the Google Calendar API.
This function takes auth, calendarId, timeMin, timeMax, and timeZone as parameters and returns the items.
Next, we are creating two variables, start and end, and giving them a range. Lastly, we are calling the getEvents function. Here, we are calling it from inside another function getAllEvents, using async-await.
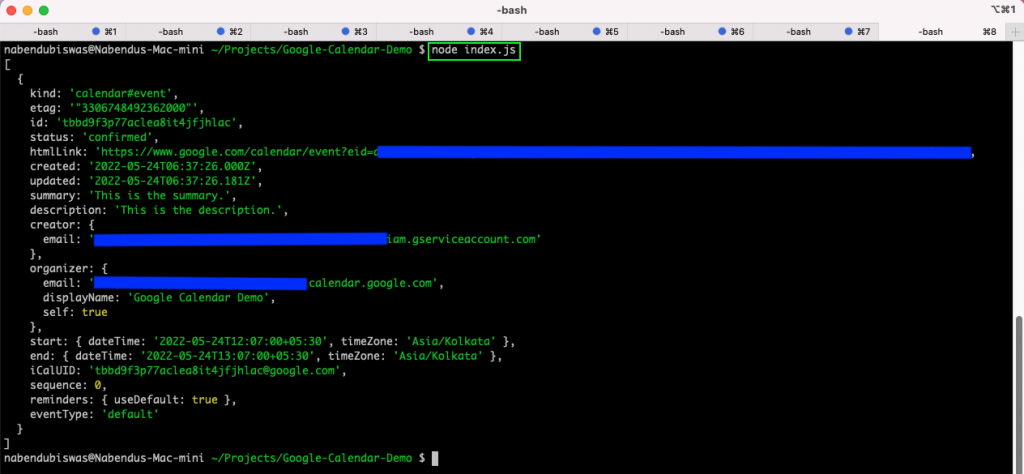
When we run our Node.js code again, we will get the event back in the console.
Delete Event
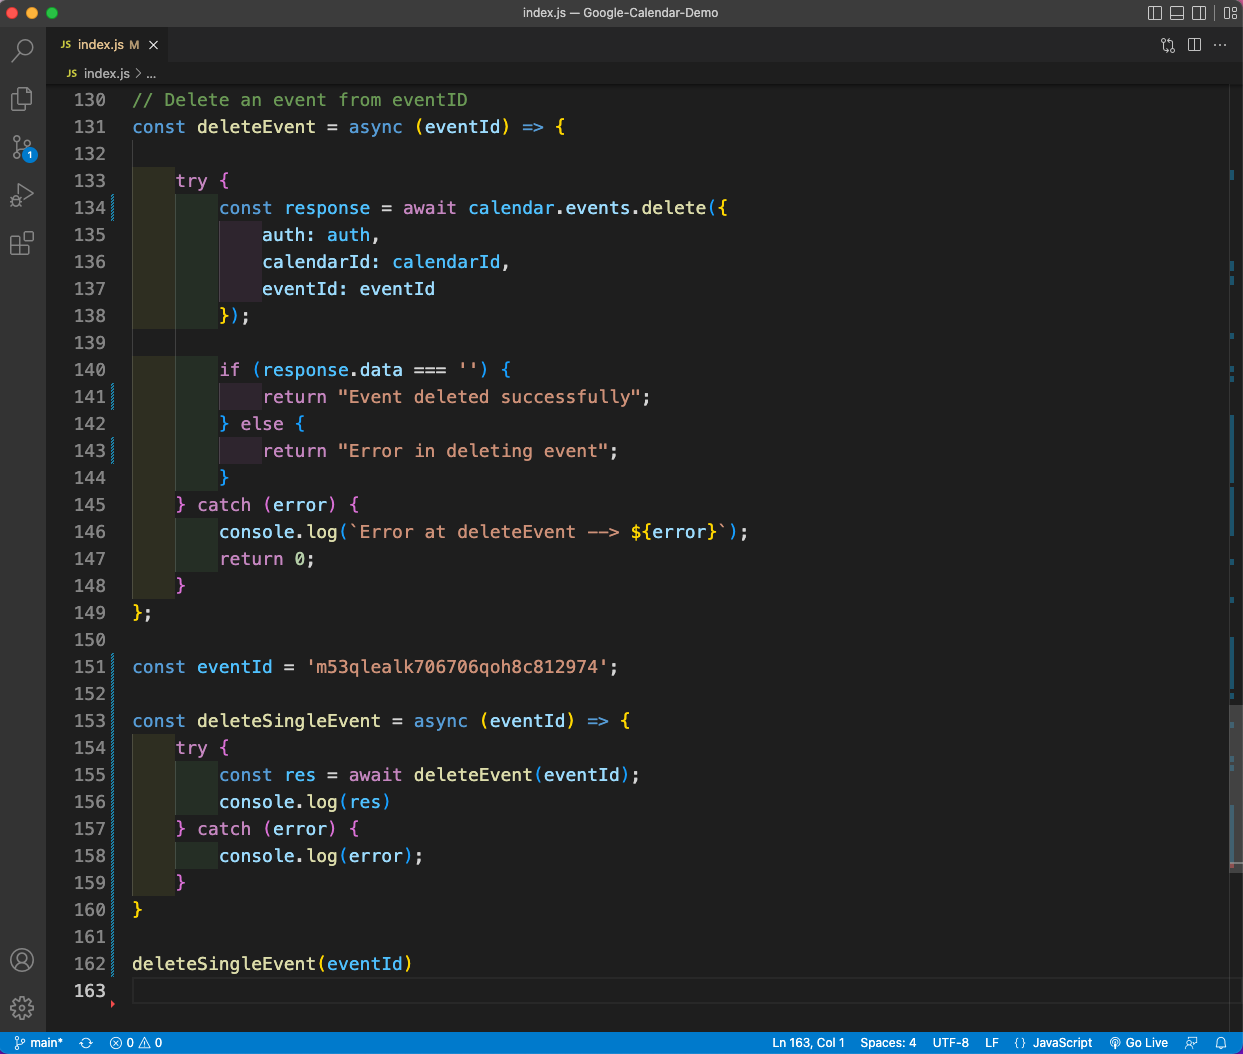
Finally, let's delete an event. To do so, we will create a deleteEvent function, which takes the eventId as the parameter. Next, we are using the calendar.events.delete function from the Google Calendar API.
This function takes auth, calendarId, and eventId as parameters and will return "Event deleted successfully" if the operation is successful. Now we have an eventId variable in which we are passing the event ID, taken from the getEvent output in the previous section.
Lastly, we are calling the deleteEvent function. Here, we are calling it from inside another function deleteSingleEvent, using async-await. \
Now when we run our Node.js code again, we will get "Event deleted successfully" back in the console.

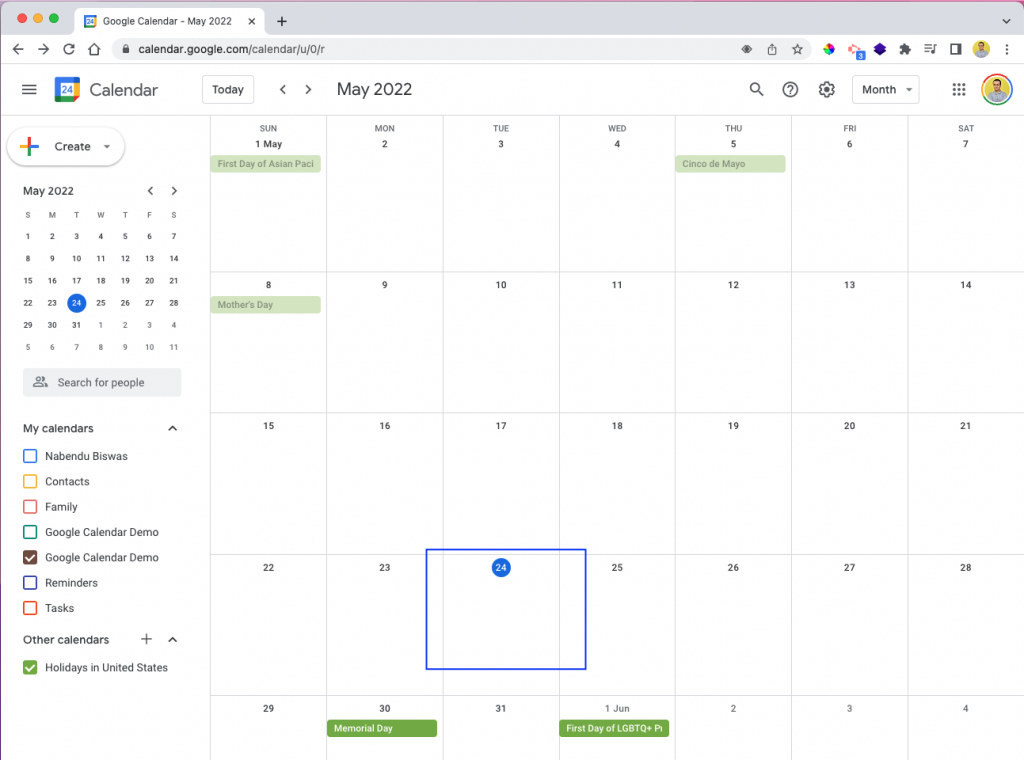
When we check Google Calendar now, the event is deleted.
Conclusion
In this post, we've done a number of things using Google Calendar API. We first set up the API from the Google developer console, showing that the setup is not straightforward and requires a lot of steps. Next, we created and set up a new calendar in Google Calendar, and then we created a simple Node.js application. Here we worked on creating an event, through which we were able to add an event to Google Calendar. We also showed what it looks like to get all the events and delete an event from the Node.js application.
When it comes to working with the Google Calendar API, this is just the beginning. You can also check out Google's reference list of calendar APIs for more information.
This post was written by Nabendu Biswas. Nabendu has been working in the software industry for the past 15 years, starting as a C++ developer, then moving on to databases. For the past six years he’s been working as a web-developer working in the JavaScript ecosystem, and developing web-apps in ReactJS, NodeJS, GraphQL. He loves to blog about what he learns and what he’s up to.
