Discord's REST API, An Introduction With Examples
Discord offers plenty of ways for developers to build and integrate custom services into the platform. For example, Discord allows users to integrate bots into their servers, which can be done using the Discord API.
Does Discord have a REST API? The short answer is "yes." In addition to making bots, the Discord API supports REST. Thanks to the Discord REST API, you can build beyond just bots that run with your Discord server in the app. For example, you can use the Discord REST API to authenticate users with your external web or mobile apps.
In this post, you'll learn how to get started with the Discord REST API and see some examples of practical things you can do using the API.
Before we continue, let's take a closer look at what the REST API and Discord API are.
What Is a REST API?
REST is the acronym for Representational State Transfer, and a REST API or RESTful API is a programmable interface that conforms to the REST architectural style. REST APIs are very common in web applications. For example, the front end of a web app can read data from the back end, or an external service can request data via RESTful APIs.
What Is the Discord API?
The Discord API is a set of tools that enables developers to build bots or extend the functionality of their app using data and services exposed by Discord. In other words, the Discord API provides a programmable interface for developers to interact with Discord. REST is one of the ways your applications can interaction with the Discord API.
With Discord's REST API, it's possible for developers to fetch users' data, like their names and profile photos, by making HTTP calls to a specific endpoint. The developer can then use the data in an external app or in a Discord application.
The Discord API is a set of tools that enables developers to build bots or extend the functionality of their app using data and services exposed by Discord.
How to Set Up the Discord REST API
To further explain Discord's REST API, let's walk through the setup process. In addition, we'll look at some examples of how we can use the API.
Prerequisites
In order to follow along better, you should have the following:
- A Discord server
- Postman
- Basic knowledge of programming and HTTP requests
Step 1: Set Up a New App
Using the Discord API requires a developer profile and a Discord app under the profile. In this step, we'll learn how to set one up. It's free and easy to set up. If you already have an app and wish to use it, you can skip this step.
Also, make sure you create a Discord server to associate with your app.
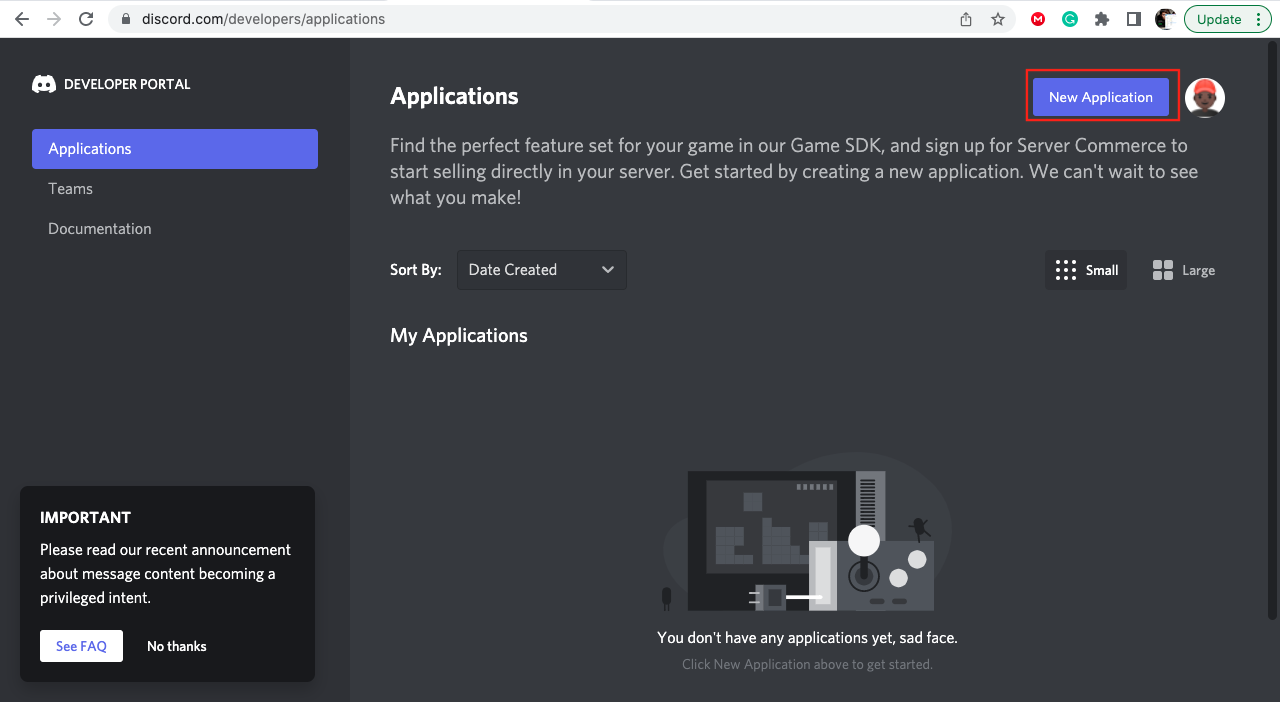
To make a new app, first, visit the Applications page and click on the New Application button.
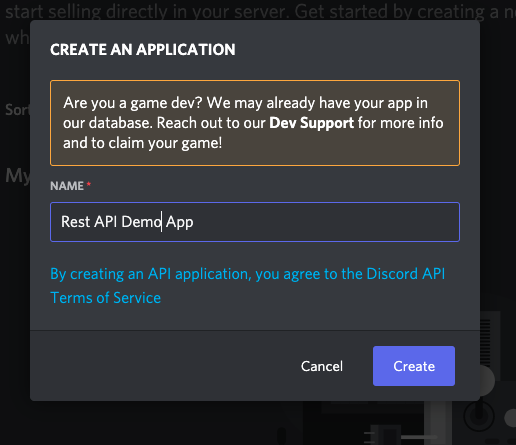
Next, enter your application name on the prompt and click on the Create button to finish creating your app.
Step 2: Set Up API Authentication
For this tutorial, we'll be using OAuth2 to authenticate users on our app. That's to say, we need a way to tell Discord what application is trying to access its services.
In order to do this, we need to retrieve the client ID and client secret for our app. You can find both values on the OAuth2 section of your application's settings page.
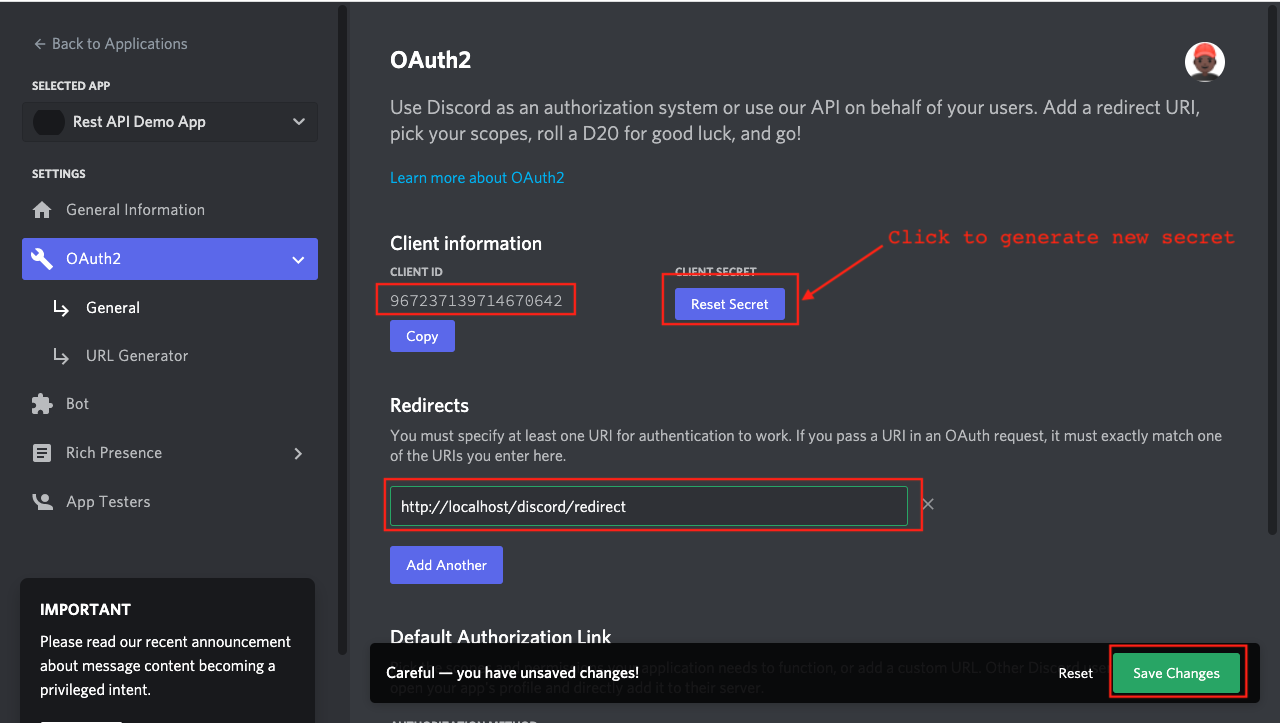
Note: Application ID and client ID have the same value. Also, note down your client secret, as it will only be visible the first time you generate it.
If you forget to copy the client secret, you’ll need to regenerate a new key by clicking the Rest Secret button. Resetting the client secret will render any old authorization code invalid and cause the OAuth token call to throw a 400 error. In order to prevent this error, always copy the client secret before proceeding.
Next, enter a redirect URL, as Discord requires at least one redirect URL in order for authentication to work. The value you enter here should be a link to some page you control. You can use http://localhost/discord/redirect for our example. In our next step, you'll see how the redirect URL actually works. Once you're done, click on the Save Changes button.
Step 3: Generate an App Authorization (Invite) Link
Before we can send requests to the Discord API on behalf of a user, the user must first authorize our app. Because of this, we need a way for them to accept or decline access. To make this process easy, Discord has an invite URL generator tool built into the application's settings page.
To generate an invite link, navigate to the URL Generator tab under the OAuth2 section. Once you're on the page, select the scopes that are relevant for your application, and the tool will generate the appropriate invite link for that scope. Scopes determine what your application can and can not do on behalf of a user.
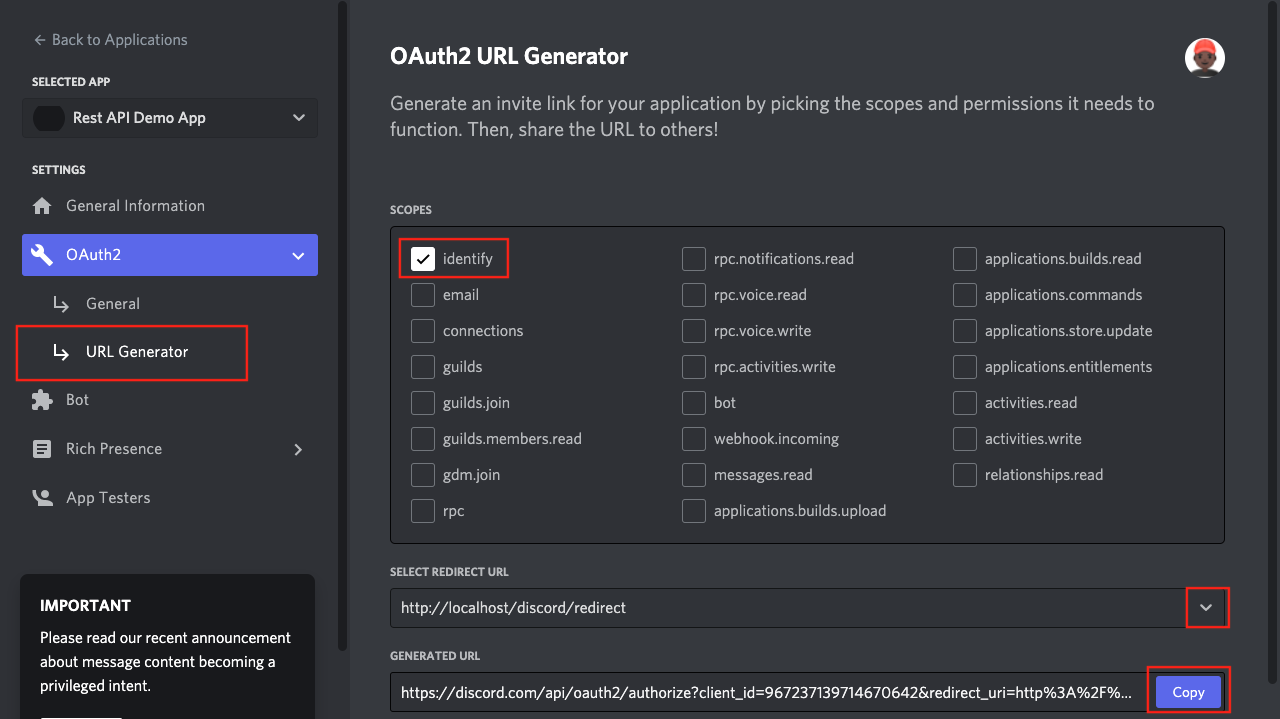
Finally, to test that everything works, copy the generated URL and open it in a browser. You should get a page that looks like this:
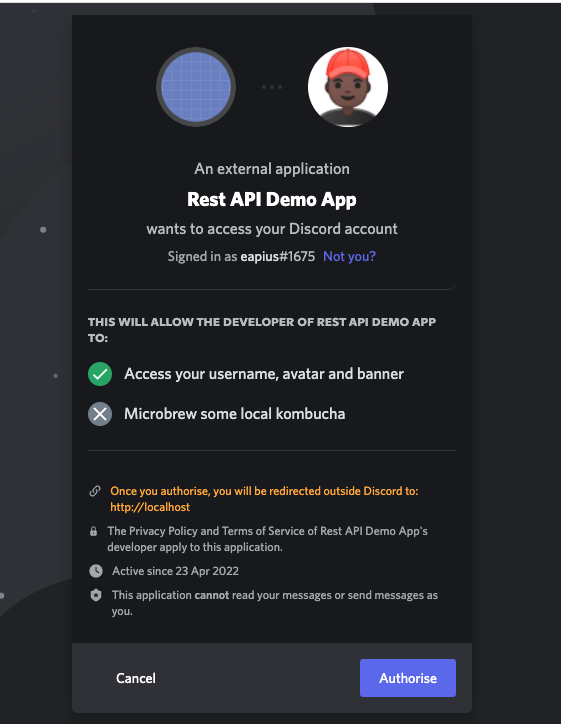
Clicking on Authorize from the above page should redirect the user to the redirect URL we specified in the previous step. However, there will be some additional query strings in the URL. If the authorization was successful, the URL should look link this:
http://localhost/discord/redirect?code=y3pnUdjLc0jWebnyK0zwwbbRaaiXki
Note down the value for the code parameter, which is y3pnUdjLc0jWebnyK0zwwbbRaaiXki for the above example. Also, note that this value will be unique for each session. In the next step, we'll use the code to retrieve the user authorization token.
Step 4: Request an Authorization Token for the User
The Discord API endpoints we'll be using in our examples require authorization from the user. Hence, we need a way to tell Discord that we actually have the right to make requests on behalf of the user. We can do this by using a bearer authorization header in our HTTP request. However, we need a way to retrieve the bearer token first.
In order to get the authorization token, we need to swap the value for the code parameter we retrieved from the user when they accepted our application invite in the previous step. To do that, make an HTTP request to the following endpoint:
https://discord.com/api/oauth2/token
For this tutorial, we'll be using Postman to make all requests. Below is the configuration for the request:
Request type: POST, Content-type: x-www-form-urlencoded Body:
- client_id: "YOUR APP ID"
- client_secret: "YOUR CLIENT SECRET"
- grant_type: "authorization_code"
- code: "CODE FROM USER ACCEPTING INVITE"
redirect_uri: "<http://localhost/discord/redirect>"If the request is successful, you should get a response that looks like this:
{
    "access_token": "z4HhmDy5ghijpIRL1YFzhCeVFabcdef",
    "expires_in": 604800,
    "refresh_token": "5luvWWWACKJmsQS3HJUcYew5oxyzk",
    "scope": "identify",
    "token_type": "Bearer"
}
We'll use the value for access_token in our next requests.
For reference, below is a screenshot of the request in Postman:
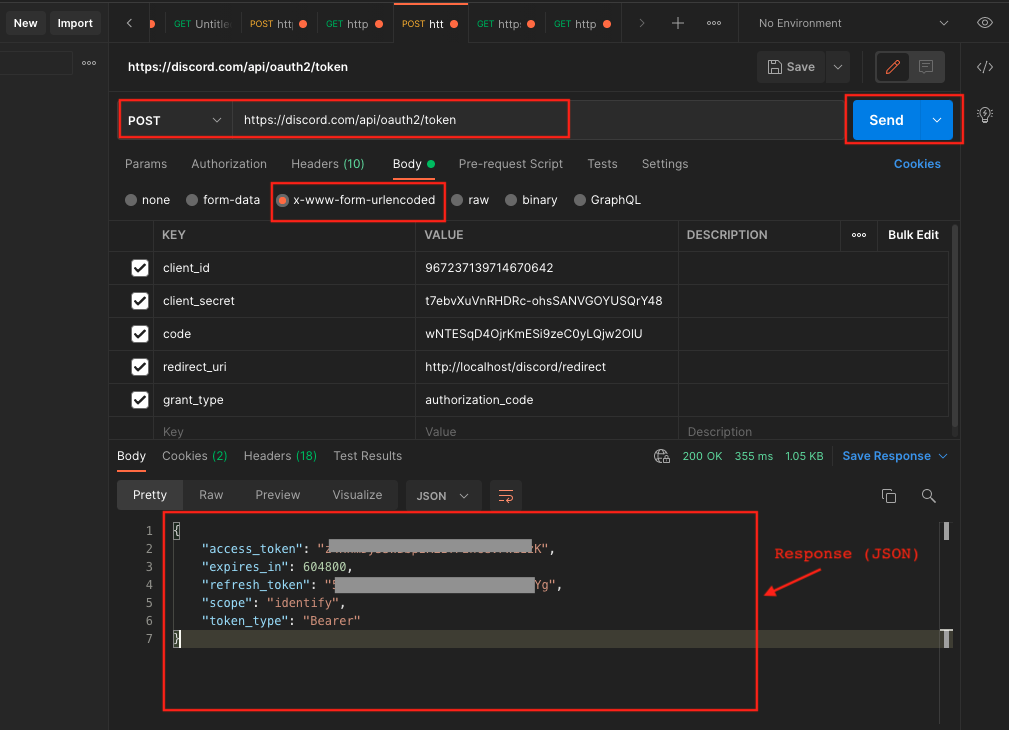
In the next section, we'll take a look at two practical examples of making requests to the Discord REST API for data. But before that, let's briefly discuss the relationship between scopes and endpoints in the Discord REST API.
In order to get the authorization token, we need to swap the value for the code parameter we retrieve from the user when they accepted our application invite in the previous step.
Scopes and Endpoints
The scopes you select while setting up your invite URL affect what endpoint you can access. For example, the identity scope gives access to endpoints like /users/@me. It's important to note this, as the API may return an unauthorized error message when you work outside your scope. If you experience an authorization issue, check your scope to see if you've it set correctly.
Example1: Read User Profile
So, let's try to retrieve a user's profile using the authorization token we acquired in the last step. Open Postman and start a new request with the following configurations:
Endpoint: https://discord.com/api/users/@me
Request type: GET
Header:
- Authorization: "Bearer [PLACE VALUE FOR access_token HERE]" Once you're done, hit Send and you should get the following response:
{
    "id": "669871802121453571",
    "username": "eapius",
    "avatar": "92e924c603fff46aa36b69a60578559c",
    "avatar_decoration": null,
    "discriminator": "1675",
    "public_flags": 0,
    "flags": 0,
    "banner": null,
    "banner_color": null,
    "accent_color": null,
    "locale": "en-GB",
    "mfa_enabled": false
}
For reference, here's a screenshot of the above request in Postman:
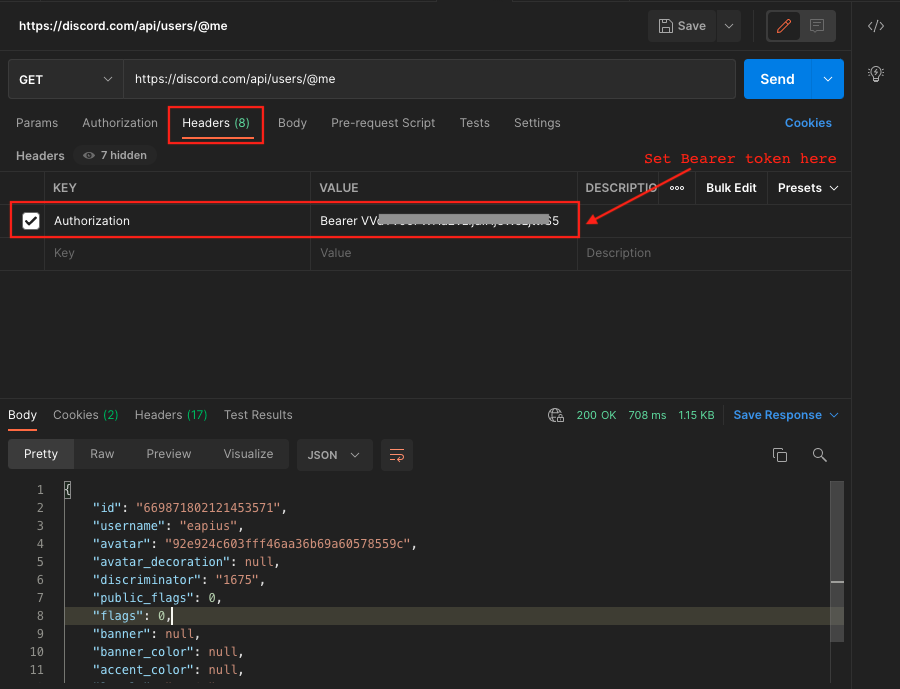
Example 2: Get Users' Connections
Connections in Discord refer to external services that you link your Discord account to. For example, you can link your account to your Facebook, Twitter, Playstation, and Xbox profiles.
In this example, we'll be making requests to the connections endpoint. This endpoint should return JSON data with all connections active for a user. Otherwise, it will return an empty array if the user has no active connections.
Note: This endpoint requires the connection scope. You can enable the scope in step 3 above.
The configuration to use in Postman for this request is shown below:
Endpoint: https://discord.com/api/users/@me/connections
Request type: GET
Header:
- Authorization: "Bearer [PLACE VALUE FOR access_token HERE]"
After setting up the request in Postman, hit Send. If the current user has active connections, you should get a response similar to the JSON data below:
[
    {
        "type": "twitter",
        "id": "723565394",
        "name": "ea_pius",
        "visibility": 1,
        "friend_sync": false,
        "show_activity": true,
        "verified": true
    }
]
Conclusion
In this post, you've learned what the Discord API is, how to set it up, and the steps for making requests to its endpoints. The next thing I recommend is figuring out how to parse the response data in your preferred programming language. That will help you take the example usage above and turn it into a practical application that you can use to enhance your Discord usage.
You can do many useful things by parsing the data from the Discord REST API. For example, you can parse the value for the /users/@me endpoint to display a user's Discord profile photo in your custom web or mobile app. Similarly, you can parse the JSON response for the /users/@me/connections endpoint to show a user's ID on external services like Facebook and Twitter.
This post was written by Pius Aboyi. Pius is a mobile and web developer with over 4 years of experience building for the Android platform. He writes code in Java, Kotlin, and PHP. He loves writing about tech and creating how-to tutorials for developers.
