Quickly and Easily Authenticate Users With LinkedIn OAuth
When was the last time you signed up to a website by entering your email and password? OAuth and social login have simplified the monotonous and traditional sign-up and log-in method. Your users can click a button and authenticate to your site using their LinkedIn accounts. Further, OAuth allows you to easily communicate with other apps. For instance, you can post on LinkedIn on behalf of the user or populate their job application with the data from their LinkedIn profile.
But how do you integrate LinkedIn OAuth into your app? What are the steps you should follow? How do you get LinkedIn OAuth credentials? Is LinkedIn API free to use for adding OAuth to your app?
In this post, I'll answer all these questions for you. I'll also show you how to quickly and easily authenticate users with LinkedIn OAuth in a Node.js application.
LinkedIn OAuth
OAuth, or open authorization, is a protocol that allows your app to access the features of a social provider. This also includes allowing users to authenticate using the provider. This is possible by tapping into a set of APIs provided by LinkedIn. Luckily, LinkedIn APIs are free to use and get started with.
So now, let's first understand what APIs we need to use and how we can get LinkedIn OAuth credentials.
Create a LinkedIn Developer App
To use any LinkedIn APIs, head over to LinkedIn's developer page. Then, click on Create app:
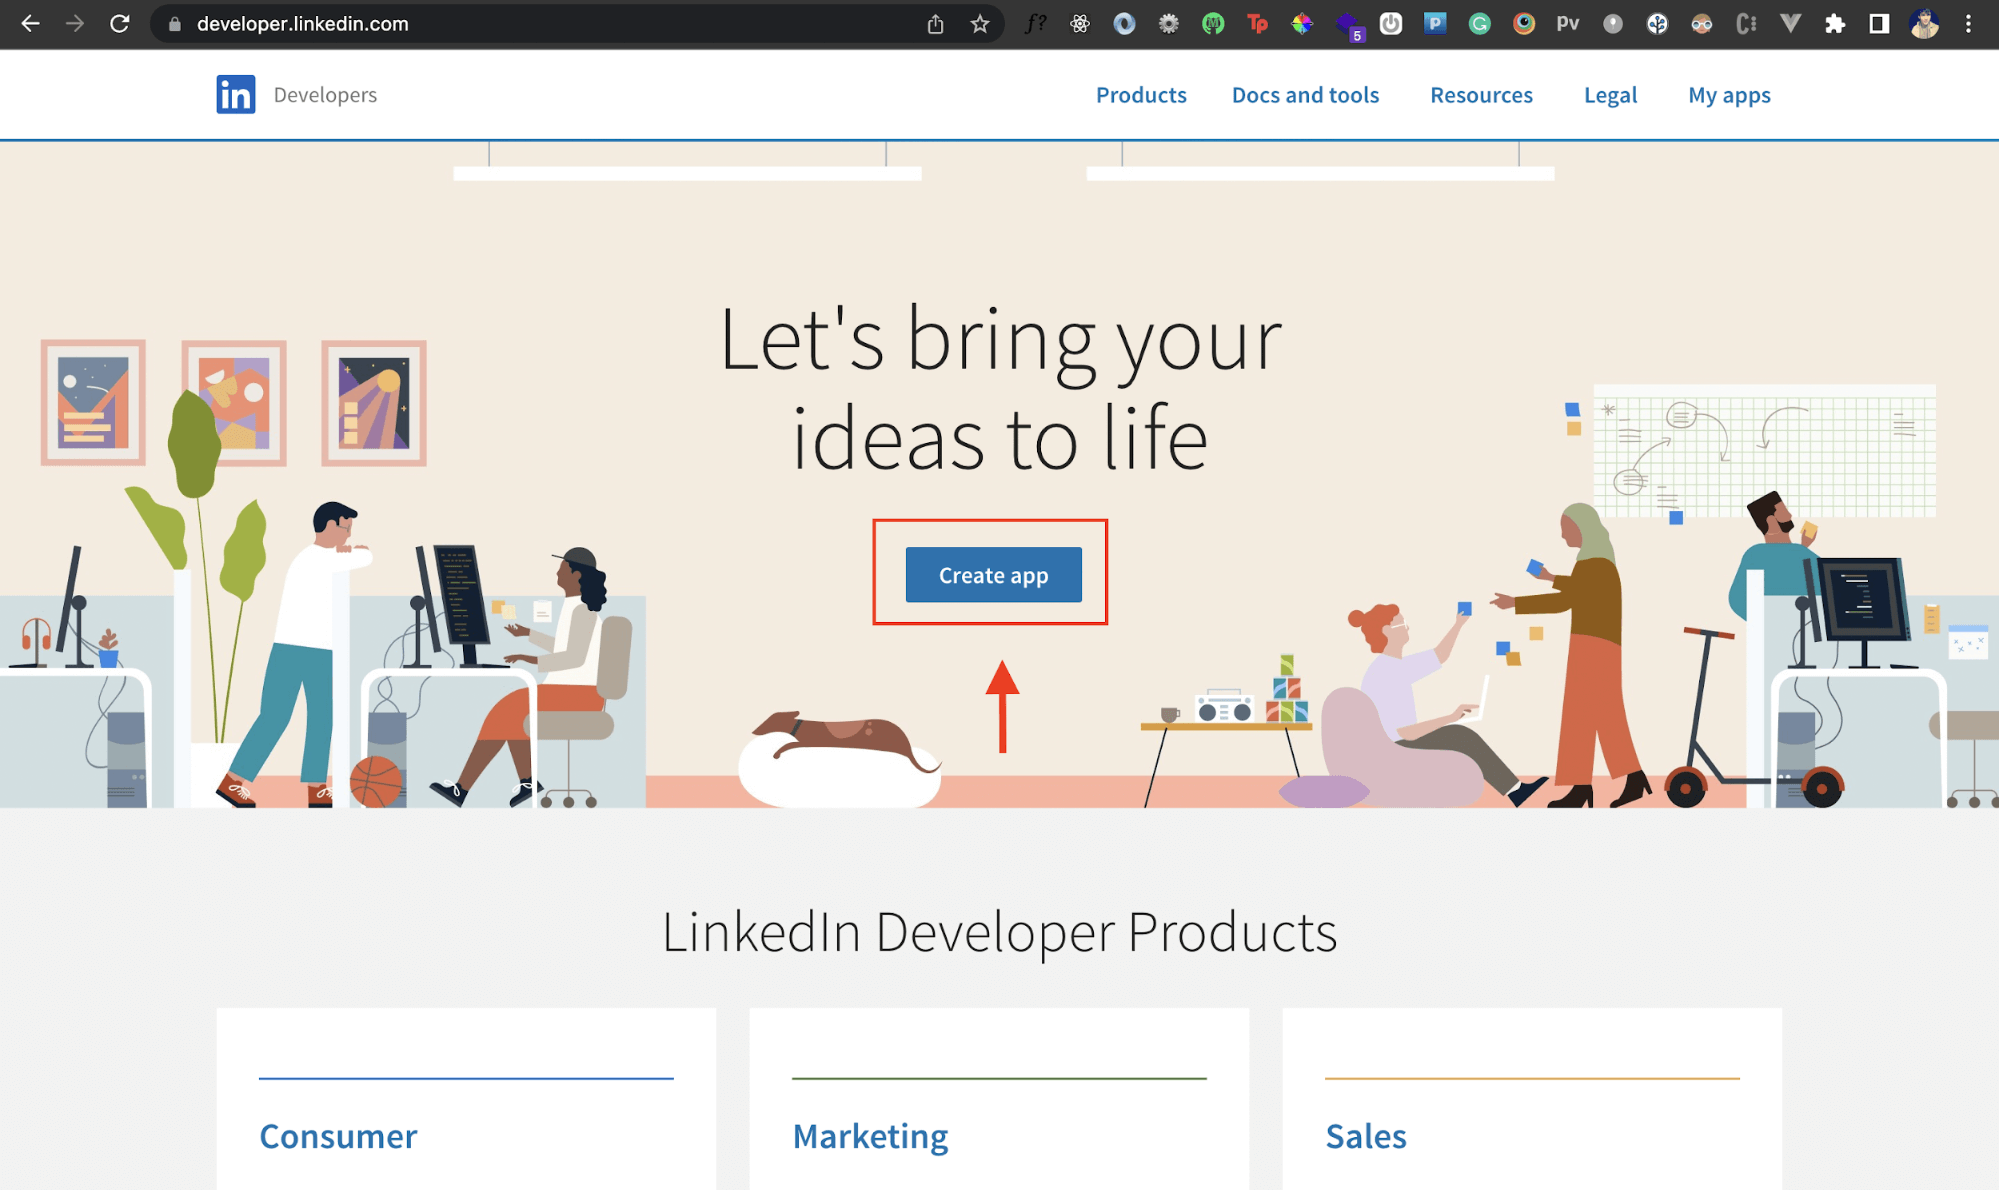
You should land on a page where you'll be asked to enter some information about the app:
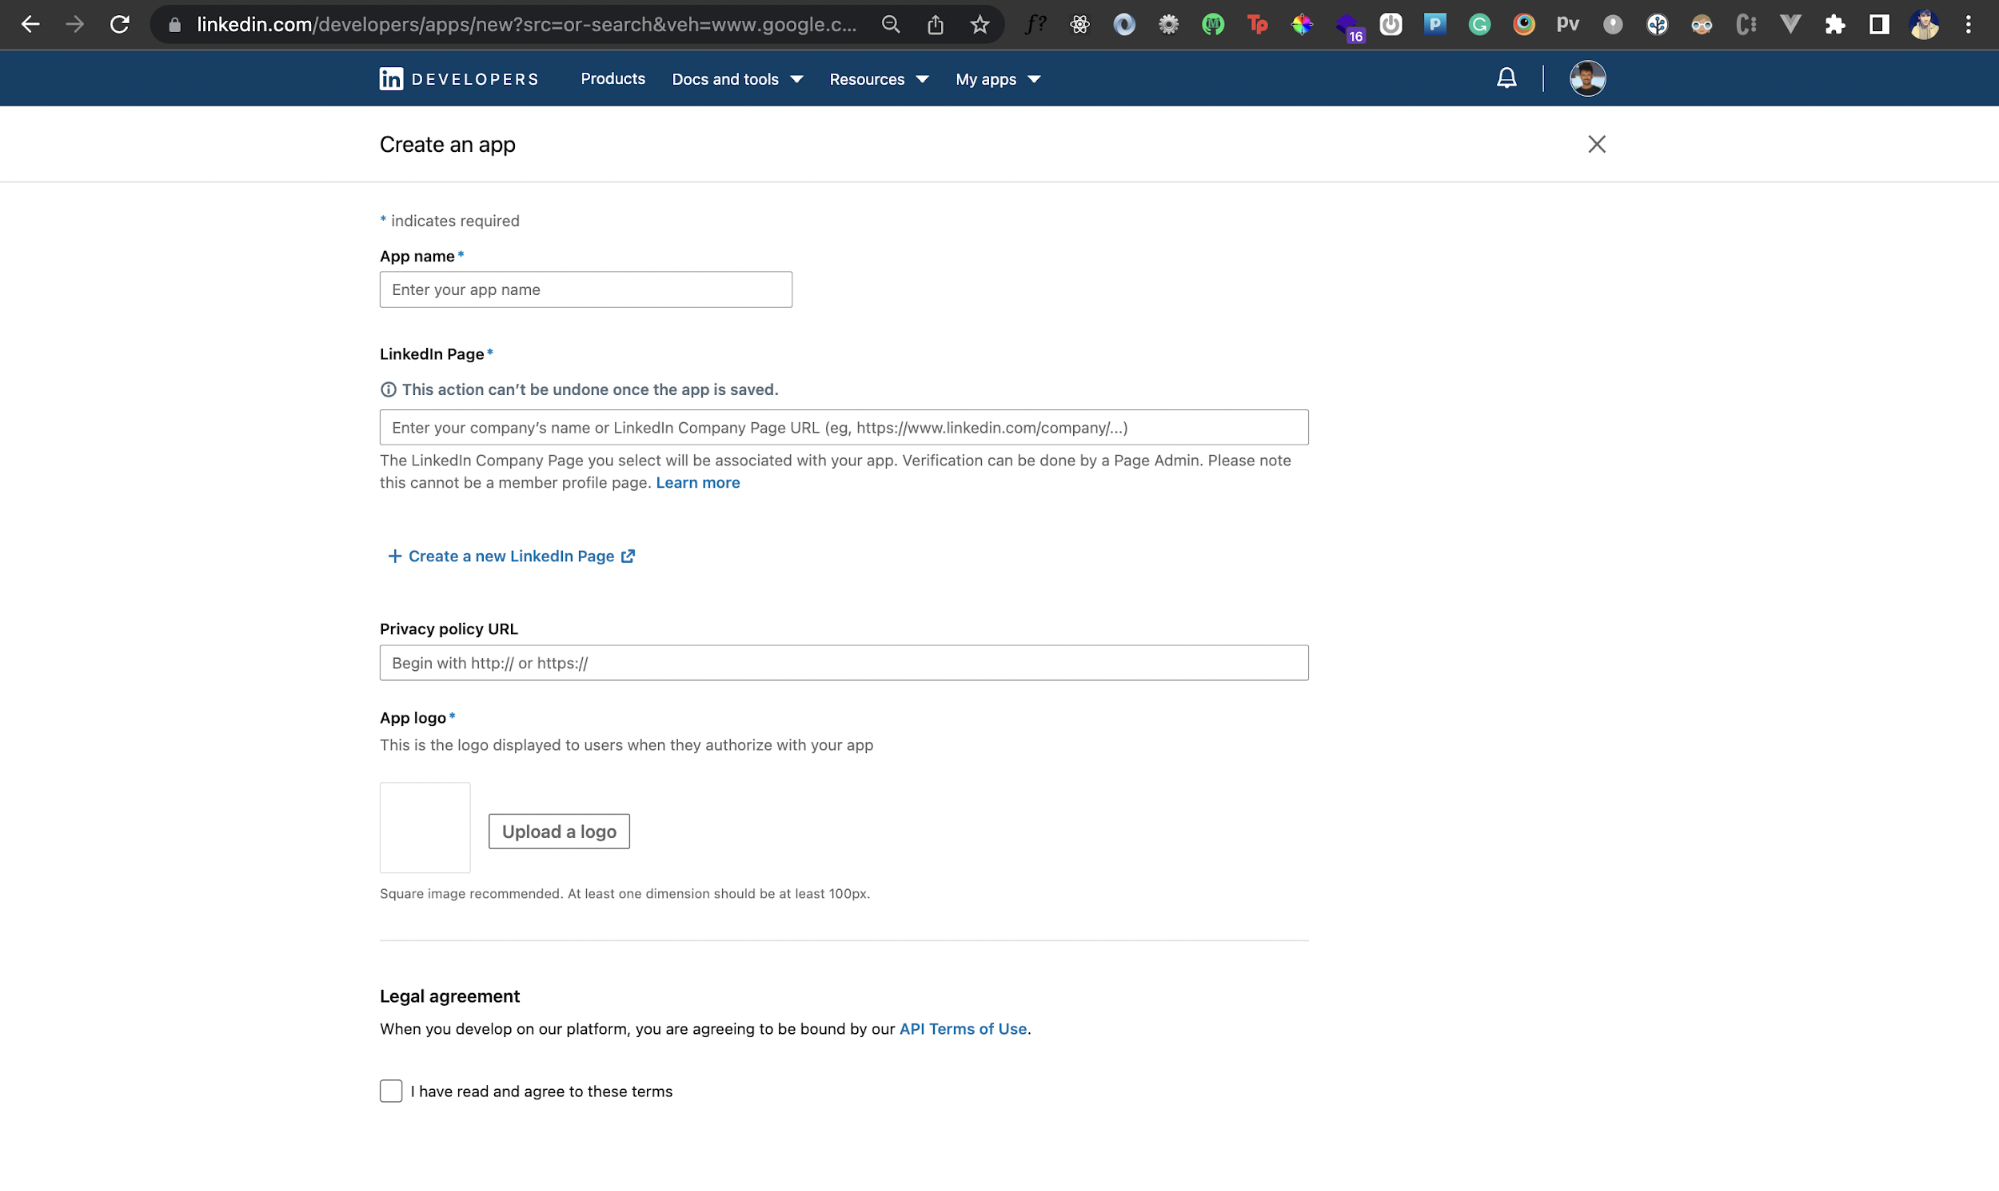
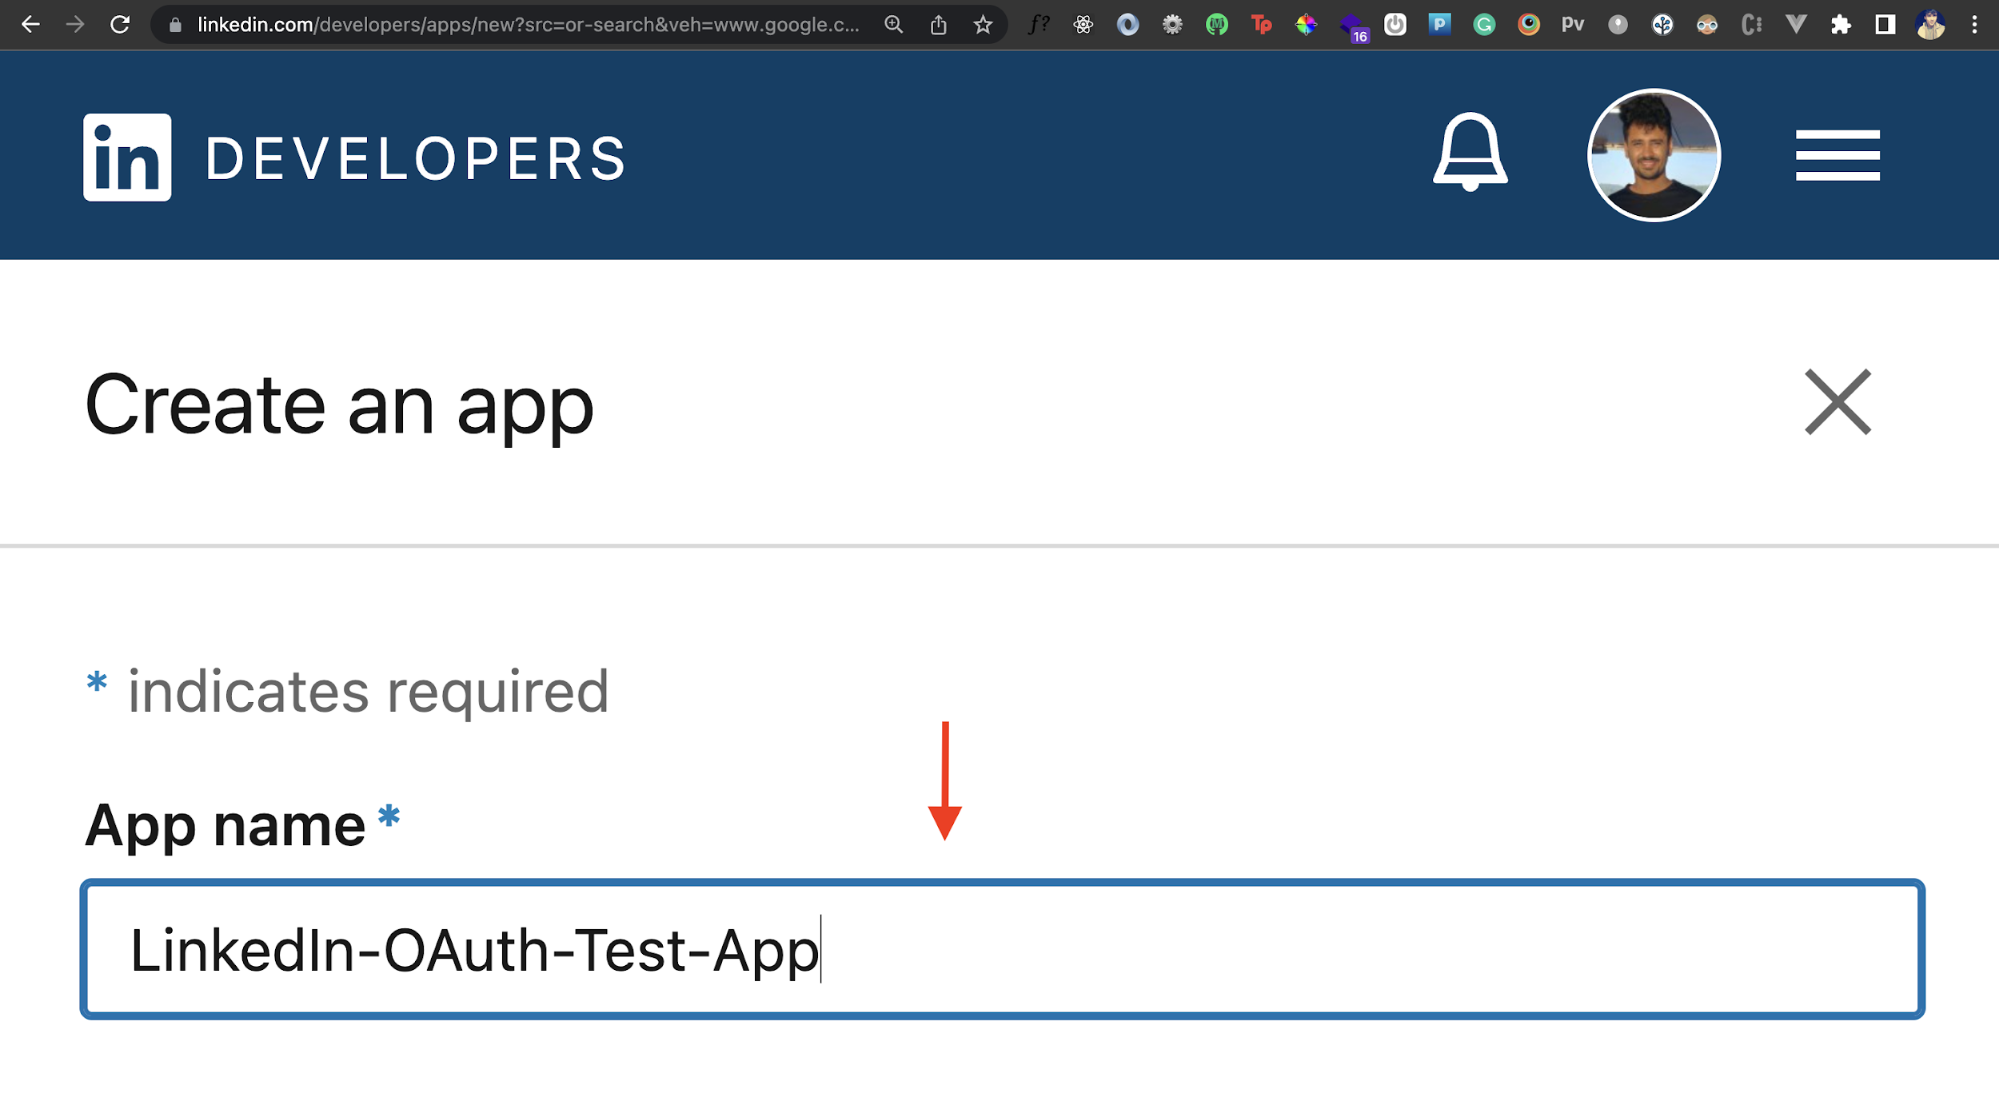
Enter the name you want to give your app.
Next, you'll need to create a new LinkedIn page for your app. Without this, you can't complete the app creation process. You can use an existing LinkedIn page of your company or brand as well. However, if you don't have one, you can create a simple dummy LinkedIn page for now:
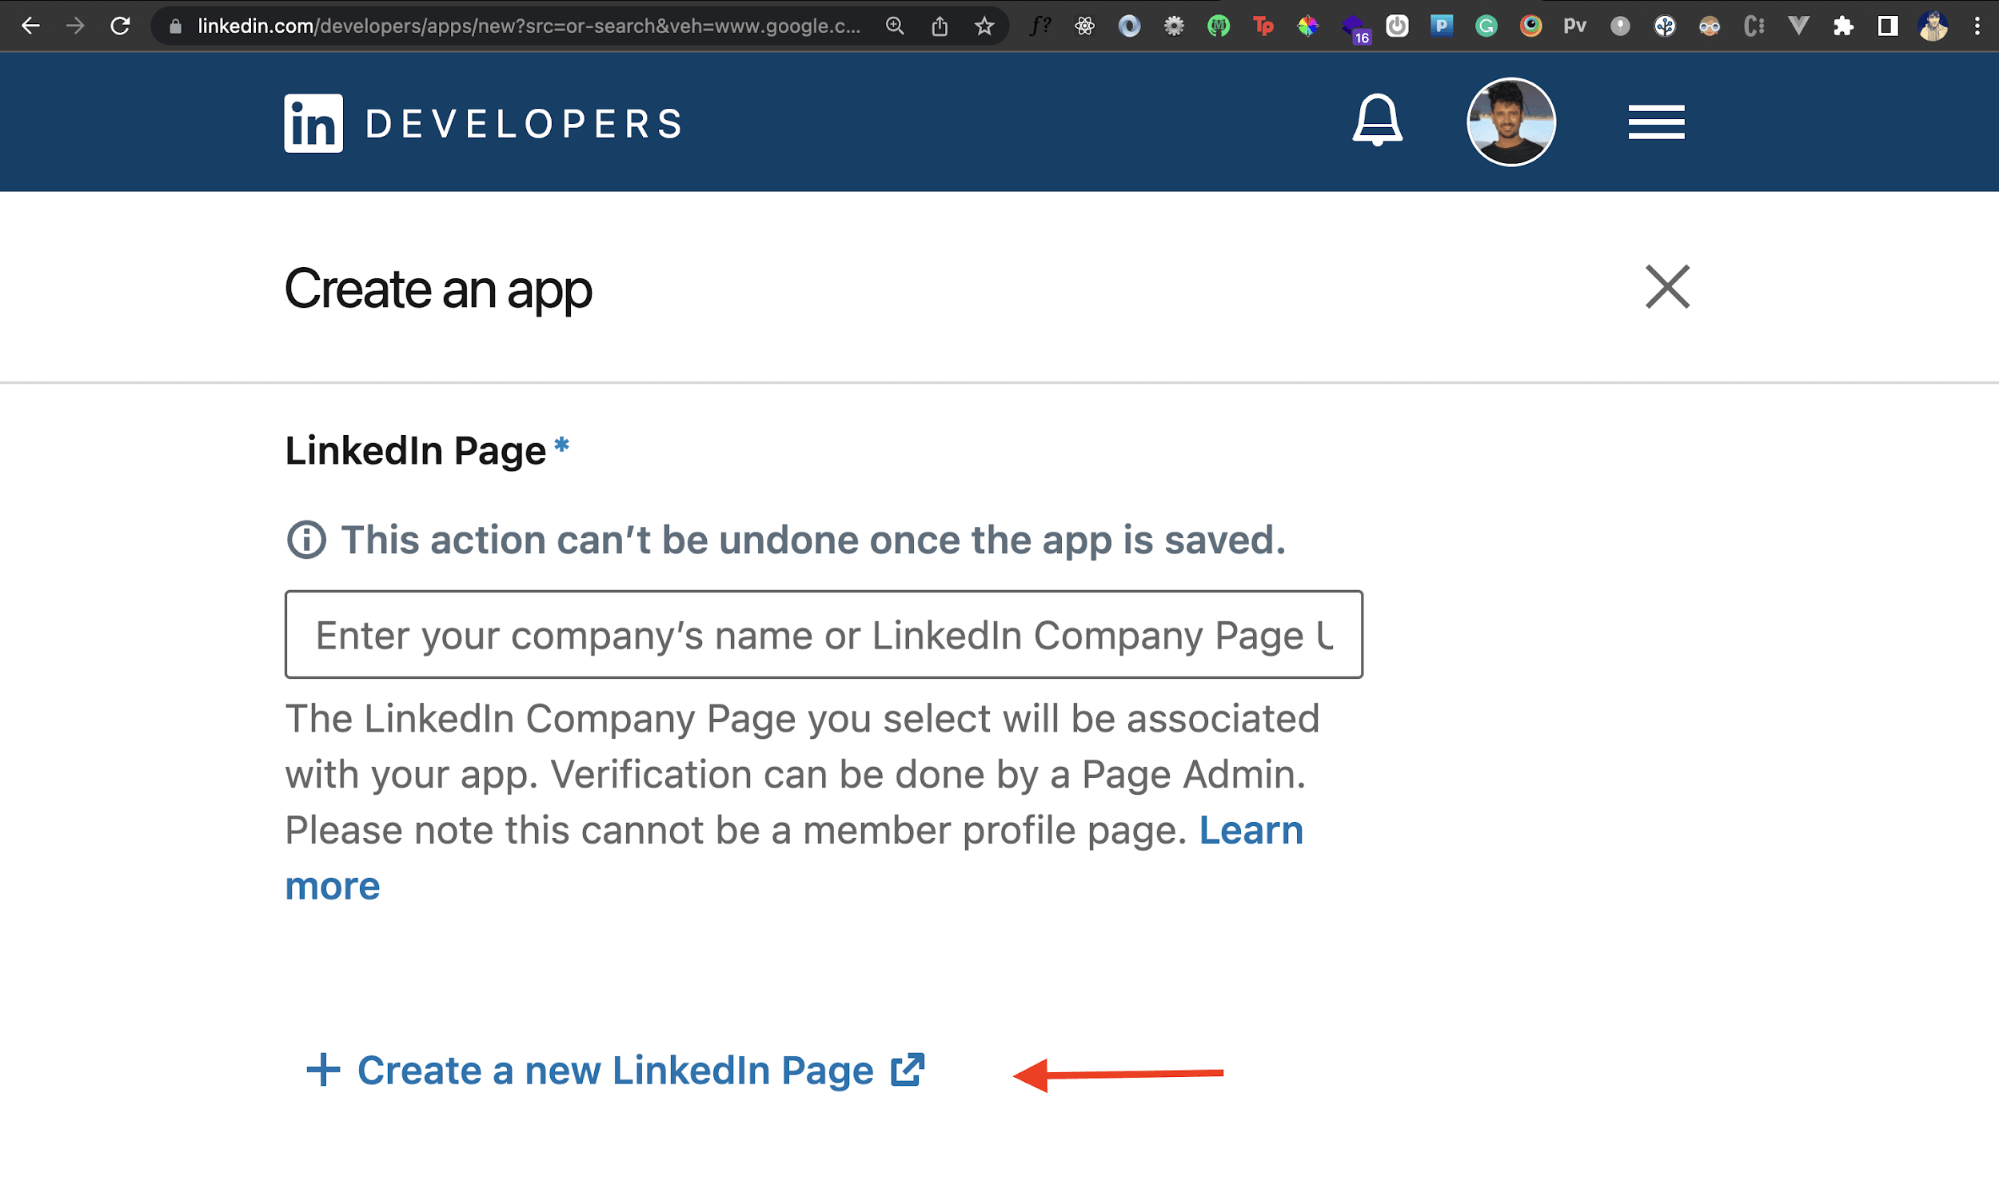
Once you've created the page, enter it in the field above. Then, you'll need to upload a logo:
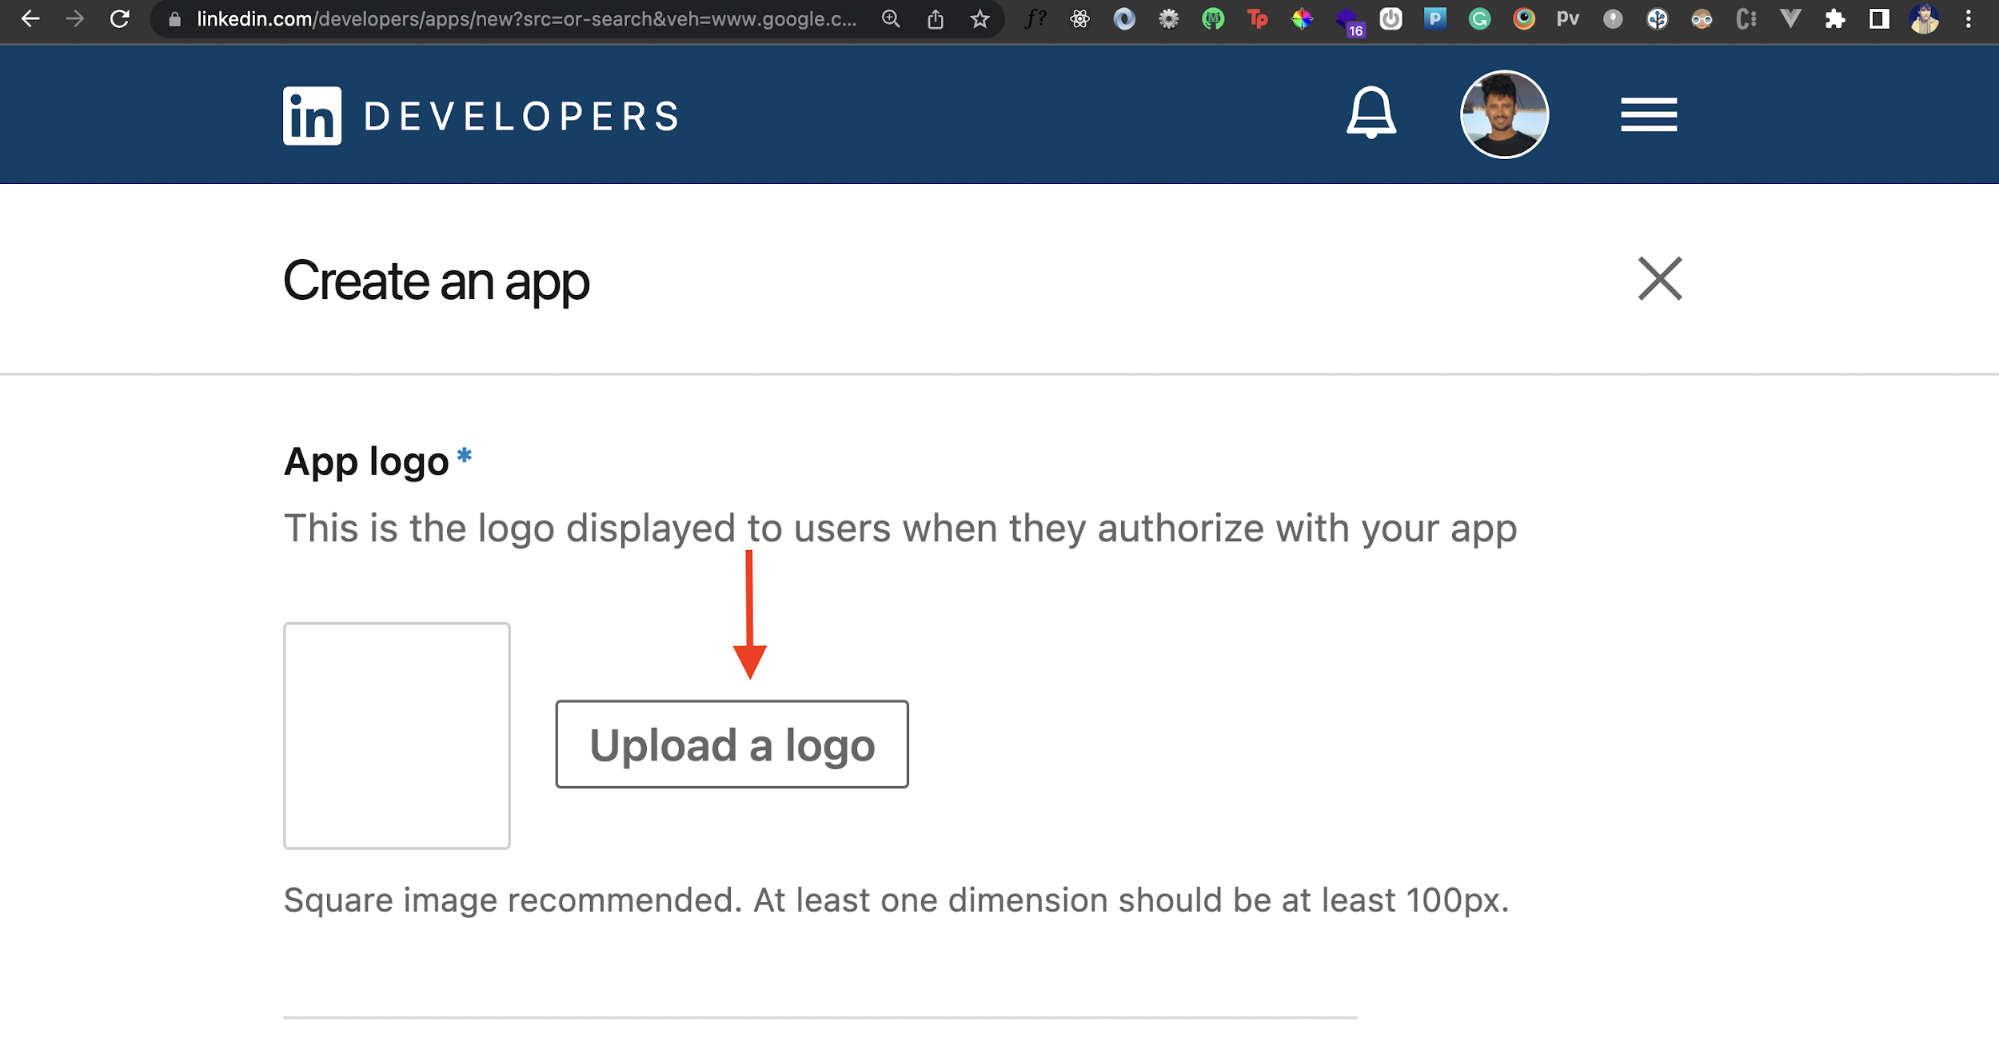
This is the image that will appear on the OAuth consent screen of your app. Then, click the Create App button. Once you do that, your LinkedIn app will be created!
Verify App
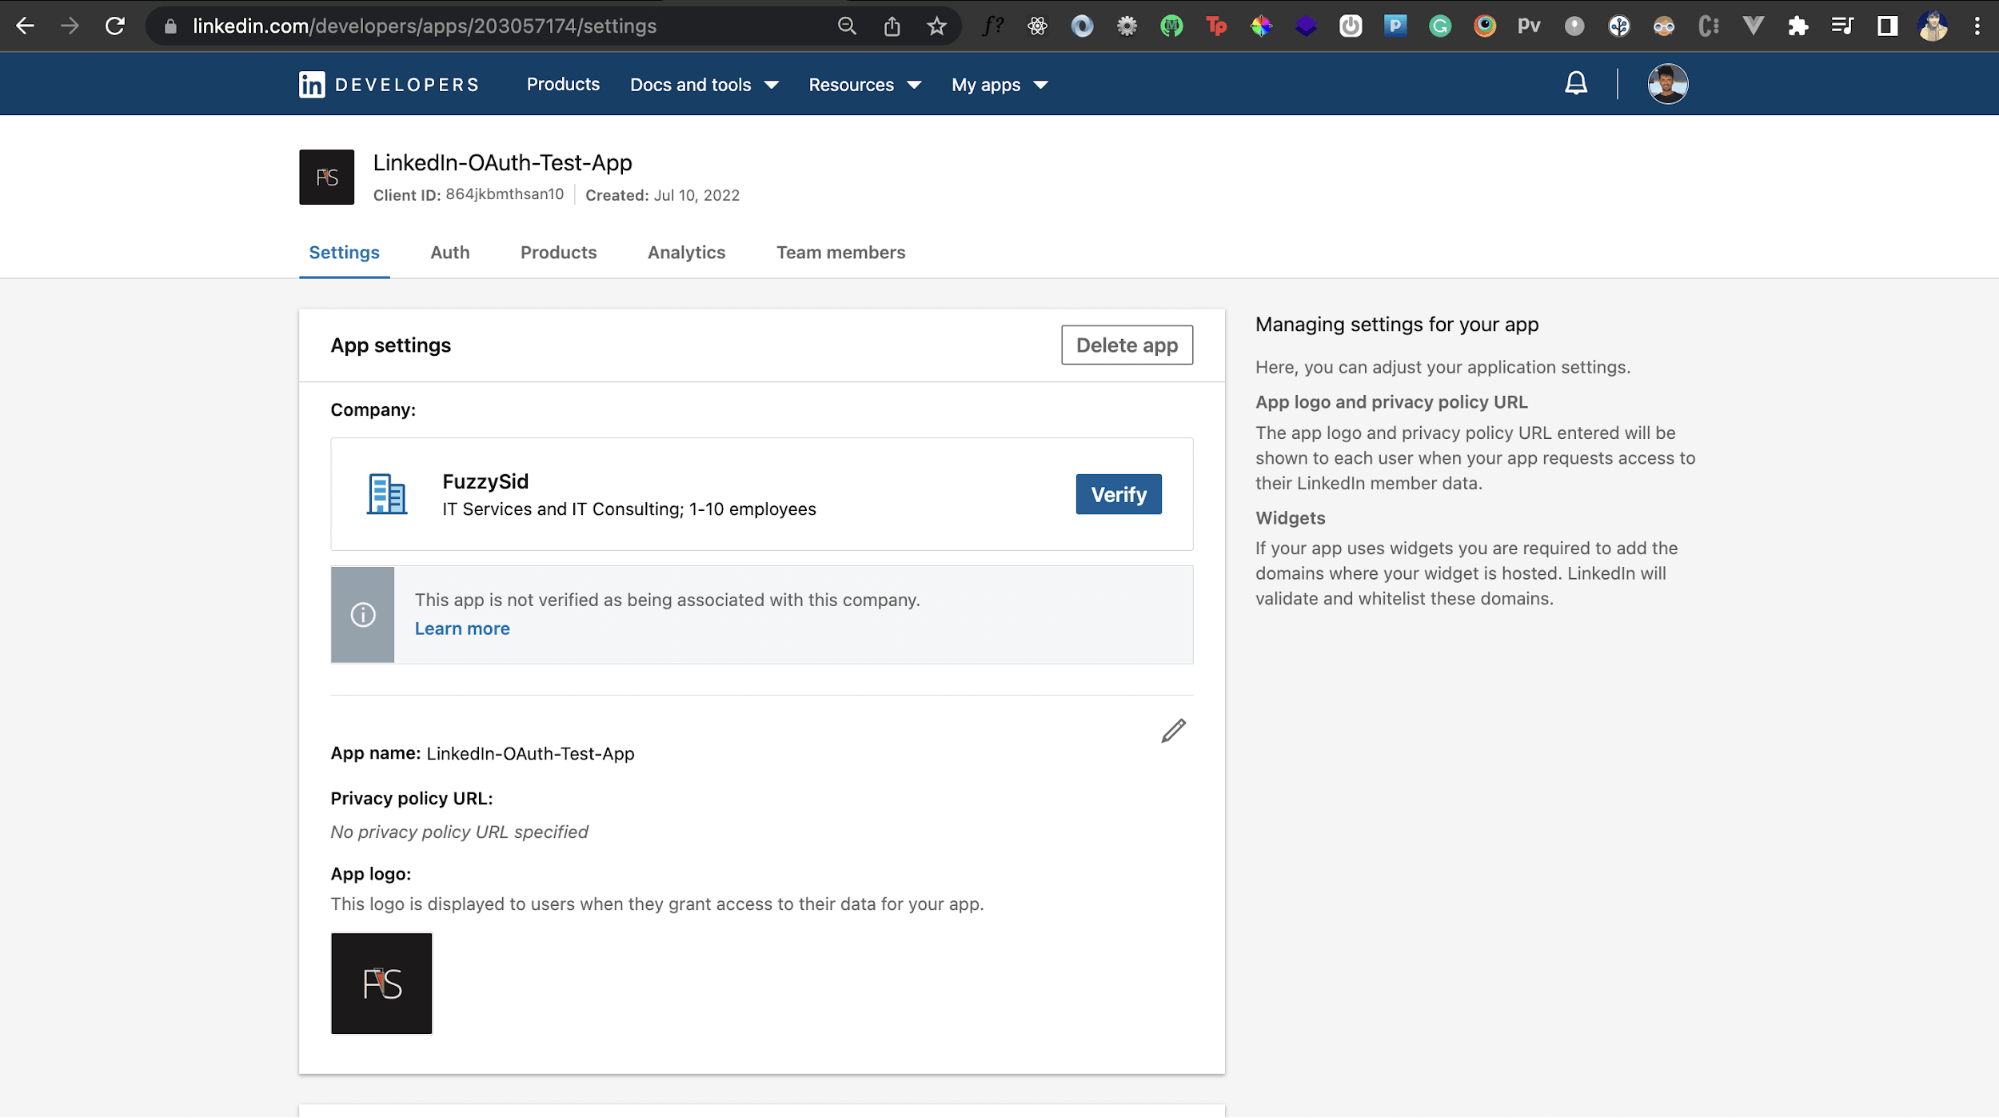
Now that we have created an app, we also need to verify it. If you go to the Settings tab of your app, you'll notice under App settings that it says that the app is not verified as being with the company. There is a Verify button in the company section, so we'll click this to verify the app.
Once you do that, you'll get a pop-up to verify the app. Click on the Verify button:
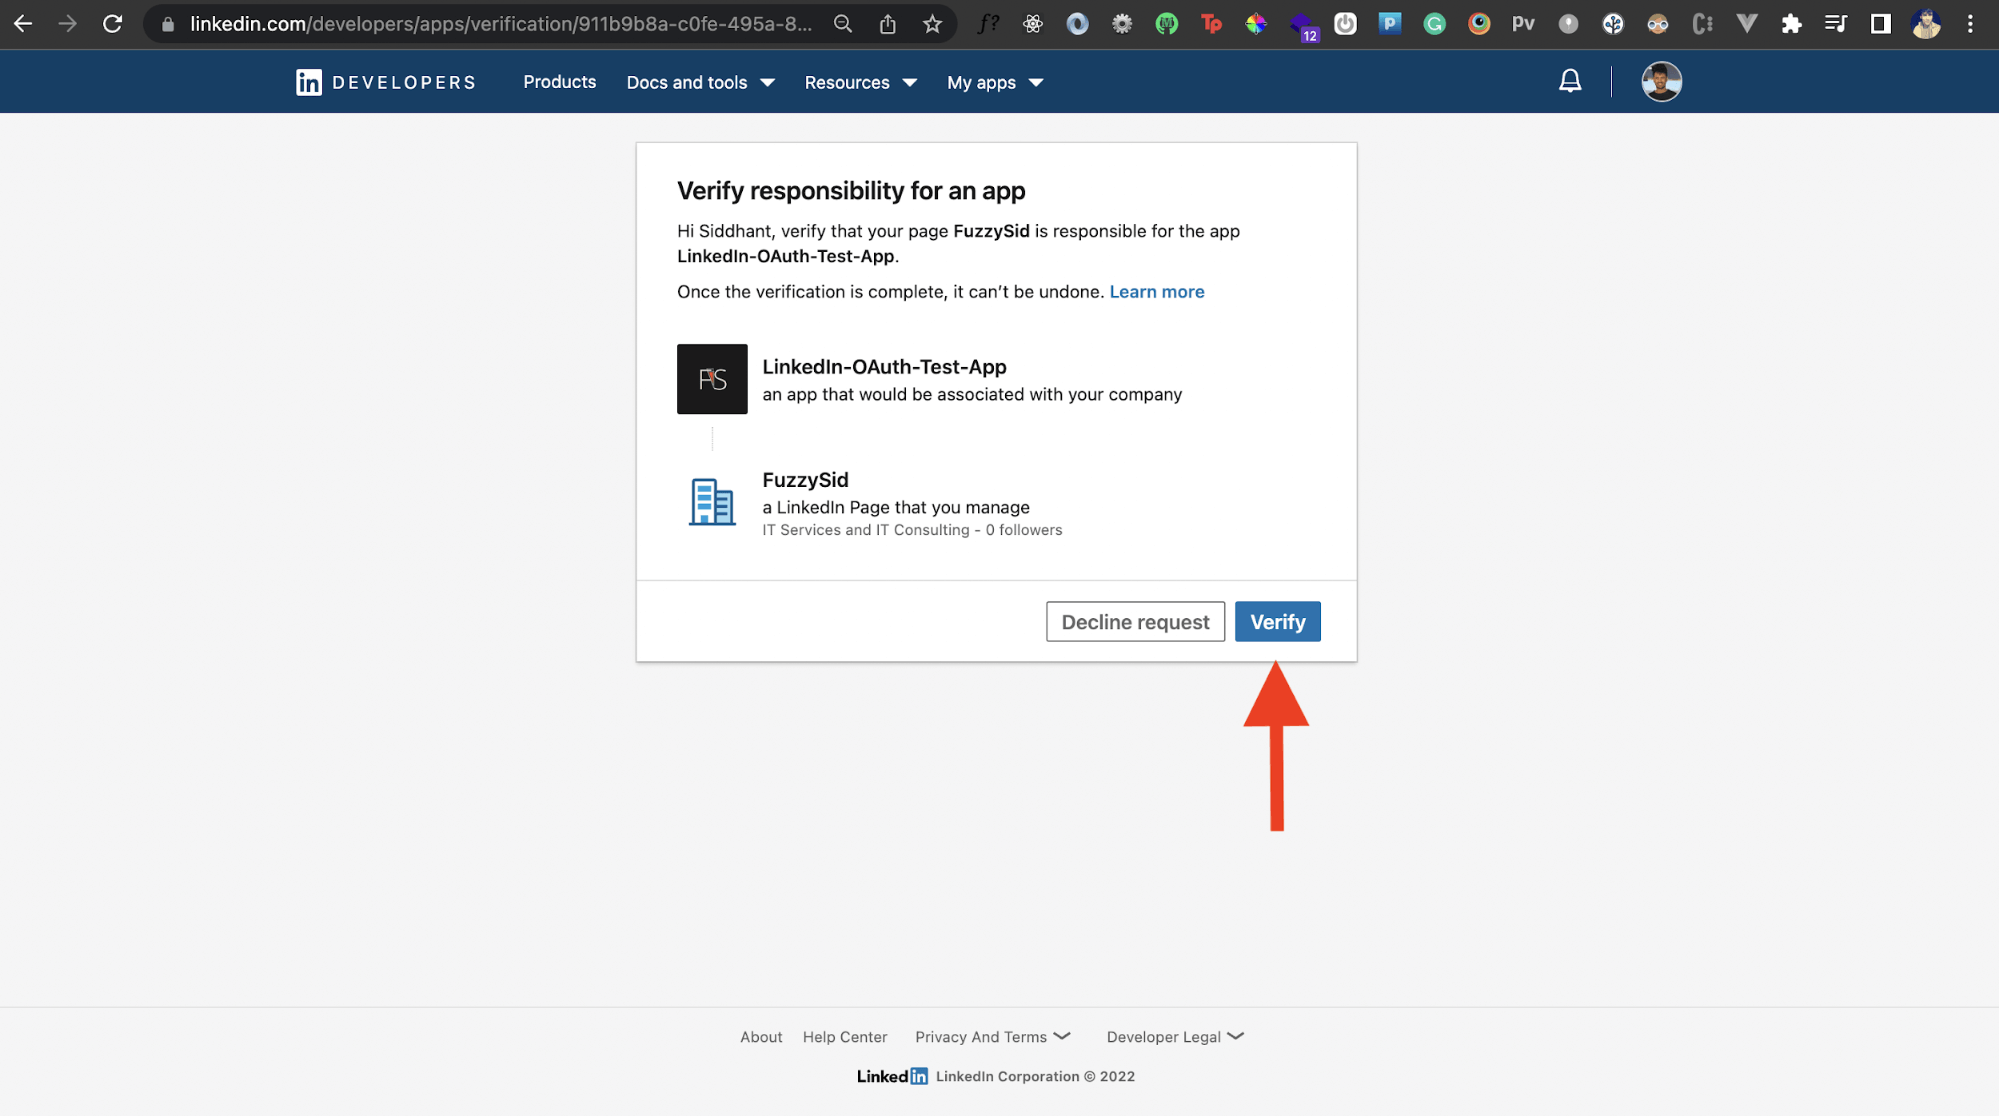
To proceed with the verification, you'll need to open the verification URL from your LinkedIn account that has admin privileges to the LinkedIn page you created for the app.
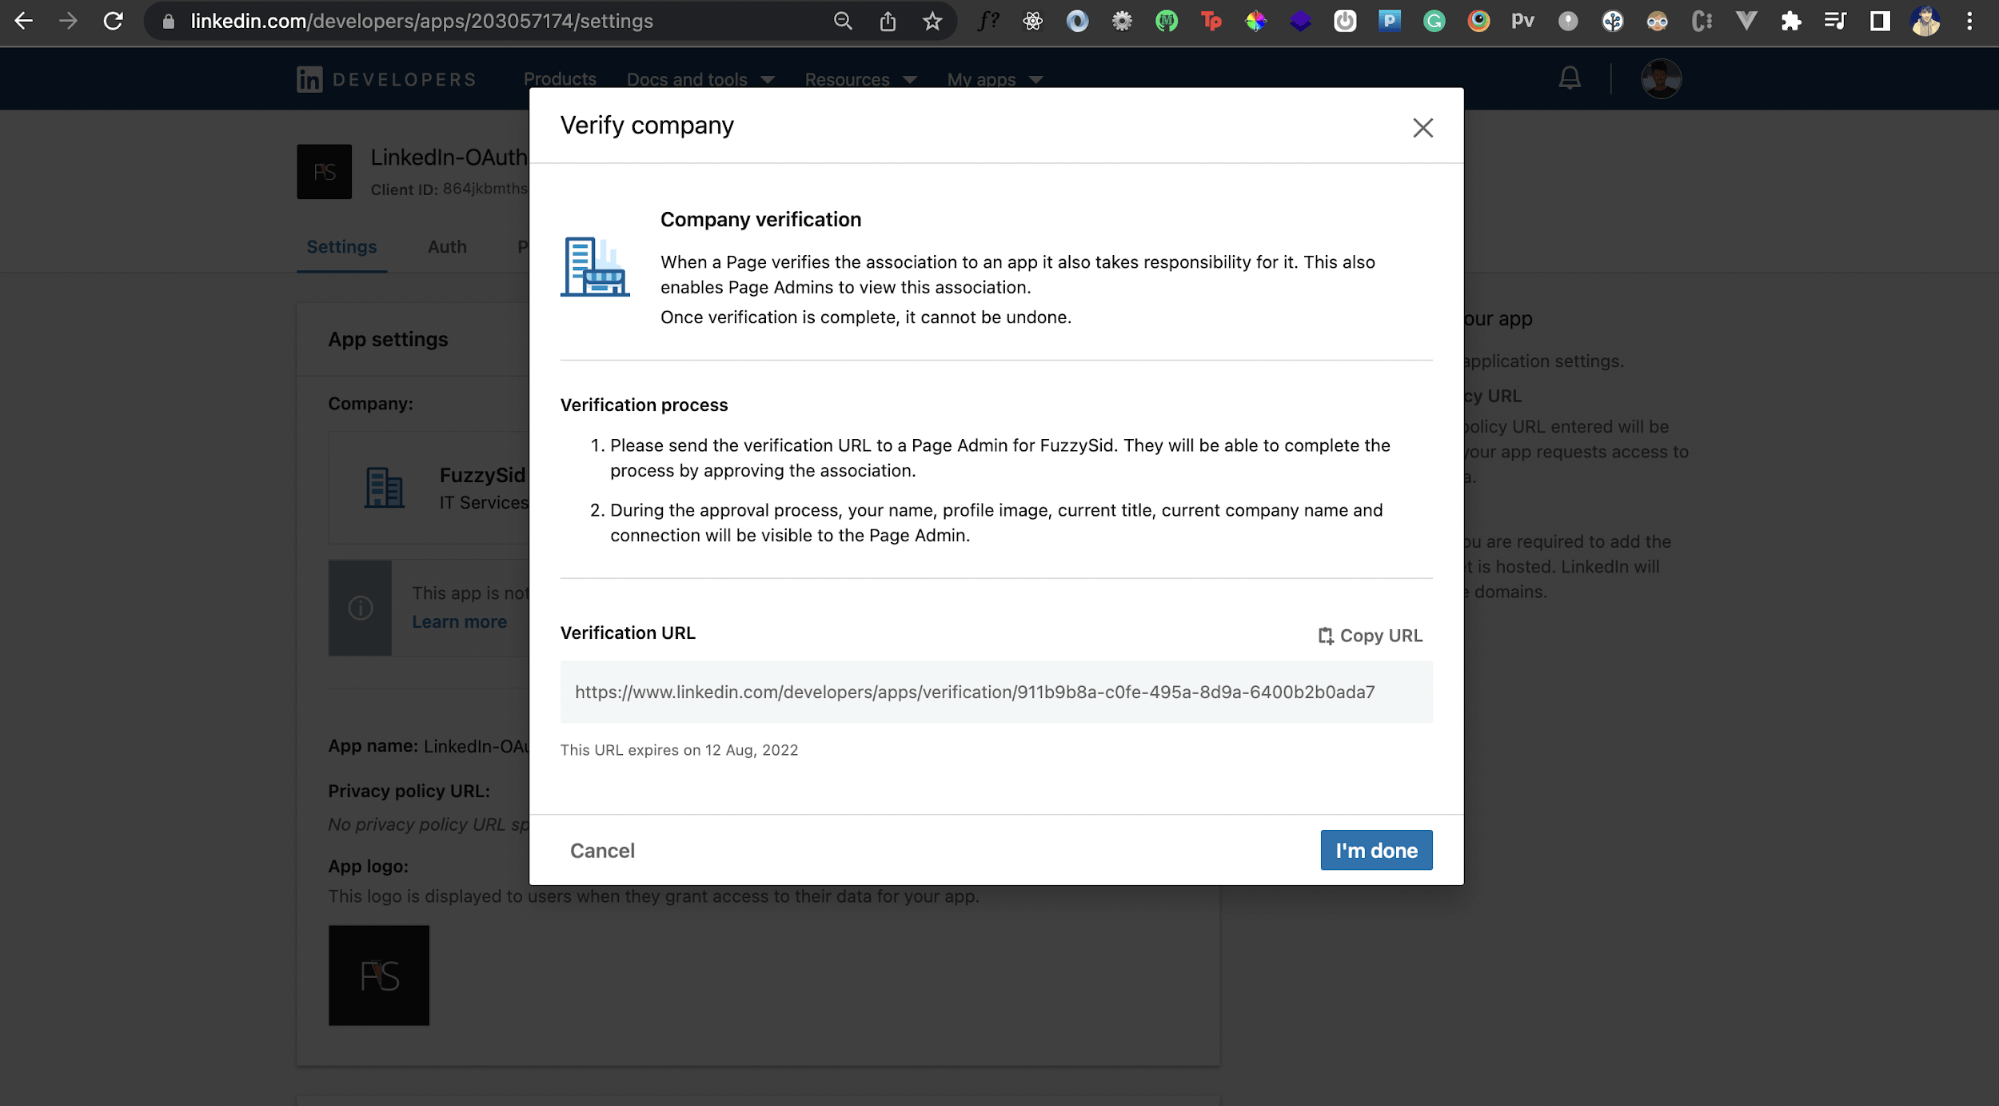
Once you visit that verification URL, your app will be verified. Great!
Activate Authentication
Now that you have a LinkedIn app up and ready, we need to enable the products we want to use it for. Go to the Products tab of your app to see the list of products available that you can add to your app:
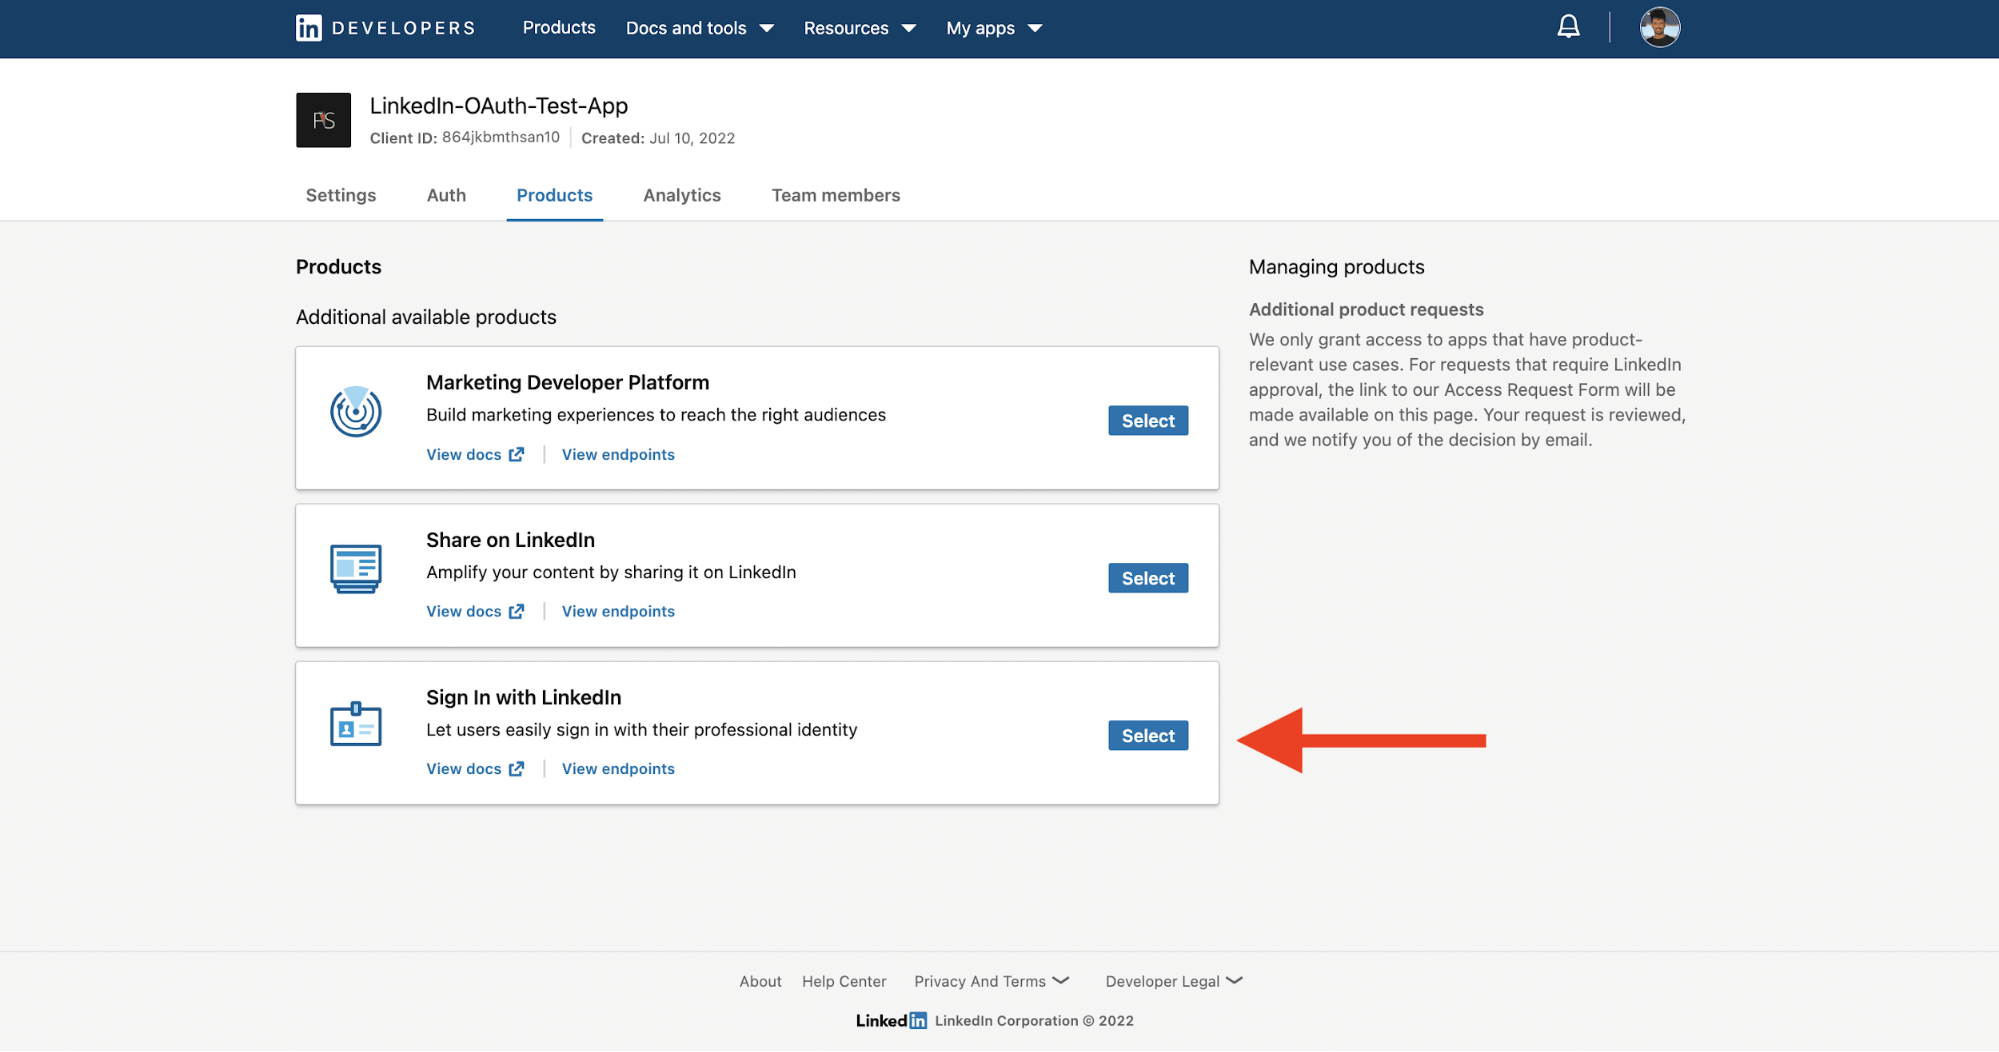
Select the Sign In with LinkedIn product. This is what will allow our own app to let users authenticate via LinkedIn OAuth. Once you select this, you're all set to start using LinkedIn OAuth to add authentication in your app.
Get LinkedIn API Credentials
In order to start using the LinkedIn API or OAuth in your app, you'll need a Client ID and a Client Secret for your LinkedIn app. You can find this under the Auth tab of your LinkedIn app:
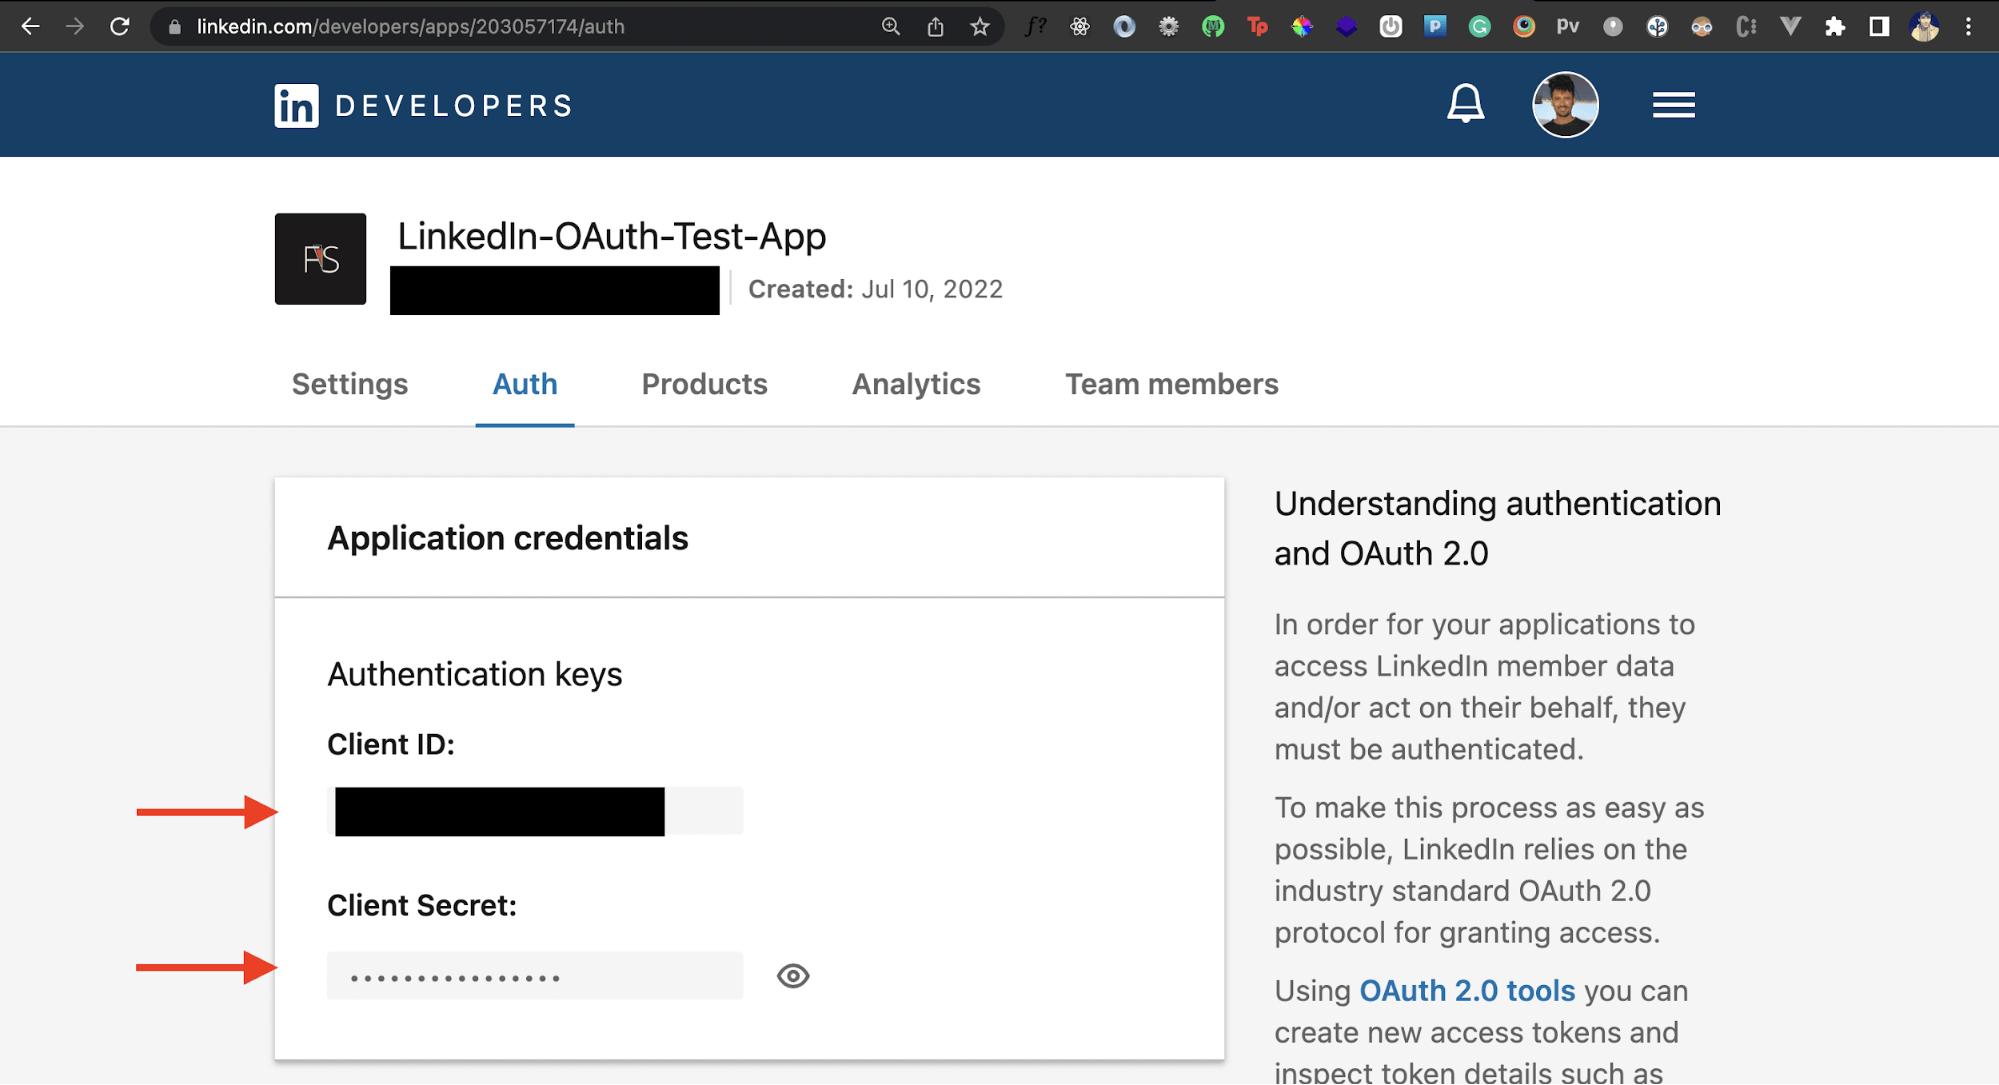
Grab these credentials and store them somewhere. We'll add them to our Node.js app shortly. We also need to update one more configuration in our app: a redirect URL.
Add Redirect URL
Your LinkedIn app needs to have an authorized redirect URL or callback URL. This is the URL it will redirect your app to after authentication so your own app can know that the process has been completed. It's a way for LinkedIn to tell you that the authentication either went through or failed.
Under the Auth tab, scroll down to the OAuth 2.0 settings section. We'll add the following redirect URL:
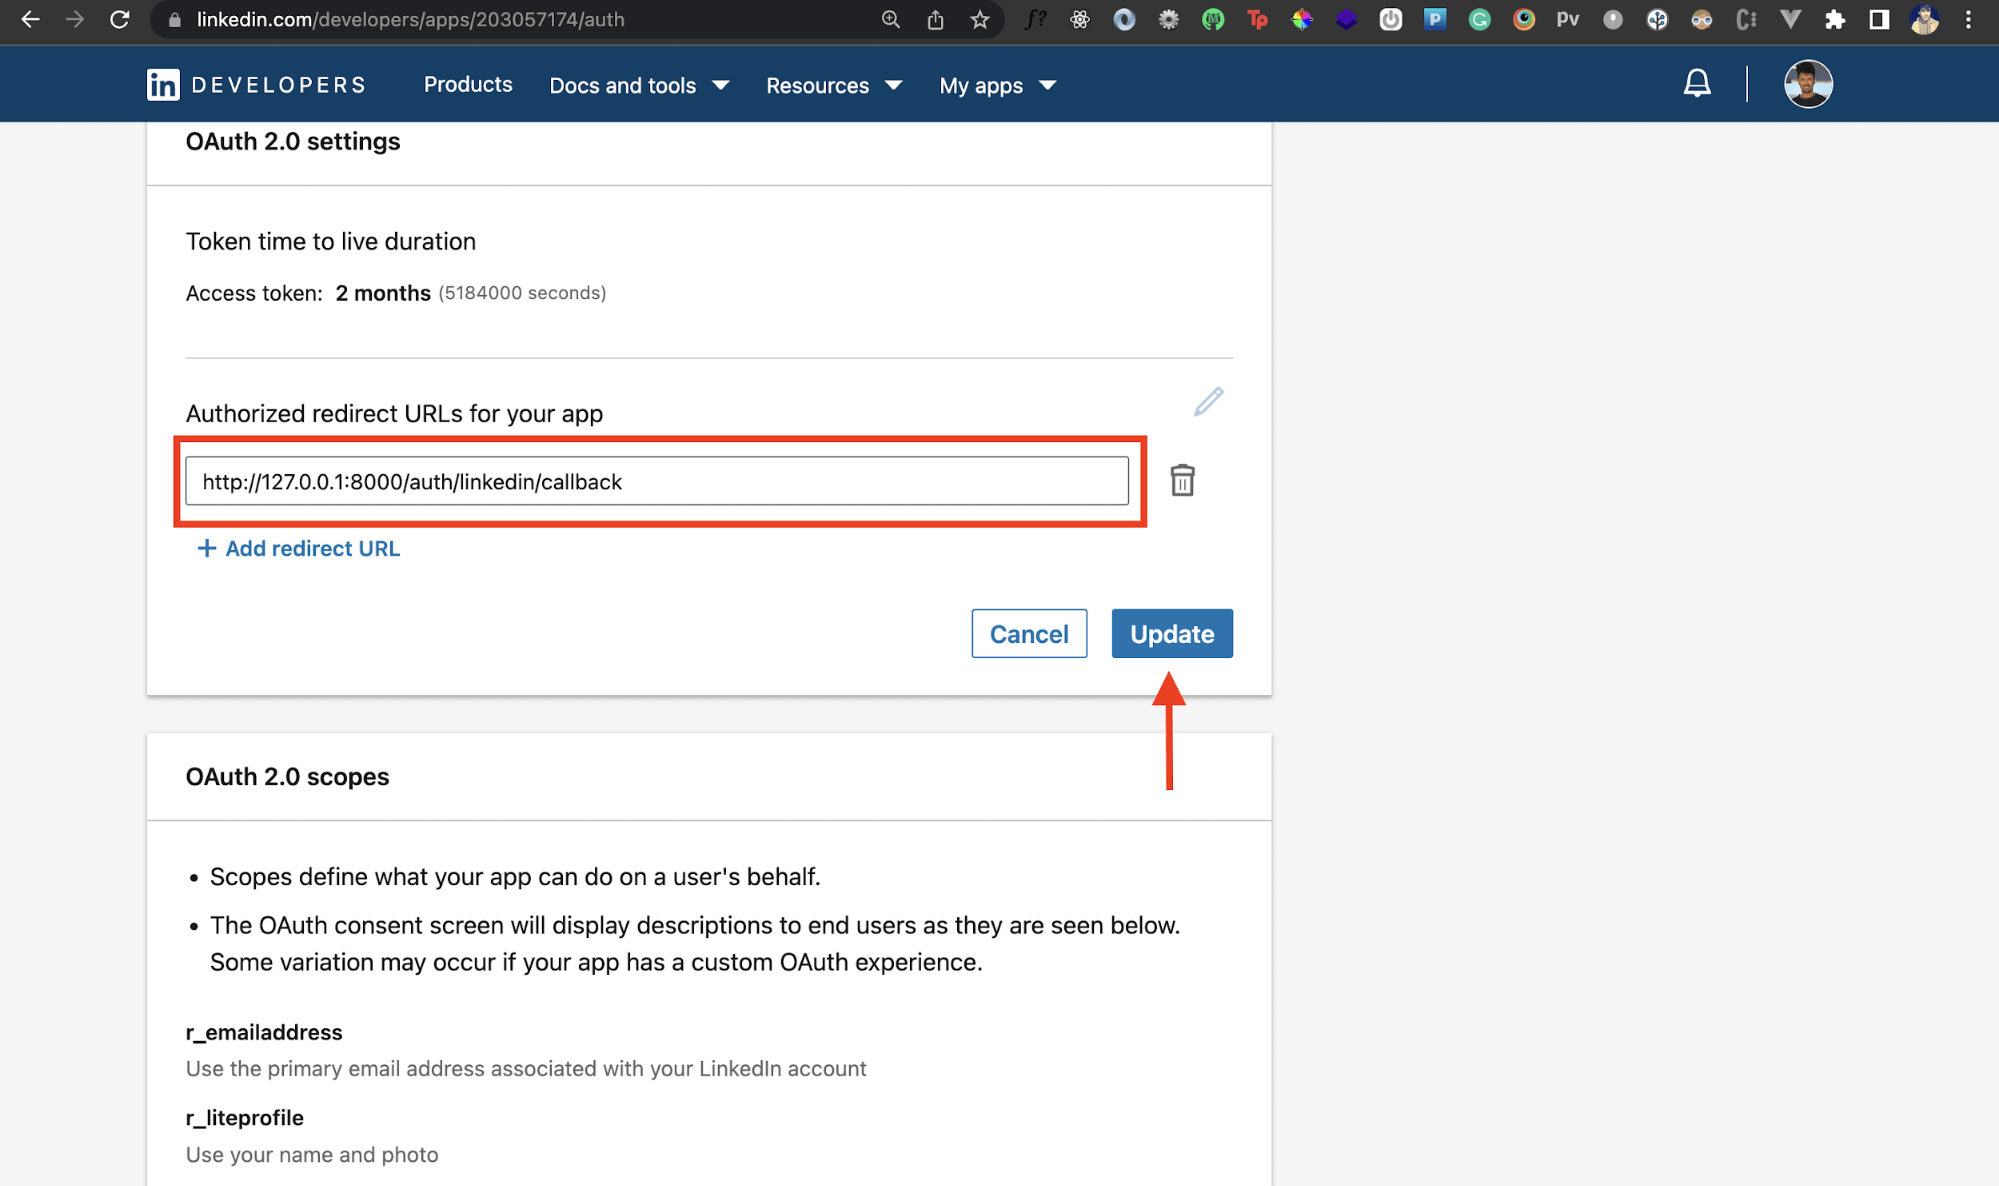
Now that we're all done with the initial setup for the LinkedIn app, let's create our own Node.js app that will interact with this LinkedIn app.
Node.js App Setup
We'll create a simple Express server in Node.js that will allow users to authenticate via their LinkedIn profiles. To get started, we'll create a new Node.js project using npm. Inside a directory of your choice, run the following command:
mkdir linkedin-oauth-app && cd linkedin-oauth-app && npm init -y
The above will make a new directory called linkedin-oauth-app. Head into it and initialize an npm project inside it. Let's now install a couple of dependencies.
We'll use Passport.js to easily connect to the LinkedIn APIs via a passport strategy. Passport.js is a popular npm package that you can use when integrating third-party login providers since it provides an easy and useful abstraction that makes working with OAuth providers convenient.
We'll also install express, dotenv, and express-session. Run the following command in the root directory of the project:
npm i passport passport-linkedin-oauth2 express express-session dotenv
Now we'll create a .env file in the root directory. Remember how we generated our LinkedIn API credentials? This is where we'll store them securely.
CLIENT_ID=
CLIENT_SECERT=
SESSION_SECRET=
Remember to put your own app's credentials there. Also, notice that we have another environment variable called SESSION_SECRET. You can put anything against it right now. We only need this later when creating a session for our Express app.
Awesome! Let's now write some code.
Create Constants and Import Dependencies
Inside the root directory, we'll first create a file called app.js. For brevity, all our code will reside inside this file. Let's start by importing the dependencies we installed earlier:
//DEPENDENCIES IMPORT

const passport = require("passport");
const LinkedInOAuth = require("passport-linkedin-oauth2");
const session = require('express-session')
const express = require("express");
const CONSTANTS=require('./constants');
Passport provides us with some useful methods and middleware out of the box to add authentication in our app. To use LinkedIn Oauth strategy with Passport, we also require the passport-linkedin-oauth2 dependency. We also import Express, which will be used to create and run a Node.js server. To facilitate session management via browser cookies, we also require express-session.
Notice that we also import a constants file from the root directory. This doesn't exist yet, so let's go ahead and create a constants.js file in the root of the project. Add the following code inside it:
const CONSTANTS={
PORT:8000,
callbackUrlDomain:'http://127.0.0.1',
callbackUrl:'/auth/linkedin/callback',
authUrl:'/auth/linkedin',
successUrl:'/',
failureUrl:'/login',
linkedInScopes: ["r_emailaddress", "r_liteprofile"],
strategy:'linkedin'
}

module.exports=CONSTANTS;
As the name suggests, we use this file to store a list of constants. But what does each constant refer to?
- PORT: This is the port on which our express server will run. You'll need to change this when deploying the app.
- Domain: The domain on which our app runs locally. You'll need to change this when deploying the app.
- callbackUrl: LinkedIn redirect URL that we added as a config to our LinkedIn app
- authUrl: URL of the page that does authentication via LinkedIn
- successUrl: URL that is redirected to when an authentication completes
- failureUrl: URL that is redirected to when an authentication fails
- linkedInScopes: Scopes requested by our app from the LinkedIn app in order to access user-related information after authentication
- strategy: The passport strategy being implemented (LinkedIn)
Create an Express App
Next, we'll create an Express app and initialize some middleware. First, we serialize and deserialize Passport. Then, we create an Express app session.
//Create a new Express App
const app = express();

//Serialize/Deserialize User
passport.serializeUser((user, done) => {
  done(null, user);
});

passport.deserializeUser((user, done) => {
  done(null, user);
});

//MIDDLEWARES

//Create a Session
app.use(session({ secret: process.env.SESSION_SECERT }));

//Initialize passport
app.use(passport.initialize());

//Create a passport session
app.use(passport.session());
app.use(express.json());
app.use(express.urlencoded({ extended: false }));

app.listen(CONSTANTS.PORT)
After that, we use our middleware. To create a session, we use the session middleware inside our app and pass the session secret we declared earlier in our environment file. Then, we initialize Passport and create a Passport session. Finally, we run the Express app on a port that we defined earlier in our constants.js file.
Create a LinkedIn Strategy
We have now created an Express server. The next thing we need to do is create a LinkedIn Strategy. Strategy in Passport is like a recipe that defines the kind of authentication you're adding in your app. We already have LinkedInOAuth in our app.js file defined, so we can access the LinkedInStrategy directly on it as a property.
const LinkedInStrategy=LinkedInOAuth.Strategy

const LINKEDIN_CLIENTID = process.env.CLIENT_ID ;
const LINKEDIN_CLIENTSECRET = process.env.CLIENT_SECERT ;

const LINKEDIN_STRATEGY_OBJECT= {
  clientID: LINKEDIN_CLIENTID,
  clientSecret: LINKEDIN_CLIENTSECRET,
  callbackURL: `${CONSTANTS.Domain}:${CONSTANTS.PORT}${CONSTANTS.callbackUrl}`,
  scope: CONSTANTS.linkedInScopes,
}
After that, we also define the credentials for our LinkedIn APIs and import them from our environment variables file. Finally, we create our strategy object that has these credentials, the callback URL, and the scope. The callback URL is what the authentication redirects to, and the scope defines what permissions the user gets from the LinkedIn app.
Use the LinkedIn Strategy
In order to use the LinkedIn Strategy, we'll create a new instance of it. We'll pass the strategy object we created earlier to this instance. Then, we'll pass this instance as a first parameter to the passport.use() method.
passport.use(
  new LinkedInStrategy(LINKEDIN_STRATEGY_OBJECT,
    (
      accessToken,
      refreshToken,
      profile,
      done
    ) => {
      process.nextTick(() => {
        return done(null, profile);
      });
    }
  )
);
The second parameter inside this method is a callback function. This callback function gives us access to authentication tokens, data payload, and a done middleware.
Authentication Route
We have everything in place for LinkedIn OAuth. So now we'll define a route or an endpoint that triggers this authentication flow.
 app.get(CONSTANTS.authUrl,passport.authenticate(CONSTANTS.strategy, { state: '' }));

 app.get(CONSTANTS.callbackUrl,passport.authenticate(CONSTANTS.strategy, {
  successRedirect:CONSTANTS.successUrl,
   failureRedirect:CONSTANTS.failureUrl,
 })
);
The authUrl we defined earlier in our constants.js file is the authentication endpoint. So we declare that route and pass in the passport.authenticate function as the route handler. Inside this function, we declare our strategy. Optionally, we can also pass some data payload as state if we want.
Then, we also declare the route for our callback URL. Here, inside the passport.authenticate function, we pass in an object with information on the success and failure URLs. So now when the authentication is successful, our app will know where to redirect.
Create Authentication UI
As a final step, we'll need to render some HTML templates in two cases: one where the user hasn't logged in, and the other after they successfully authenticate. Since we redirect the user to / after authentication, we'll return this template inside the route handler for the / route.
app.get("/", (req, res) => {
  const user=req.user;
  if (user) {
    const firstName = user.name.givenName;
    const photo = user.photos[0].value;
    res.send(
      `<div style="text-align:center; width:100%; margin: 200px 0px;">
        <h1 style="font-family: sans-serif;"> Hey ${firstName} 👋</h1>
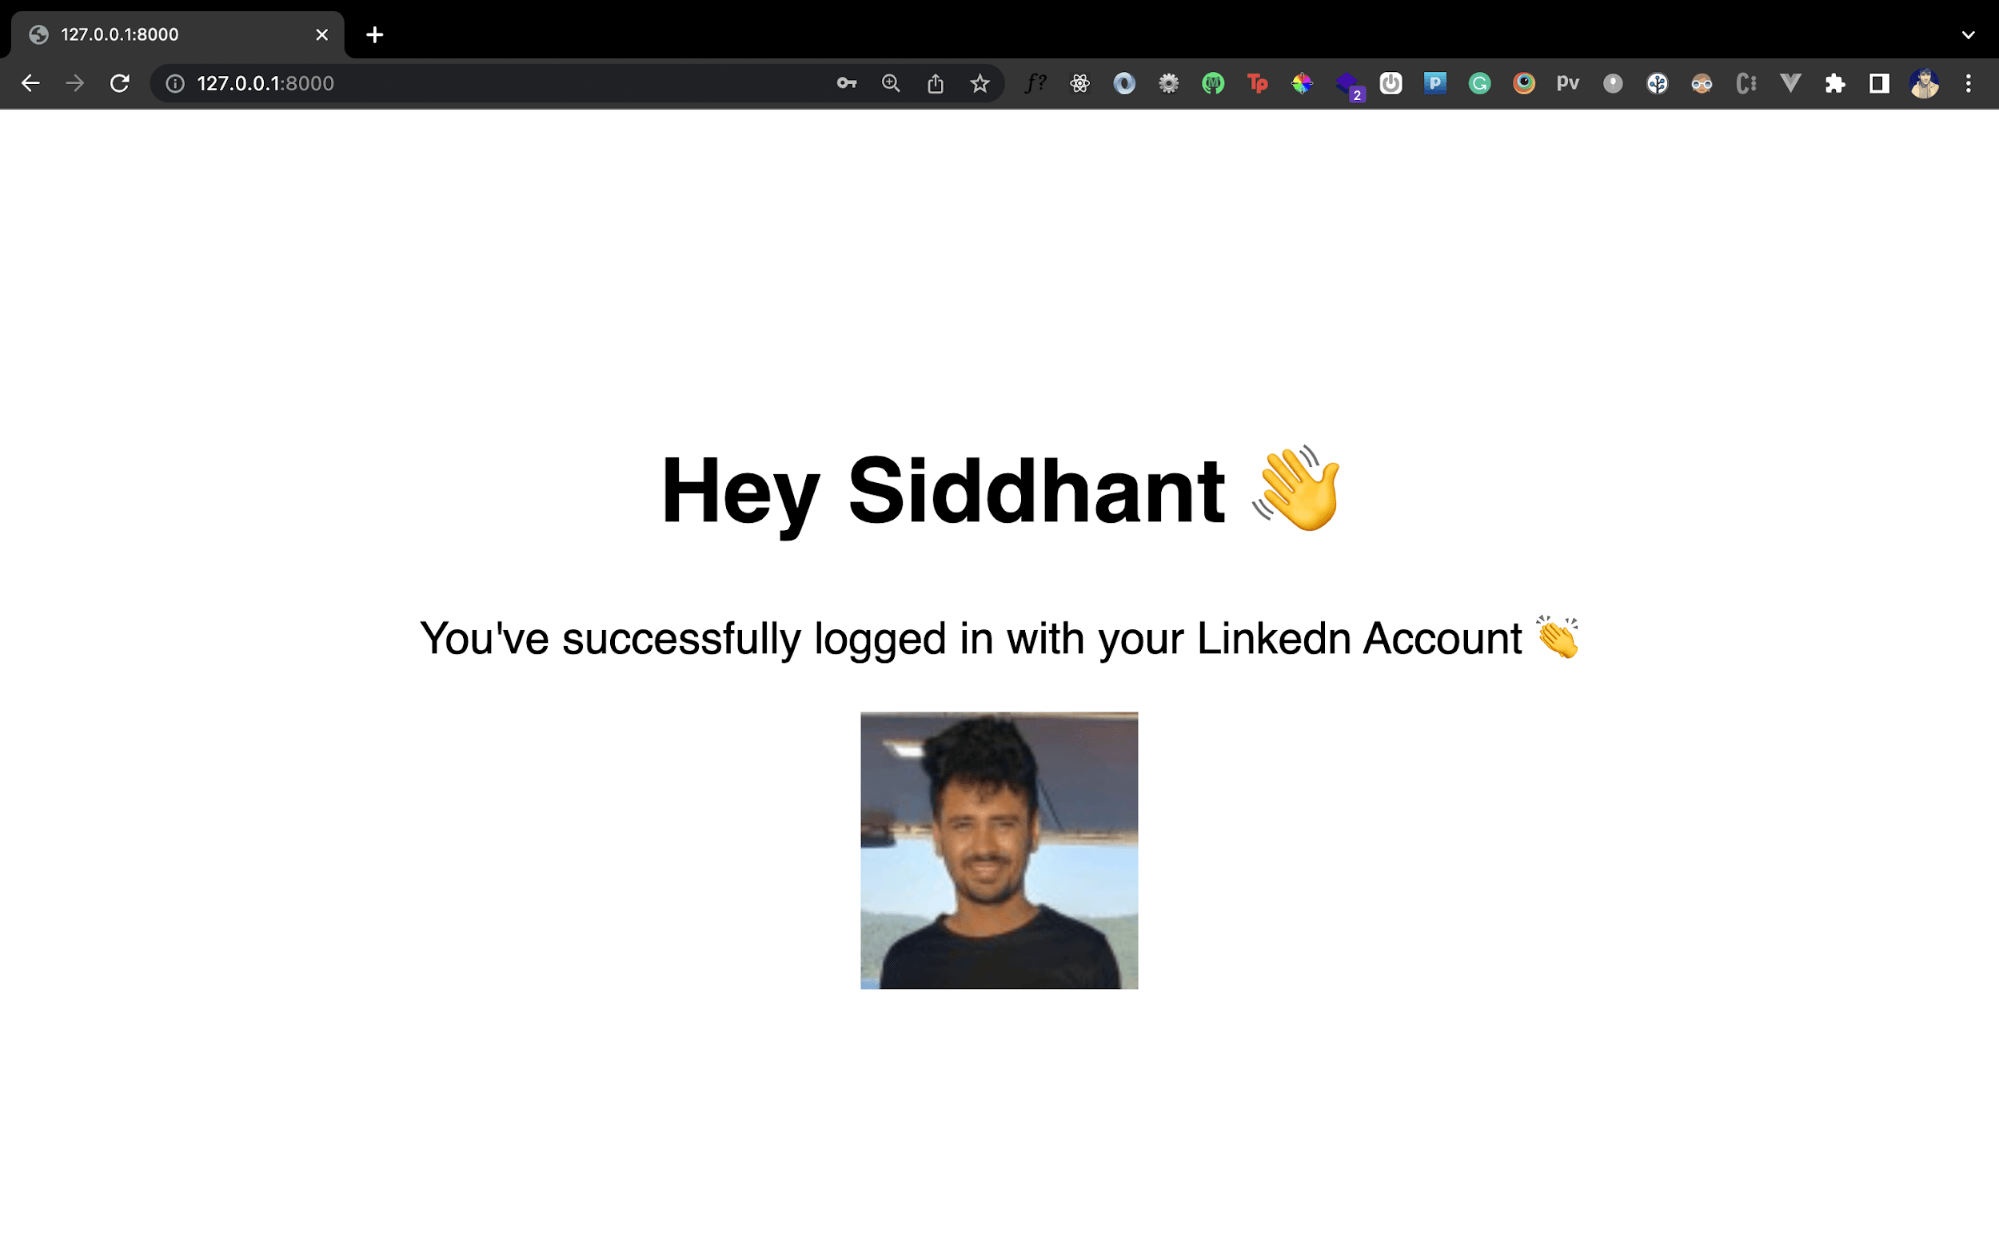
        <p style="font-family: sans-serif;"> You've successfully logged in with your Linkedn Account 👏 </p>
        <img src="${photo}"/>
      </div>
      `
    )
  } else {
    res.send(
    `<div style="text-align:center; width:100%; margin: 200px 0px;">
          <h1 style="font-family: sans-serif;">Welcome to LinkedIn OAuth App</h1>
          <img style="cursor:pointer;margin-top:20px"  onclick="window.location='/auth/linkedIn'" src="https://dryfta.com/wp-content/uploads/2017/04/Linkedin-customized-button.png"/>
    </div>
    `);
  }
});
Once you do that, if you now visit http://localhost:8000, you should see the following page:
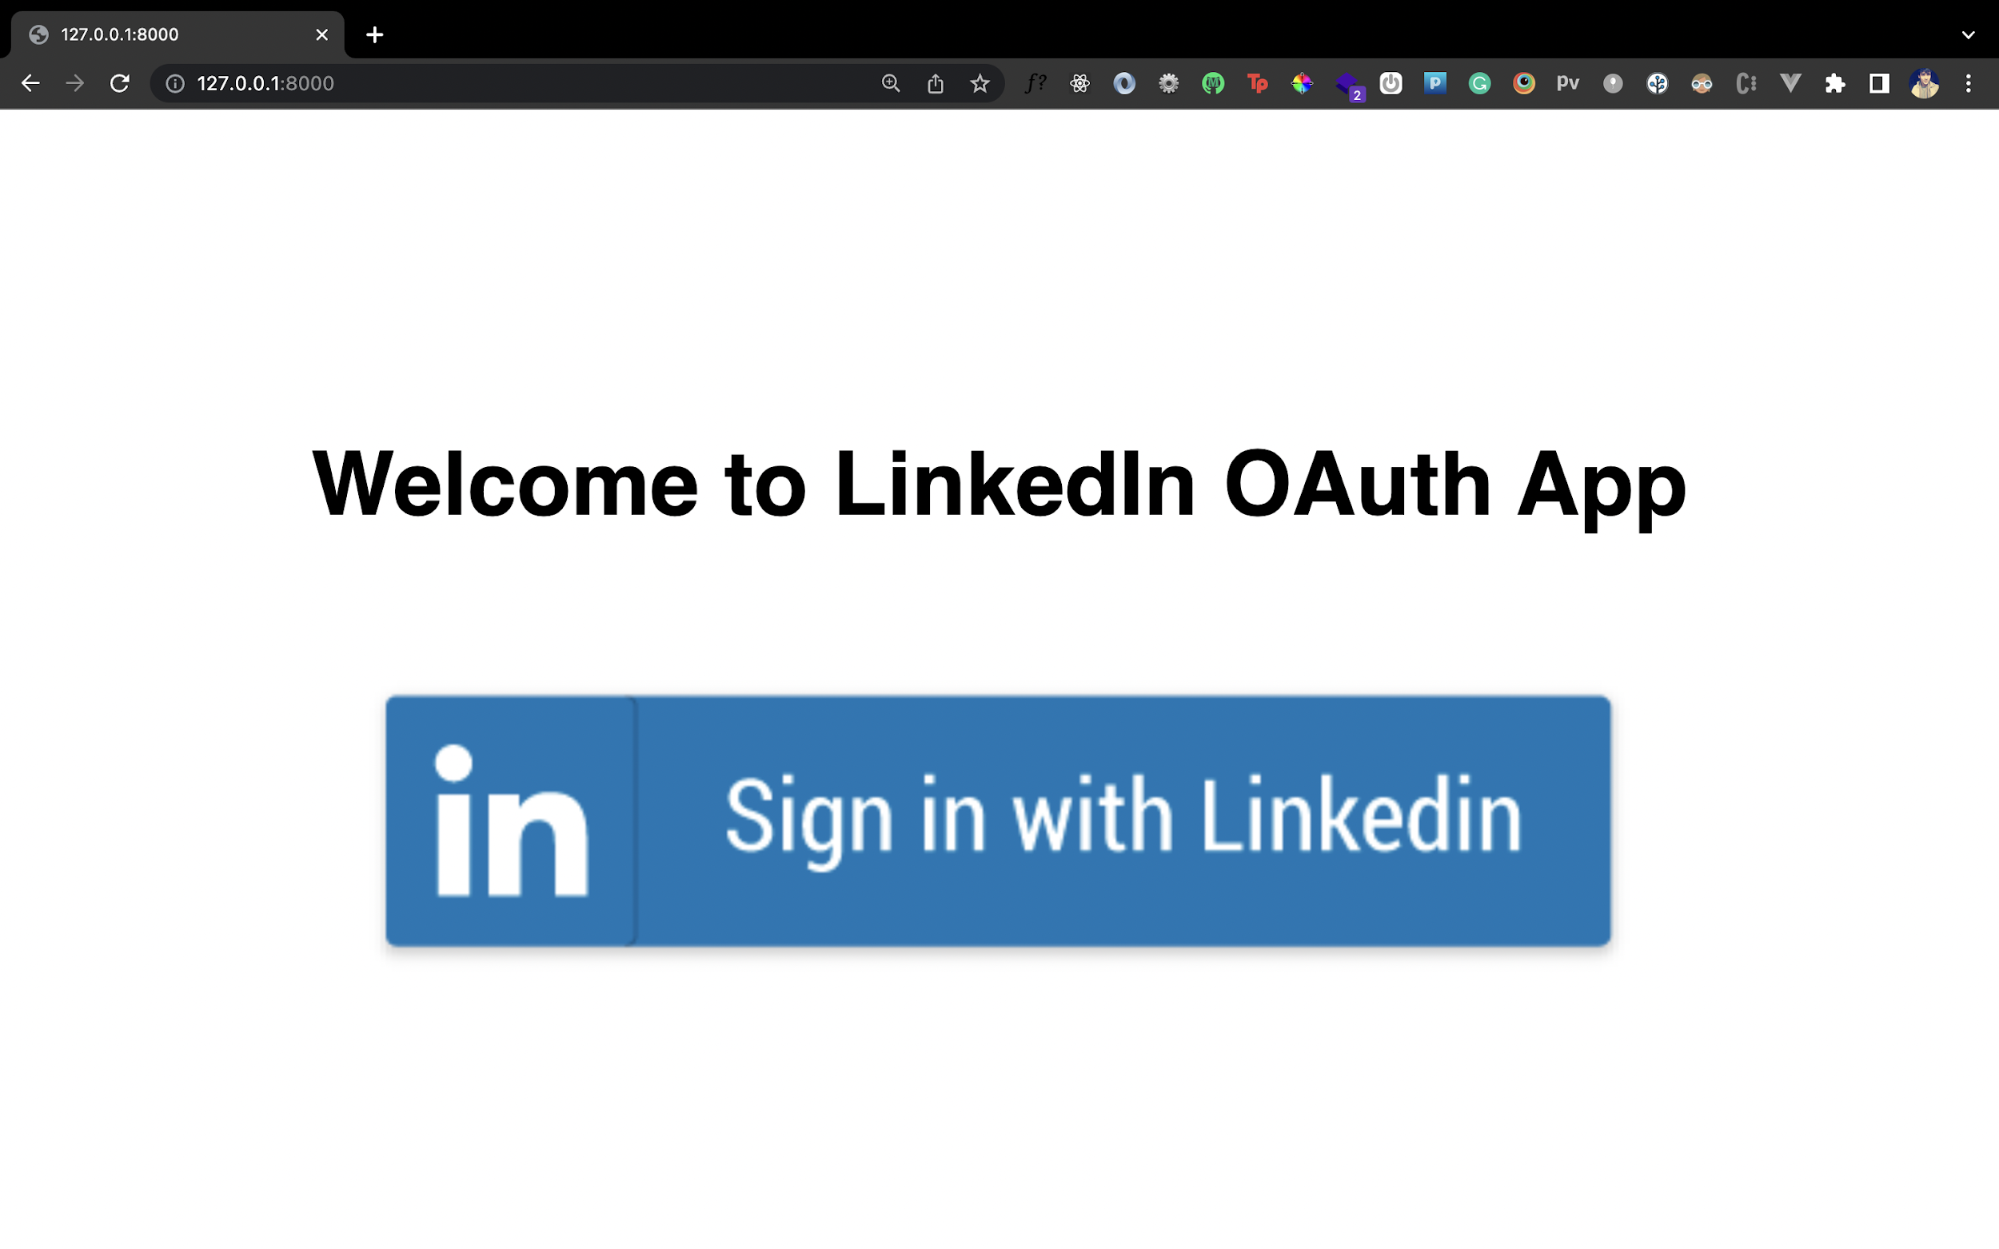
Awesome! Now let's click that button and authenticate. (You can download a quick video of what this will look like.)
We can now authenticate using LinkedIn in our own Node.js app! After authentication, we get some user-related information like name and profile picture and render it inside our template:
Conclusion
Adding OAuth to your app can enhance the authentication experience for your users. You can also do a lot more than just authentication. For instance, you can post to your user's LinkedIn profile via your own app. Using Passport also makes it much easier to work with OAuth in general.
As an added bonus, you can also check out the entire code for this tutorial. Until next time!
This post was written by Siddhant Varma. Siddhant is a full stack JavaScript developer with expertise in frontend engineering. He’s worked with scaling multiple startups in India and has experience building products in the Ed-Tech and healthcare industries. Siddhant has a passion for teaching and a knack for writing. He's also taught programming to many graduates, helping them become better future developers.
