Use the Google Search Console API and GitHub Actions to Automate SEO
In an earlier blog post, I walked you through how to get started using Node.js and Google Search Console’s API. By now, you should be familiar with how to connect your account using the service account credentials and also run basic queries to get information on how your website is performing.
The real value, however, comes from integrating this capability into your existing CI and publishing workflow. This integration will leverage the efficiencies gained from automation and focus on what matters most, growing your business presence online.
In this post, I’ll walk you through a simple use case - integrate your publishing workflow directly to the Google Search Console with GitHub Actions and automatically submit an updated sitemap for indexing. As a result, without having to do anything, your new blog post or product page will be immediately searchable on Google.
It’s super quick and you will only need to do three things:
- Add the Google Search Console API Code to your GitHub repository
- Add the GitHub Actions Configuration File to your Repo
- Add your credentials as a Secret in GitHub
Let’s get started.
As a reminder, we also have a GitHub repo containing all the files that you need to get this up and running.
1. Add the Google Search Console API Code to your GitHub repository
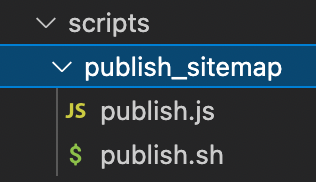
Essentially, we need to tell GitHub exactly which files to run when publishing your website. To do this create a top level directory called scripts with the following structure:

In the publish.js file, we’re essentially setting up our connection to Google’s Search Console and submitting an updated sitemap directly through the API.
Note that in the example below, we’ve specified GOOGLE_SEARCH_CONSOLE_JSON_KEY as an environment variable and will walk you through how to get this stored into your GitHub below.
File: publish.js
const { google } = require('googleapis');
const { JWT } = require('google-auth-library');
const searchconsole = google.searchconsole('v1');

const keys = JSON.parse(Buffer.from(process.env.GOOGLE_SEARCH_CONSOLE_JSON_KEY, 'base64').toString('utf-8'));
const client = new JWT({
  email: keys.client_email,
  key: keys.private_key,
  scopes: ['https://www.googleapis.com/auth/webmasters', 'https://www.googleapis.com/auth/webmasters.readonly'],
});

google.options({ auth: client });

(async () => {
  try {
    await searchconsole.sitemaps.submit({
      // UPDATE THIS TO YOUR OWN SITEMAP
      feedpath: 'https://stateful.com/sitemap.xml',
      siteUrl: 'https://stateful.com/',
    });

  } catch (e) {
    console.log(e);
  }

})();
In the publish.sh file, we’re invoking a bash command to run the above file.
Note that you may have to update the file and make it executable, you can do this easily by running the following command in your terminal: chmod +x scripts/publish_sitemap/publish.sh.
File: publish.sh
#!/usr/bin/env bash

# -- Standard Header --
echoerr() { printf "%s\n" "$*" >&2; }
export STATEFUL_DEBUG=

node scripts/publish_sitemap/publish.js
Finally, make sure to install your dependencies and you can do this by installing the two google npm package:
npm install googleapis
npm install google-auth-library
2. Add the GitHub Actions Configuration File to your Repo
Now, once you’ve uploaded the Search Console specific pieces, you want to upload the GitHub Actions Workflow file.
For context, A workflow is a configurable automated process that will run one or more jobs. Workflows are defined by a YAML file checked into your repository and will run when triggered by an event in your repository, or they can be triggered manually, or at a defined schedule.
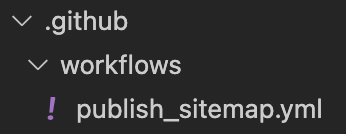
To do this create a top level directory called .github with the following structure:

In this folder, add your workflow file:
File: publish_sitemap.yml
on: [push]
jobs:

      - name: Publish Sitemap
        env:
          GOOGLE_SEARCH_CONSOLE_JSON_KEY: ${{ secrets.GOOGLE_SEARCH_CONSOLE_JSON_KEY }}
        run: ./scripts/publish_sitemap/publish.sh
Whenever you push to a branch with this file in it, GitHub will automatically execute the script using the provided environment variables.
3. Add your credentials as a Secret in GitHub
The last step is to add the GOOGLE_SEARCH_CONSOLE_JSON_KEY environment variable as secret in your GitHub repo. Otherwise, Google won’t be able to authenticate your request and return an error.
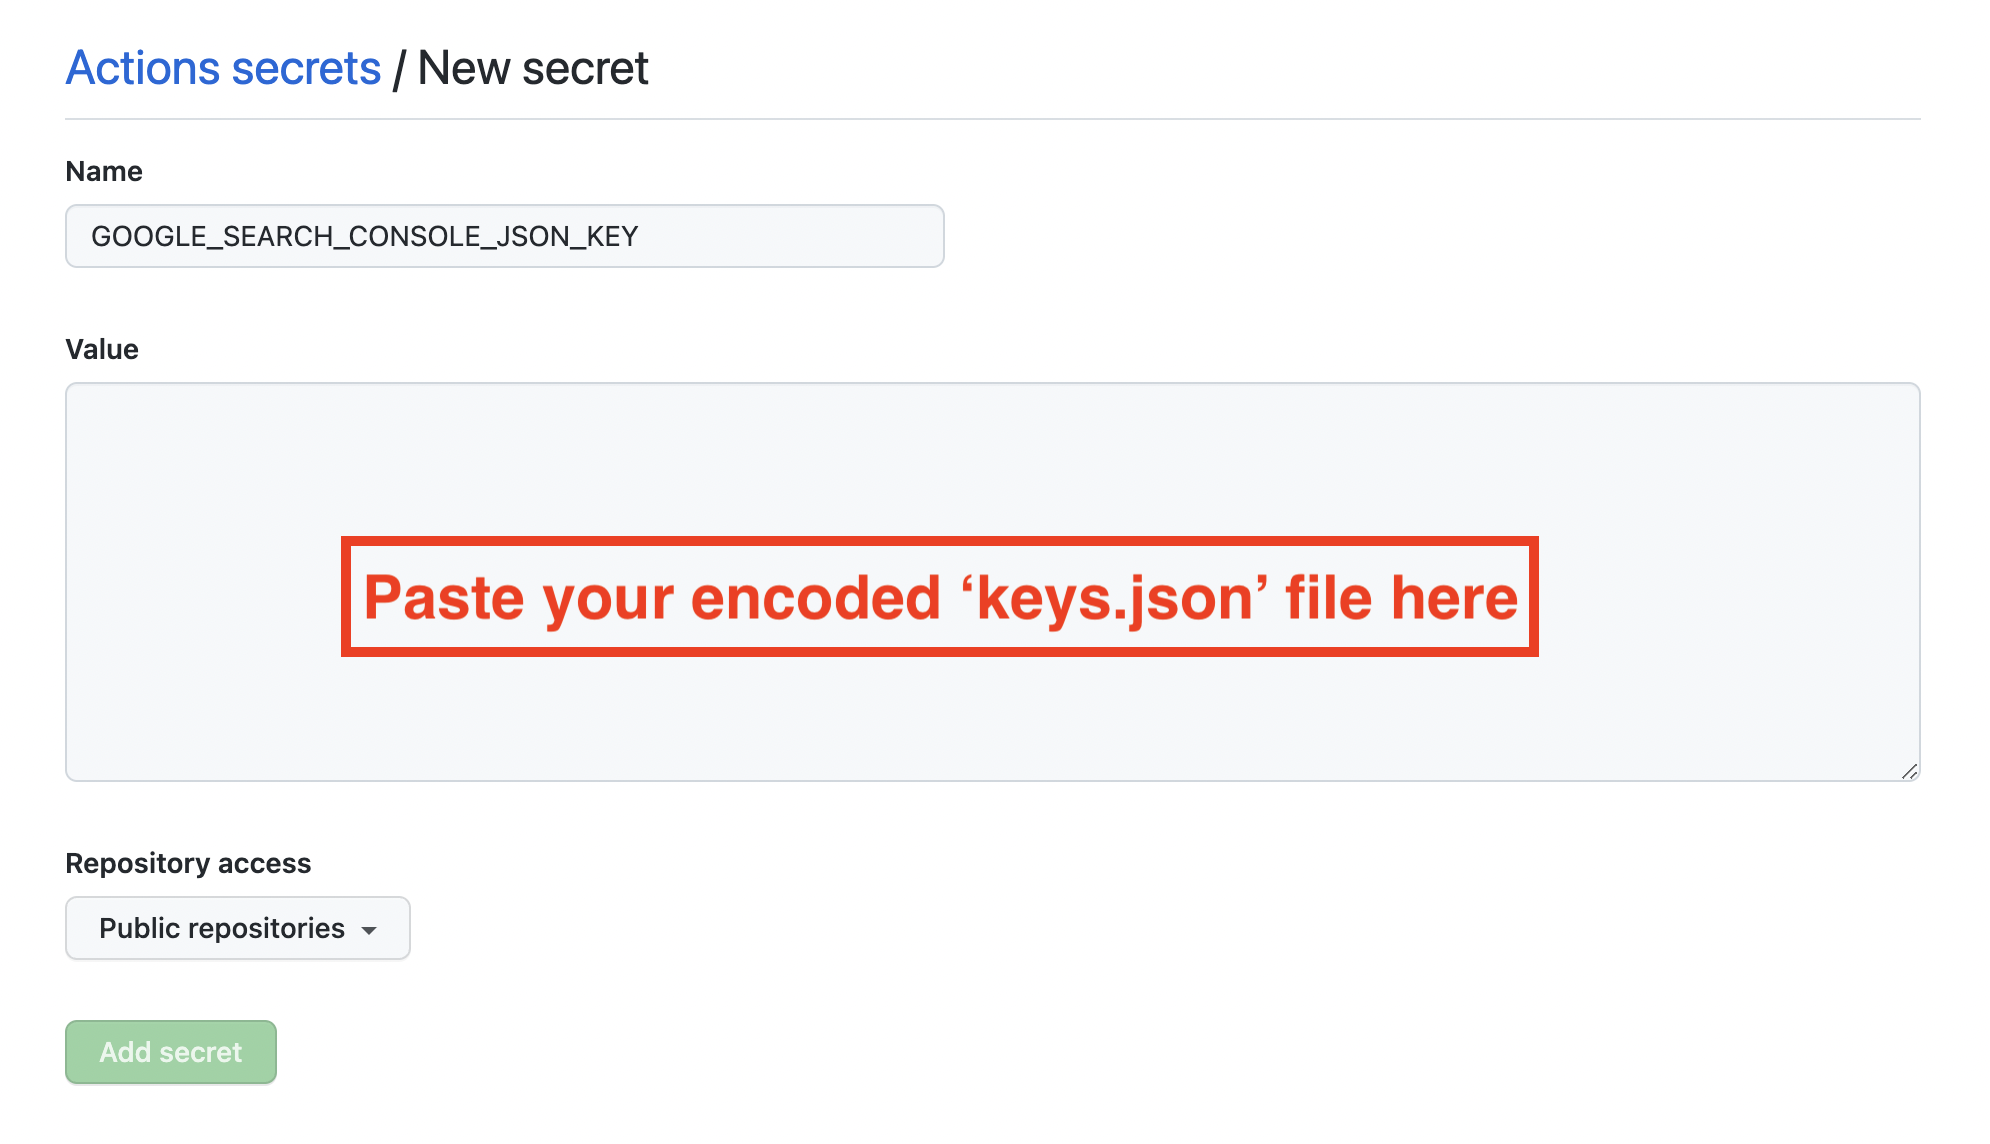
To do this, in your terminal window, navigate to the directory where your keys.json file is stored, this is the file that contains your Client ID, Private key etc.
Generate an encoded version of this file by running the following command:
cat keys.json | base64 | pbcopy
This will copy the file encoding to your clipboard and you will paste it in the next step.
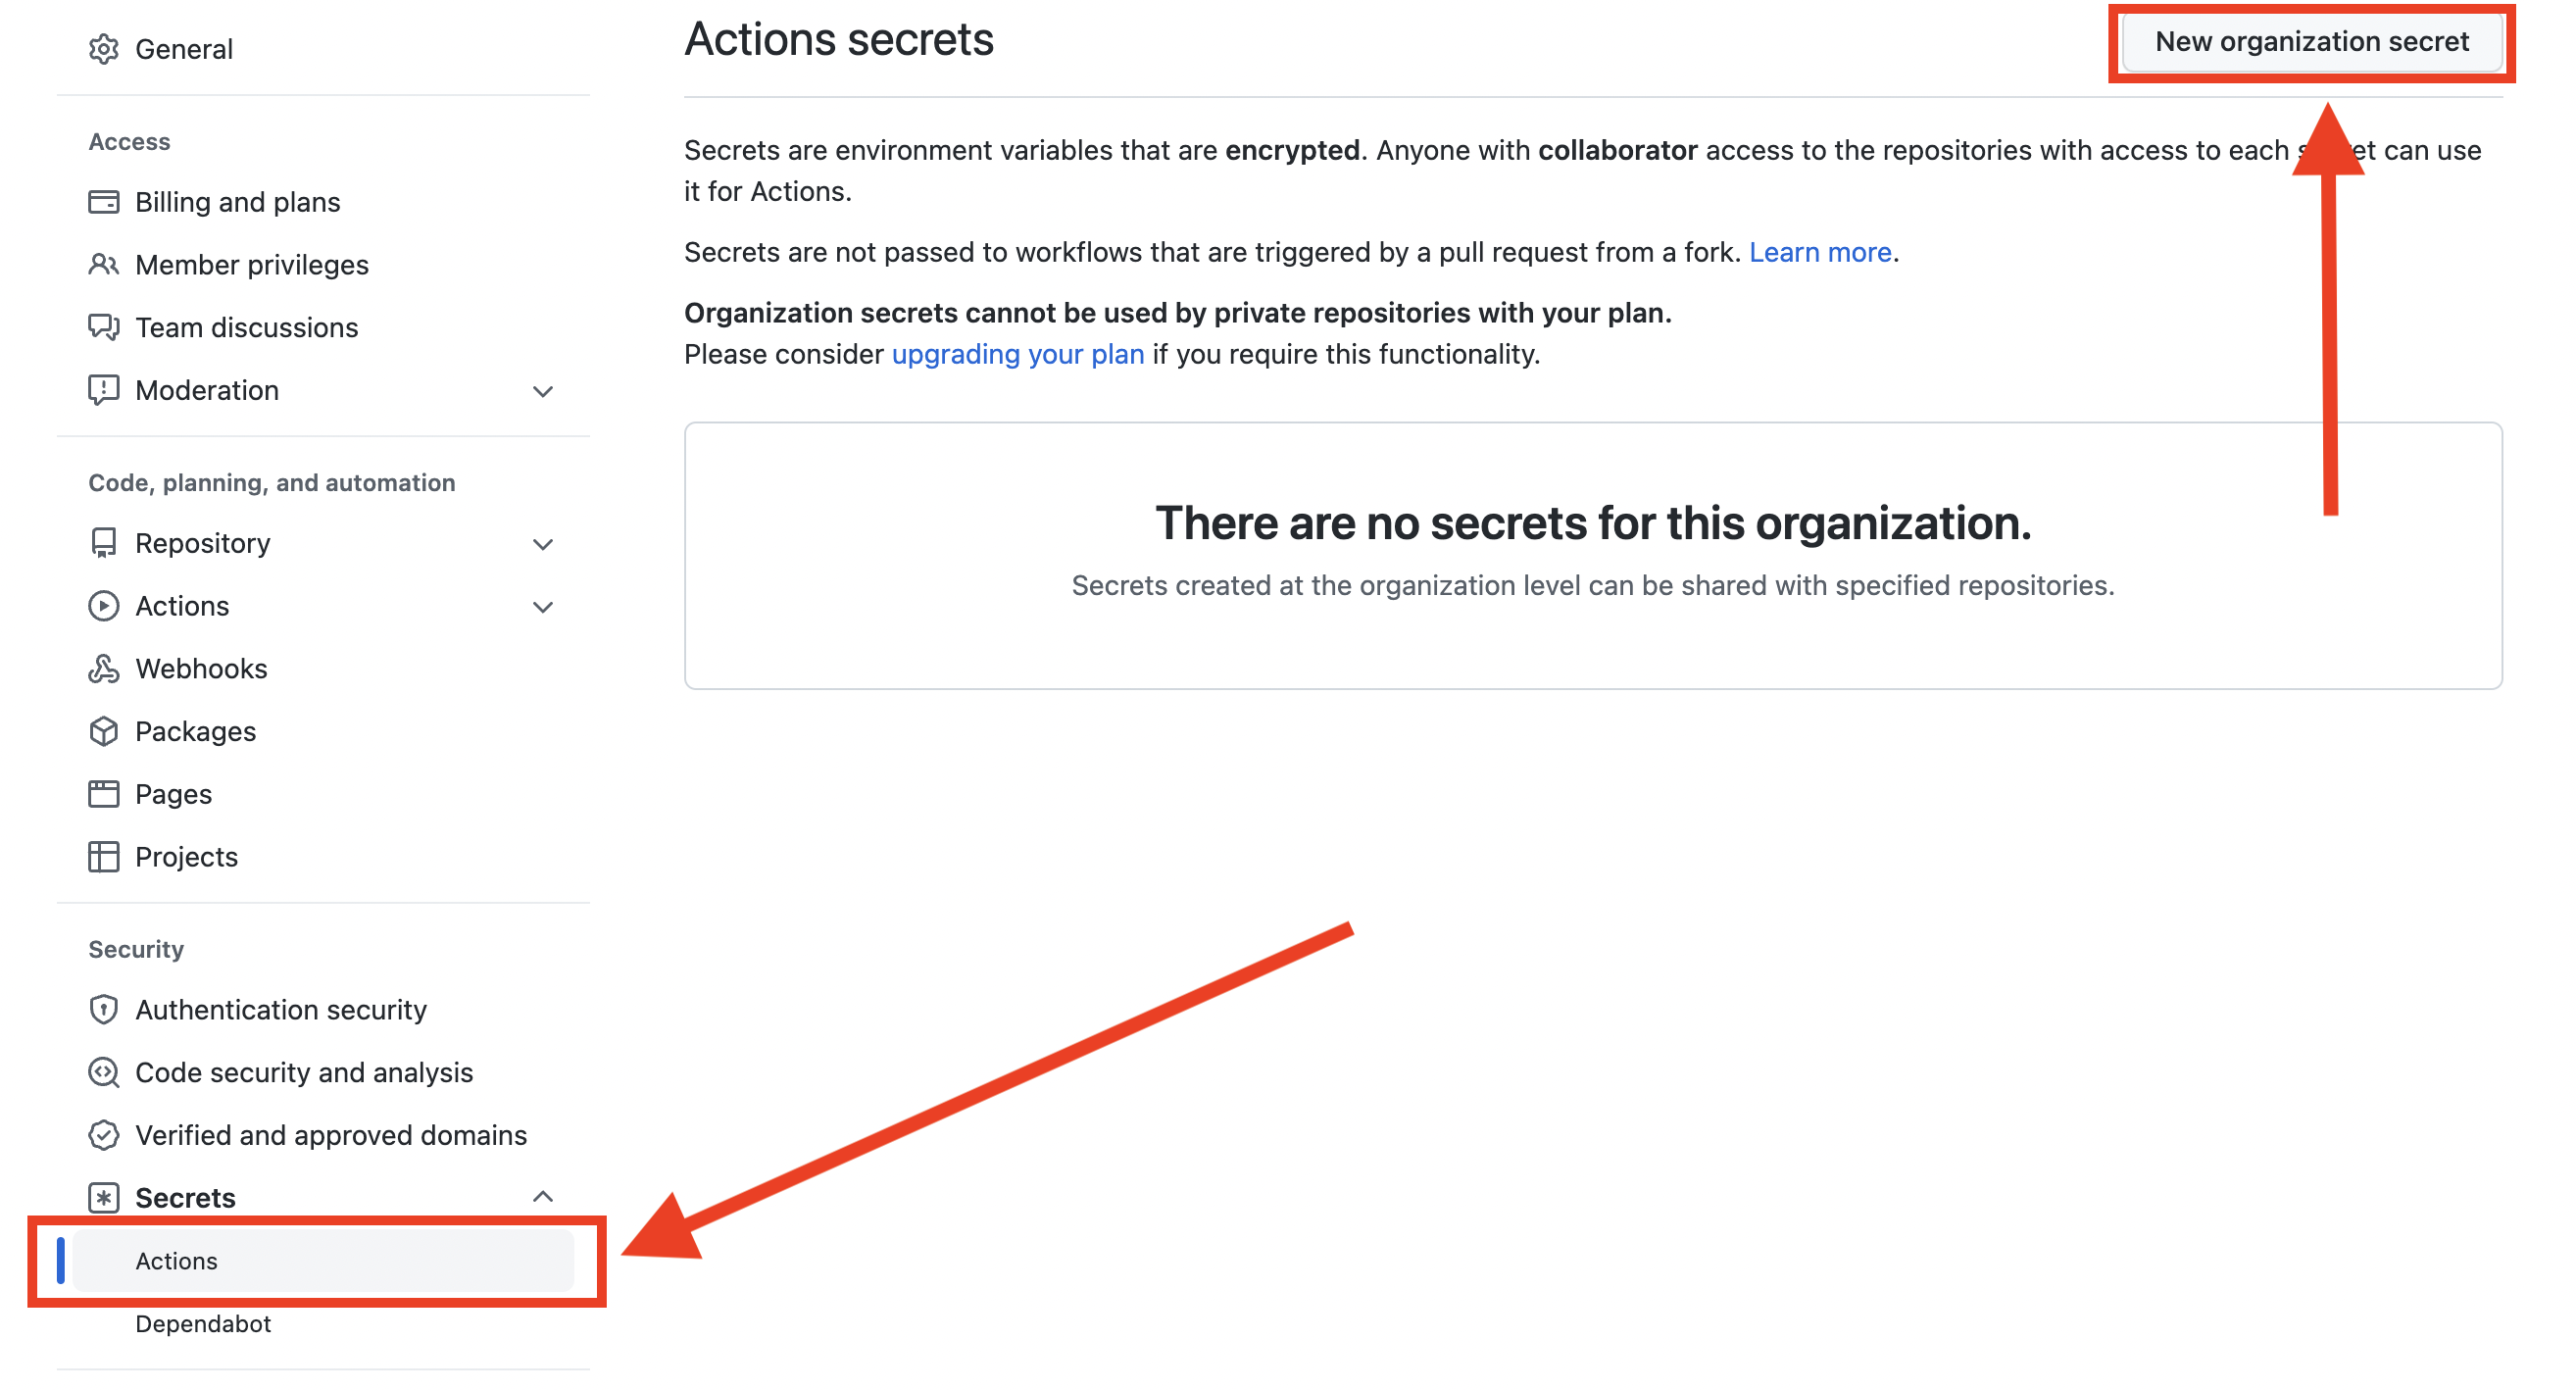
Next, for your GitHub Organization navigate to: Settings > Security > Secrets > Actions and click on New Organization Secret

On this screen, set the name to GOOGLE_SEARCH_CONSOLE_JSON_KEY, paste in the encoded file from your clipboard and hit save.

That’s it! Now anytime you publish an update to your website, GitHub will automatically trigger the Workflow Action that will submit an updated sitemap to Google using your publish scripts. You can check on the Google Search Console to verify the results!

Conclusion
Hopefully that was helpful in getting you set up with automations for your website and to speed up your content’s discovery on organic search. Remember, you can download the codebase on Statefuls's GitHub and easily copy/paste the files you need directly into your codebase.
