Using the Google Calendar API in React.js: An In-Depth Guide
Google Calendar API is one of the most powerful calendar APIs on the market today, and it has a plethora of features. It's hard for a developer to understand all of them, and it's even more difficult for a developer to implement them all in a React.js application.
This post is a comprehensive step-by-step guide for the Google Calendar API in React.js. It will cover the different aspects of the Google Calendar API and show you how to use them with React.js.
We'll build a simple React app that uses Google Calendar API and that lists and adds events to your calendar. Let’s dive in. You can checkout and run the example application locally via Runme.
First, you need to have a Google account and basic understanding of how React works
Requirements for Integrating Google Calendar API
Before integrating Google Calendar API with React, you need to understand the prerequisites required to make this work. First, you need to have a Google account and a basic understanding of how React works.
Furthermore, the following are a few more prerequisites you'll need:
- Node >= 14.0.0 and NPM >= 5.6 installed on your system
- Understanding of CLI tools such as NPX
- Basic understanding of how APIs work
That's all you need to follow along with this guide. We'll first create an API key for using the Google Calendar API, then we'll set up the React application that will consume the API.
We’ll create and use an access token from the Google Developer Playground for generating the token
Creating an API Key and Access Token for Accessing Google Calendar API
As discussed earlier, we'll implement two functionalities in the application:
- List calendar inputs
- Add events to the calendar
You'll need an API key to list events from the calendar, but for adding an event to the calendar, an API key won’t work. We'll create and use an access token from the Google Developer Playground for generating the token.
How to Generate an API Key From Google Cloud Console
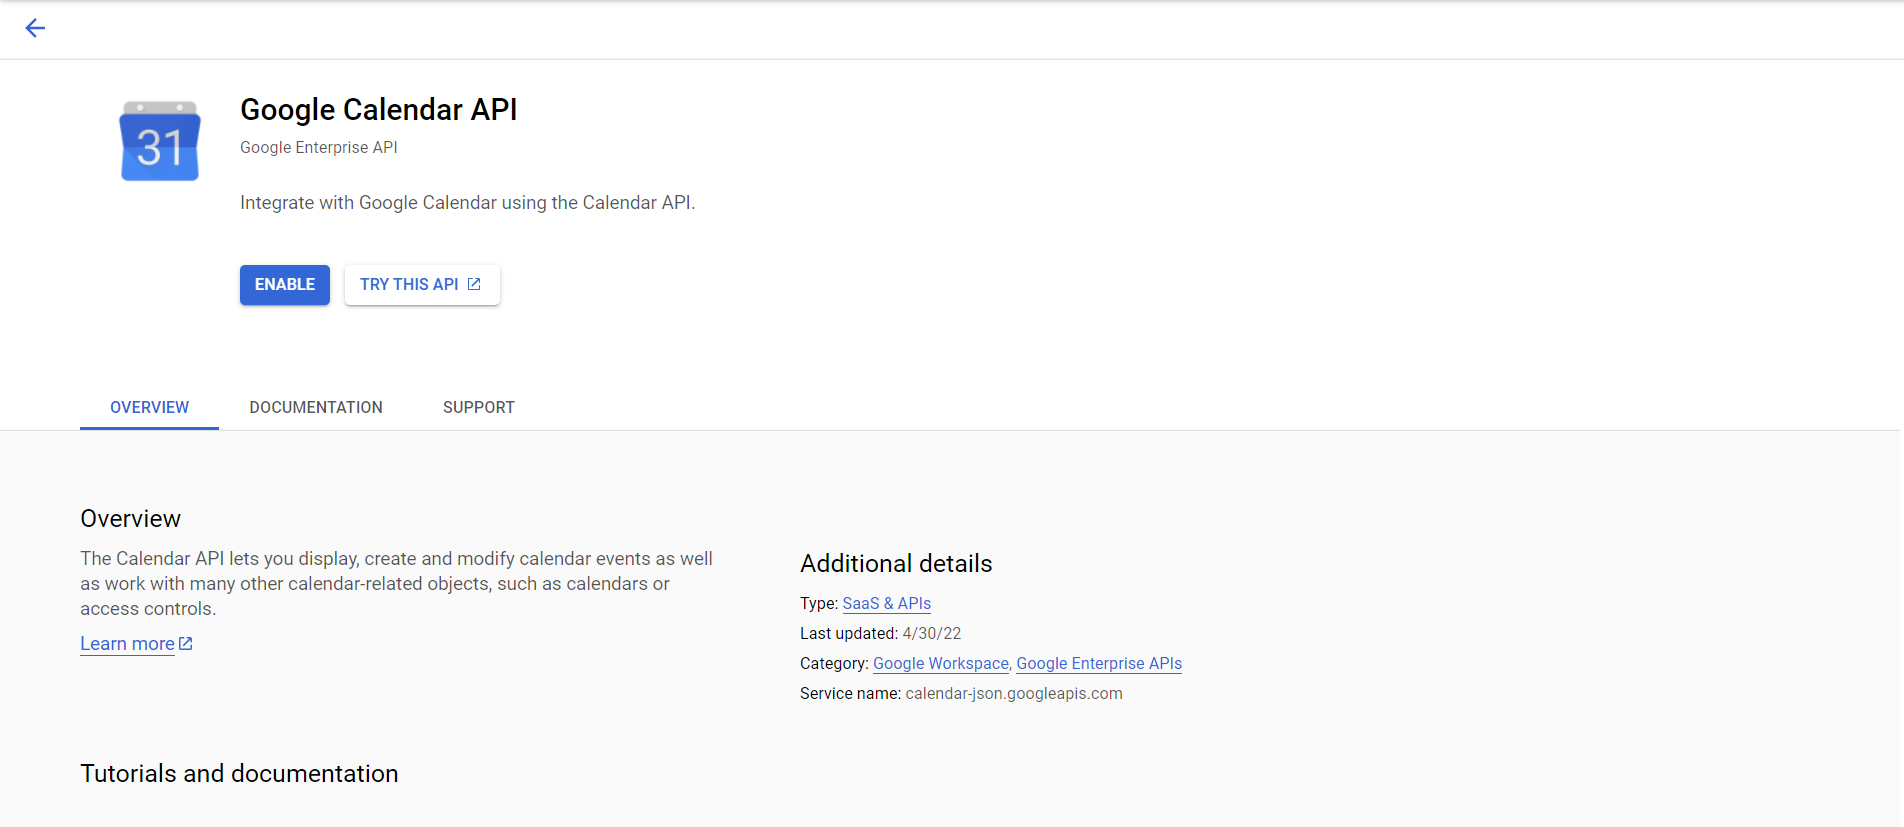
Before generating an API key, navigate to the library tab in the Google Cloud Console and enable Google Calendar API.
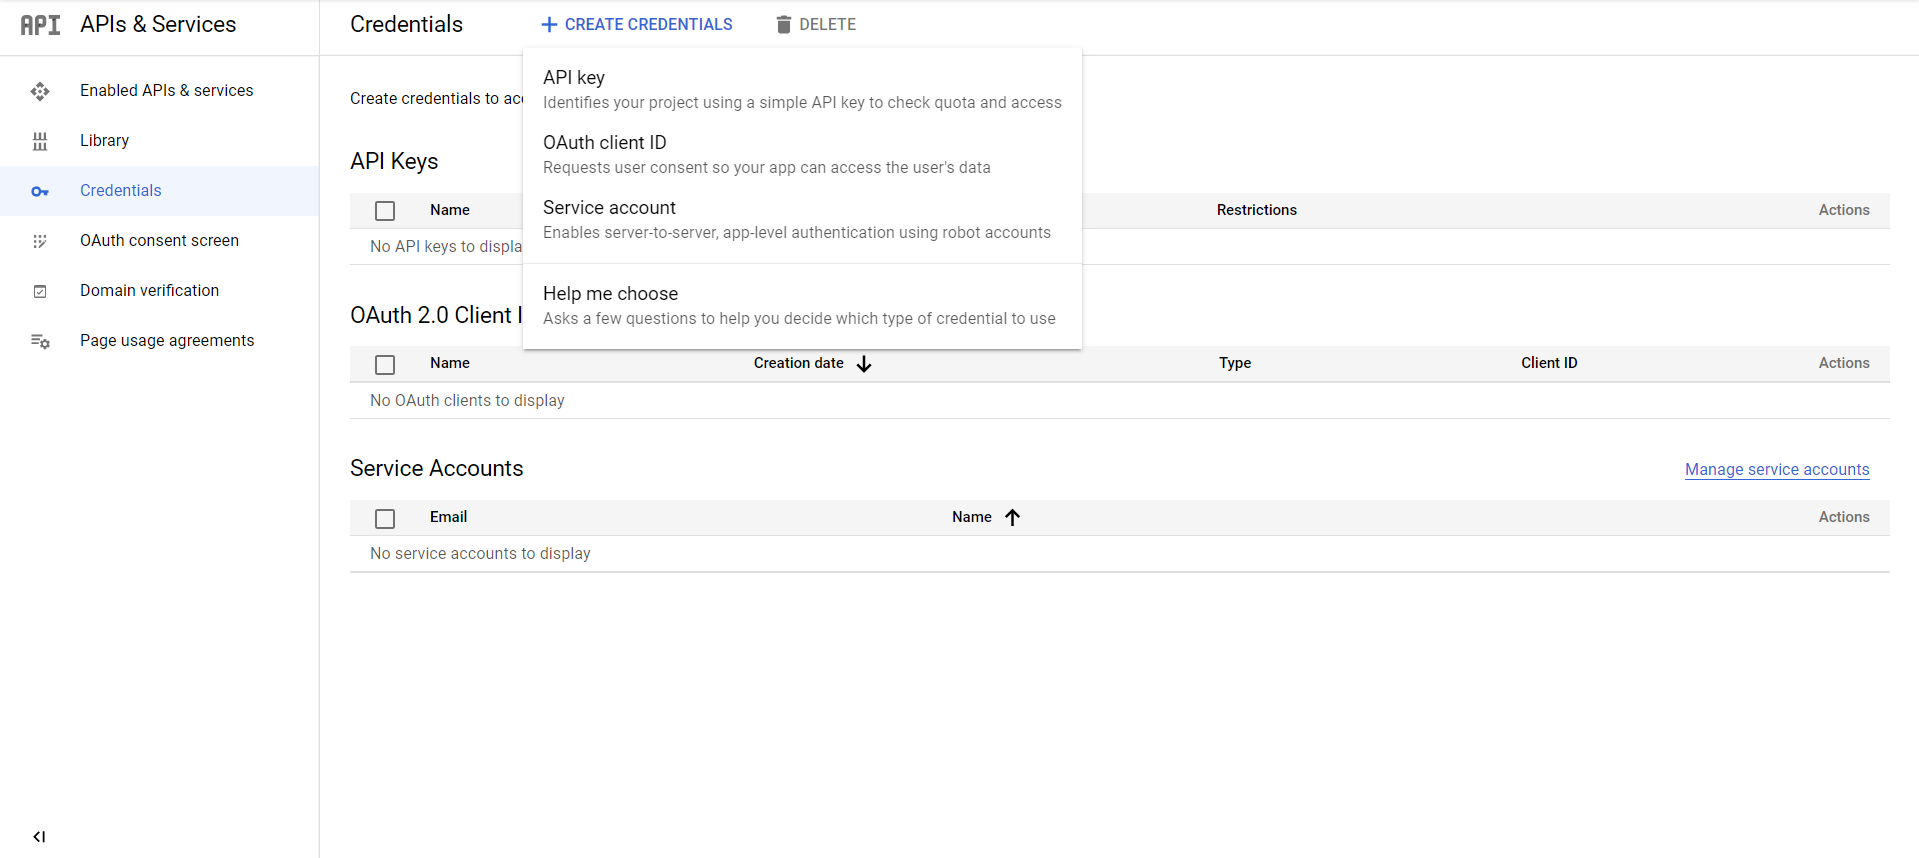
It’s time to generate the API key. Move to the Credentials tab from the left sidebar and click "Create Credentials." From the dropdown, select "API key." Once the API key is generated successfully, keep it someplace safe until we start with the actual coding.
How to Generate an Access Token From Developer Playground
To add events to your calendar, you must pass an access token in your request headers for authentication.
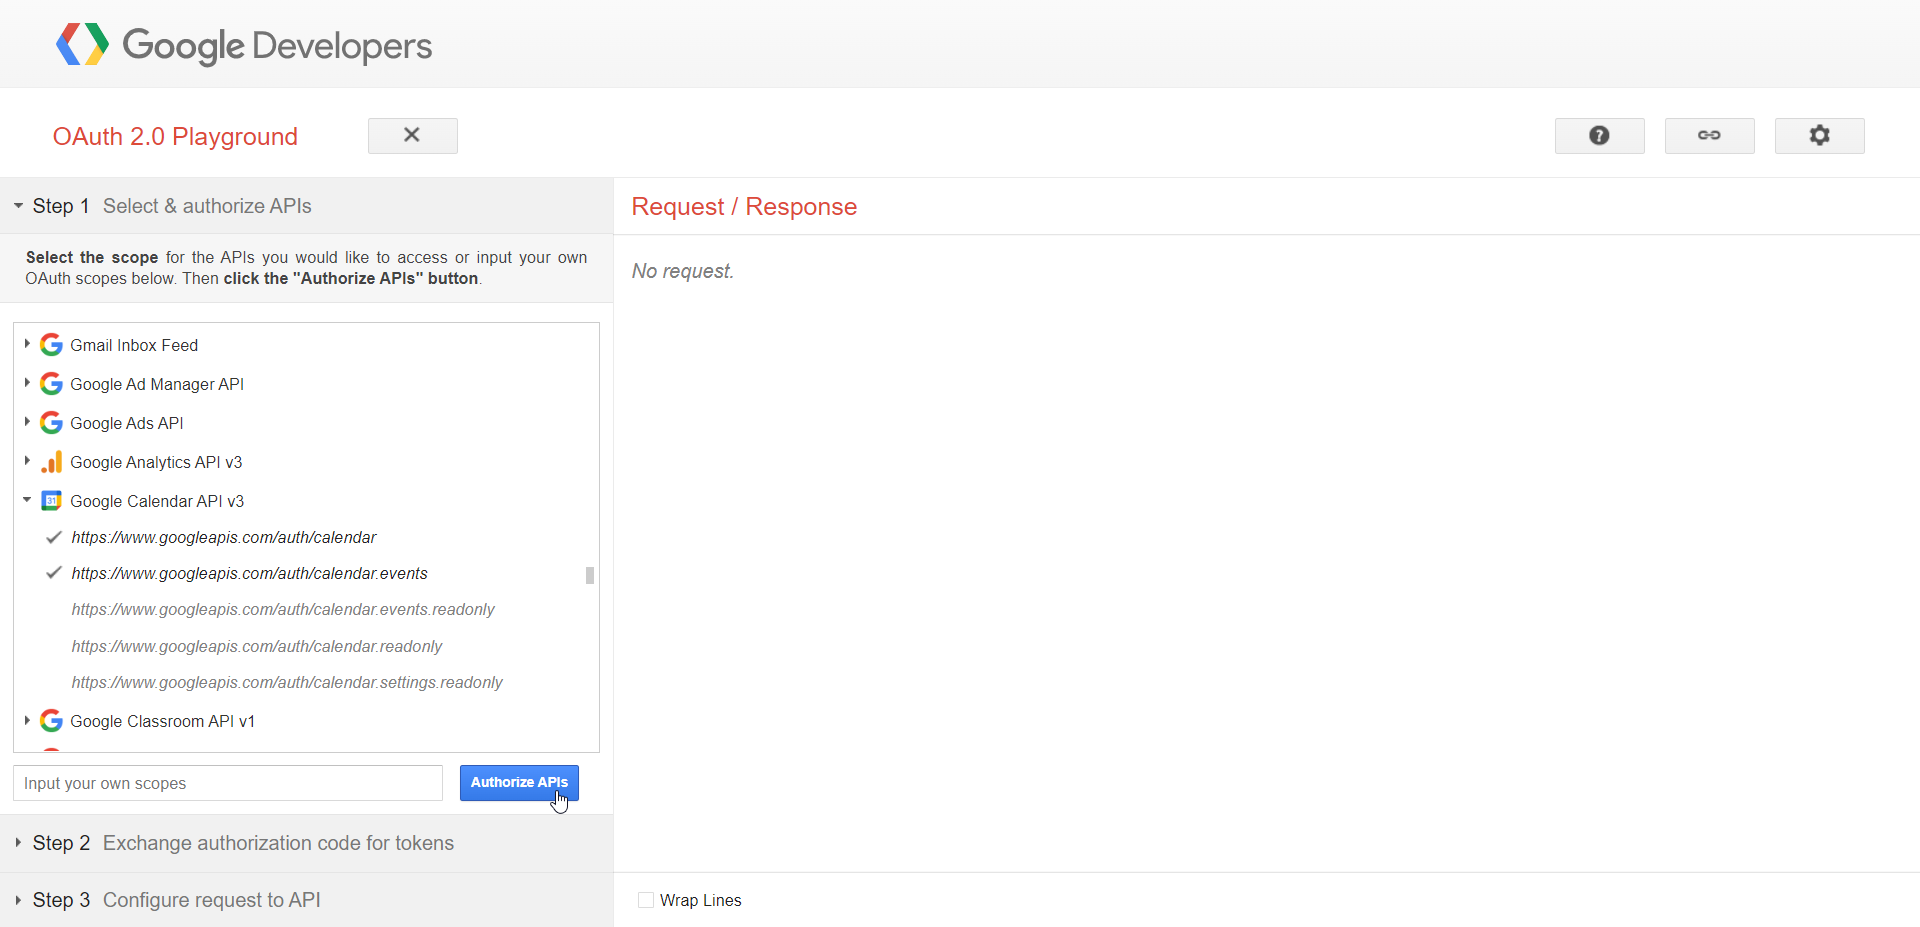
You can quickly generate an access token from Google OAuth Playground. Select "Google Calendar API V3" from the list and click "Authorize APIs."
You will now be redirected to the Google consent screen, where you have to select the Google account you’ll be using. Press Continue to accept the terms, and you’ll be redirected to the following screen:
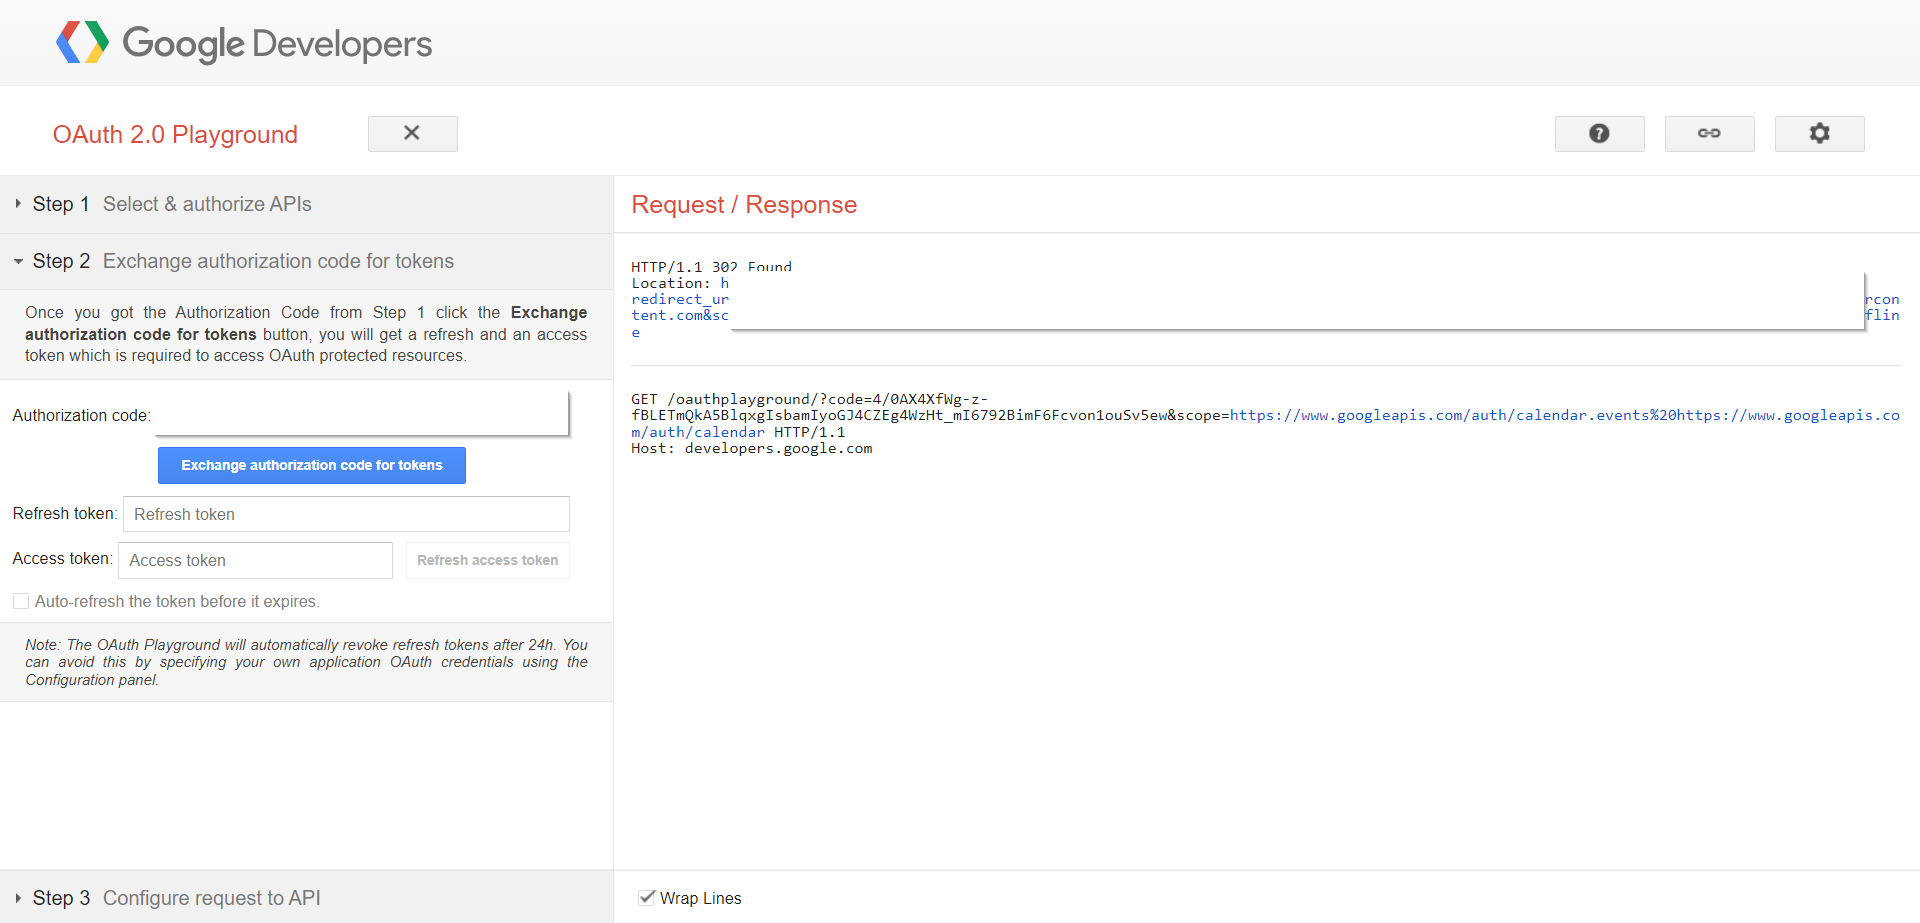
Note: The access code is only valid for 3,600 seconds for security reasons.
If the token expires by the time you start writing code, you can click "Refresh Access Token," and a new token will be issued. You can also auto-refresh the token before it expires to avoid the hassle.
Now that you have successfully generated the API key and the access token, it’s time to code. Take into account this access token is for development purposes only. In a real-world scenario, your application needs to ask for user authorization to access their Calendar, and you will get an access token after the user consent access.
Integrating React App With Google Calendar API
You can play around with final example application by cloning and checking it out locally via Runme! Otherwise follow the next steps and run them manually.
First, create a new React app using create-react-app. You can use the following command to create an app:
npx create-react-app react-gcal-api
Once the above command is complete, navigate to the directory using cd react-gcal-api and start the server.
npm run start
The above command will start your React application on http://localhost:3000.
For better styles, you can useTailwind CSS as well. Use the following command from the root of your project:
npm install -D tailwindcss postcss autoprefixer
npx tailwindcss init -p
This will installtailwindcss, postcss and autoprefixer and create a tailwind.config.js file. Open the tailwind.config.js file and update the content.
module.exports = {
    content: ['./src/**/*.{js,jsx,ts,tsx}'],

    theme: {
        extend: {},
    },

    plugins: [],
}
You're ready with your setup, and now it’s time to integrate the API. To securely save the secrets, install the dotenv package using the following command:
npm install dotenv
After the dotenv package is successfully installed, create a .env file and add the following code:
REACT_APP_GOOGLE_API_KEY = ''

REACT_APP_GOOGLE_ACCESS_TOKEN = ''

REACT_APP_CALENDAR_ID = ''
Note: You can find Calendar ID from Calendar settings > Integrations tab.
Install one more NPM package to load the Google API script using the following command:
npm i gapi-script
Remove the default code from App.js and all the default styling (from CSS files) and add the following code to the App.js file:
import React, { useEffect, useState } from 'react'
import { gapi } from 'gapi-script'

function App() {
    const calendarID = process.env.REACT_APP_CALENDAR_ID
    const apiKey = process.env.REACT_APP_GOOGLE_API_KEY
    const accessToken = process.env.REACT_APP_GOOGLE_ACCESS_TOKEN

    return (
        <div className="App pt-4">
            <h1 className="mb-4 text-2xl font-bold">
                React App with Google Calendar API!
            </h1>
        </div>
    )
}

export default App
In the above code, you have imported gapi from the gapi-script module and created three variables for storing secrets, including the following:
- API key
- Access token
- Google Calendar ID
Now create the first function to fetch the list of events from the calendar.
const getEvents = (calendarID, apiKey) => {
    function initiate() {
        gapi.client
            .init({
                apiKey: apiKey,
            })

            .then(function () {
                return gapi.client.request({
                    path: `https://www.googleapis.com/calendar/v3/calendars/${calendarID}/events`,
                })
            })

            .then(
                (response) => {
                    let events = response.result.items
                    return events
                },
                function (err) {
                    return [false, err]
                }
            )
    }

    gapi.load('client', initiate)
}
In the above code, there's a function named getEvents that takes in CalendarID and apiKey as arguments and sets the output to the list of events using setEvents.
Add the function App.js file, then update the App.js file with the following code:
import React, { useEffect, useState } from 'react'
import './App.css'
import { gapi } from 'gapi-script'
import Event from './components/Event.js'

function App() {
    const [events, setEvents] = useState([])

    const calendarID = process.env.REACT_APP_CALENDAR_ID
    const apiKey = process.env.REACT_APP_GOOGLE_API_KEY
    const accessToken = process.env.REACT_APP_GOOGLE_ACCESS_TOKEN

    const getEvents = (calendarID, apiKey) => {
        function initiate() {
            gapi.client
                .init({
                    apiKey: apiKey,
                })
                .then(function () {
                    return gapi.client.request({
                        path: `https://www.googleapis.com/calendar/v3/calendars/${calendarID}/events`,
                    })
                })
                .then(
                    (response) => {
                        let events = response.result.items
                        setEvents(events)
                    },
                    function (err) {
                        return [false, err]
                    }
                )
        }
        gapi.load('client', initiate)
    }

    useEffect(() => {
        const events = getEvents(calendarID, apiKey)
        setEvents(events)
    }, [])

    return (
        <div className="App flex flex-col justify-center py-8">
            <h1 className="mb-4 text-2xl font-bold">
                React App with Google Calendar API!
                <ul>
                    {events?.map((event) => (
                        <li key={event.id} className="flex justify-center">
                            <Event description={event.summary} />
                        </li>
                    ))}
                </ul>
            </h1>
        </div>
    )
}

export default App
In the above code snippet, you've imported the helper function from the helpers/index.js file and called it in useEffect. You need an Event component that renders the details of the event, so let’s create that.
Create a new directory in the src folder named "Components" and create a new file named Event.js. Paste the following code in the Event.js file:
import React from 'react'

function Event({ description }) {
    return (
        <div className="via-navy-500 mt-4 w-1/4 rounded-2xl bg-gradient-to-r from-blue-500 to-purple-500 p-1 shadow-xl">
            <span className="block rounded-xl bg-white sm:p-2" href="">
                <div className="sm:pr-8">
                    <p className="mt-2 text-sm text-black">{description}</p>
                </div>
            </span>
        </div>
    )
}

export default Event
To make the application look good, I’ve added minimal CSS. Now head over to the App.css file and paste the following code:
@tailwind base;
@tailwind components;
@tailwind utilities;

* {
    margin: 0;
    padding: 0;
    box-sizing: border-box;
}

.App {
    background: #0e1217;
    font-family: 'Roboto', sans-serif;
    min-height: 100vh;
    text-align: center;
    color: white;
}

.color-purple {
    color: #ce3df3;
}
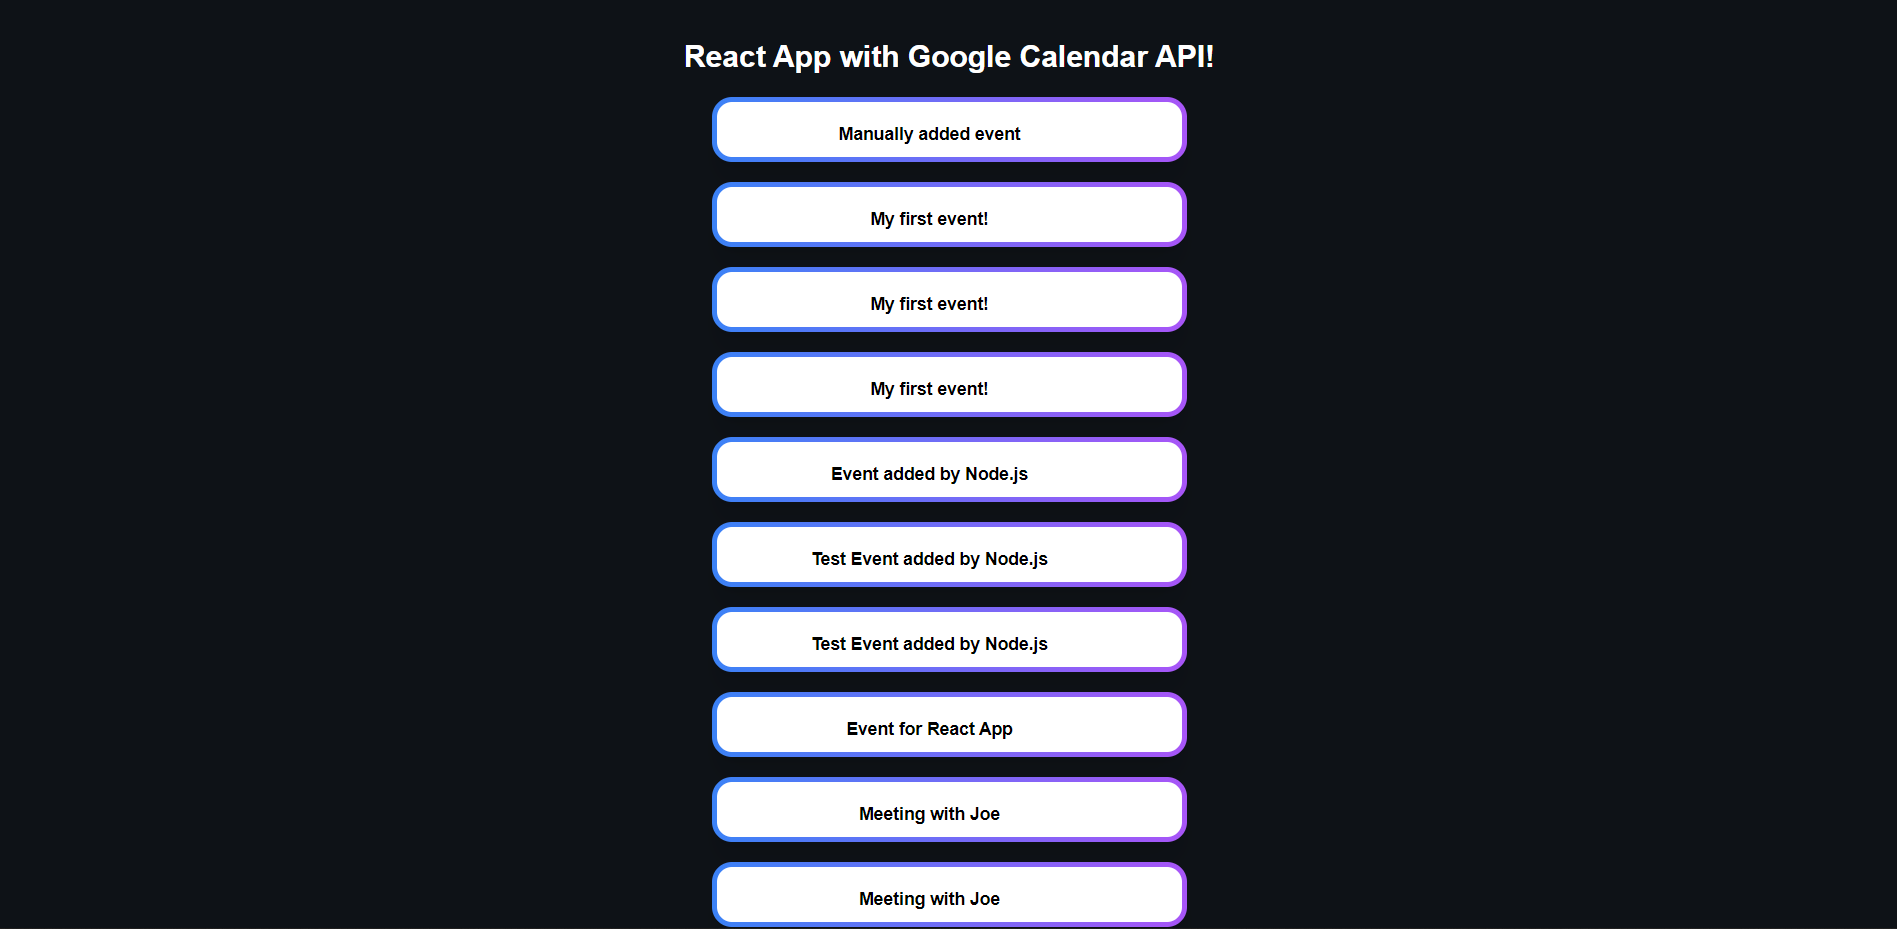
If you now open your browser, you’ll see a list of events on the screen like this:
Let’s also create one more function that will add events to the calendar. Paste the following function in the App.js file:
const addEvent = (calendarID, event) => {
    function initiate() {
        gapi.client
            .request({
                path: `https://www.googleapis.com/calendar/v3/calendars/${calendarID}/events`,
                method: 'POST',
                body: event,
                headers: {
                    'Content-type': 'application/json',
                    Authorization: `Bearer ${accessToken}`,
                },
            })
            .then(
                (response) => {
                    return [true, response]
                },
                function (err) {
                    console.log(err)
                    return [false, err]
                }
            )
    }
    gapi.load('client', initiate)
}
The function mentioned above uses the access token that you generated from the OAuth Playground. The addEvent function takes in calendarID and event as arguments. An event is an object that looks like this:
var event = {
    summary: 'Hello World',
    location: '',
    start: {
        dateTime: '2022-08-28T09:00:00-07:00',
        timeZone: 'America/Los_Angeles',
    },
    end: {
        dateTime: '2022-08-28T17:00:00-07:00',
        timeZone: 'America/Los_Angeles',
    },
    recurrence: ['RRULE:FREQ=DAILY;COUNT=2'],
    attendees: [],
    reminders: {
        useDefault: false,
        overrides: [
            { method: 'email', minutes: 24 * 60 },
            { method: 'popup', minutes: 10 },
        ],
    },
}
You can call the addEvent function with any to-do list or other task management application.
Conclusion
Google Calendar API is a powerful way to display events in your application. This is a widespread use case for many applications. We hope this post has helped you understand how to use Google Calendar API in your ReactJS application.
This post was written by Keshav Malik. Keshav is a full-time developer who loves to build and break stuff. He is constantly on the lookout for new and interesting technologies and enjoys working with a diverse set of technologies in his spare time. He loves music and plays badminton whenever the opportunity presents itself.
