Build a Plugin System With Node.js
Writing a plugin system enables your application to be extensible, modular, and customizable. This is a guiding principle for the most popular Node.js web frameworks, as we already covered in our previous blog post Plugin Architecture Overview Between Express, Fastify and NestJS.
This blog post will cover how to build a plugin system from scratch. As an example, we will be creating a simple CLI application that applies a text transformation plugin to an entry text, and the user selects the plugin to use:

You can build a plugin system as complex as you want, but it comes at a cost. I recommend you design a plugin system that aims for simplicity, yet powerful enough to allow your system to be highly customizable.
Building a Plugin System With Node.js
We’re going to build a CLI application that allows a user to select and apply a text transformation plugin to an entry text.
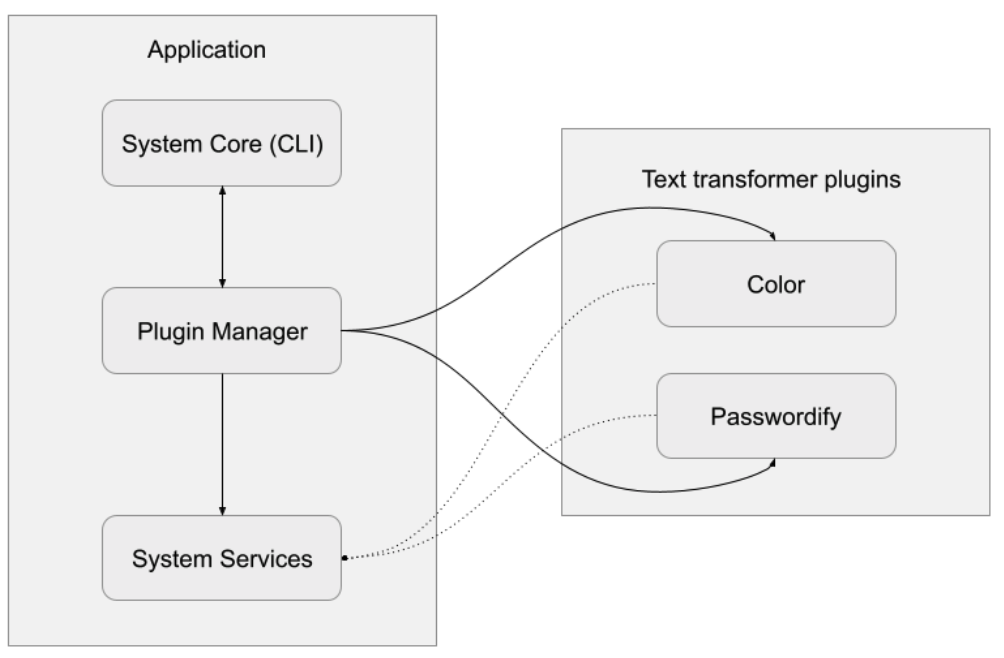
Let’s define the main components acting in our plugin system:
- System Core: Defines the minimum functionalities of the system.
- System Services: Extended functionalities from the system implemented via plugins.
- Plugin Manager: Manage the plugin’s lifecycle. It handles the registration and loading of the plugins.
- Plugin: Represents an independent functionality executed in the context of a system service that extends the system functionality. All the system plugins follow a standard interface.

System Core
The Core of our example is CLI program with a text prompt that can execute transformation plugins chosen by the user. In case there are no plugins added, we load an echo plugin by default, so the user at least can see something in action.
- The CLI is wrapped around a TextCLI class with a constructor that receives a pluginManager.
- The CLI is displayed by calling the displayPrompt method.
- The plugin manager can create an instance of the selected plugin by using the registered plugin name:
const textPlugin = this.pluginManager.loadPlugin<TextPlugin>(answer.pluginName);
console.log(`This is the transformed result for ${answer.text}: ${textPlugin.transformText(answer.text)}`);
As you may have noticed, we use TypeScript generics to keep a great developer experience by using the editor’s IntelliSense to see the supported plugin methods. Our plugin system only supports a TextPlugin with a transformText method.
Let's see the full implementation of the TextCLI class. We use the popular inquirer npm package to create the command-line interface.
import PluginManager from '@text-plugins/plugin-manager';
import { TextPlugin } from '@text-plugins/types';
import inquirer from 'inquirer';

export interface ITextSelectedChoice {
 text: string;
 pluginName: string;
}

class TextCLI {
 private pluginManager: PluginManager;

 constructor(pluginManager: PluginManager) {
   this.pluginManager = pluginManager;
   // Register the default behavior plugin
   this.pluginManager.registerPlugin({
     name: 'echo-plugin',
     packageName: './echoPlugin',
     isRelative: true
   });
 }

 displayPrompt(): void {
   const pluginChoices: string[] = [];
   this.pluginManager.listPluginList().forEach((plugin) => {
     pluginChoices.push(plugin.name);
   });

   inquirer
     .prompt([
       {
         type: 'input',
         name: 'text',
         message: 'What text do you want to transform?',
       },
       {
         type: 'list',
         name: 'pluginName',
         message: 'What plugin do you want to execute?',
         choices: pluginChoices,
       },
     ])
     .then((answer: ITextSelectedChoice) => {
       // Execute the plugin
       const textPlugin = this.pluginManager.loadPlugin<TextPlugin>(answer.pluginName);
       console.log(`This is the transformed result for ${answer.text}: ${textPlugin.transformText(answer.text)}`);
     });
 }
}

export default TextCLI;
Plugin Manager
The application will load the plugins as npm packages or modules within the same application (co-located). Up to you! But if you’re allowing third-party developers to extend the functionality of your application via plugins, npm packages are the best option! We will cover both examples.
Co-located plugin
The Plugin manager registers a plugin located in a relative path from your core application:
import PluginManager from '@text-plugins/plugin-manager';
const manager = new PluginManager(__dirname);
manager.registerPlugin({
 name: 'passwordify-plugin',
 packageName: './plugins/passwordify',
 isRelative: true, // Specify this is a plugin living in a relative path
 options: {
   symbol: '*',
 },
});
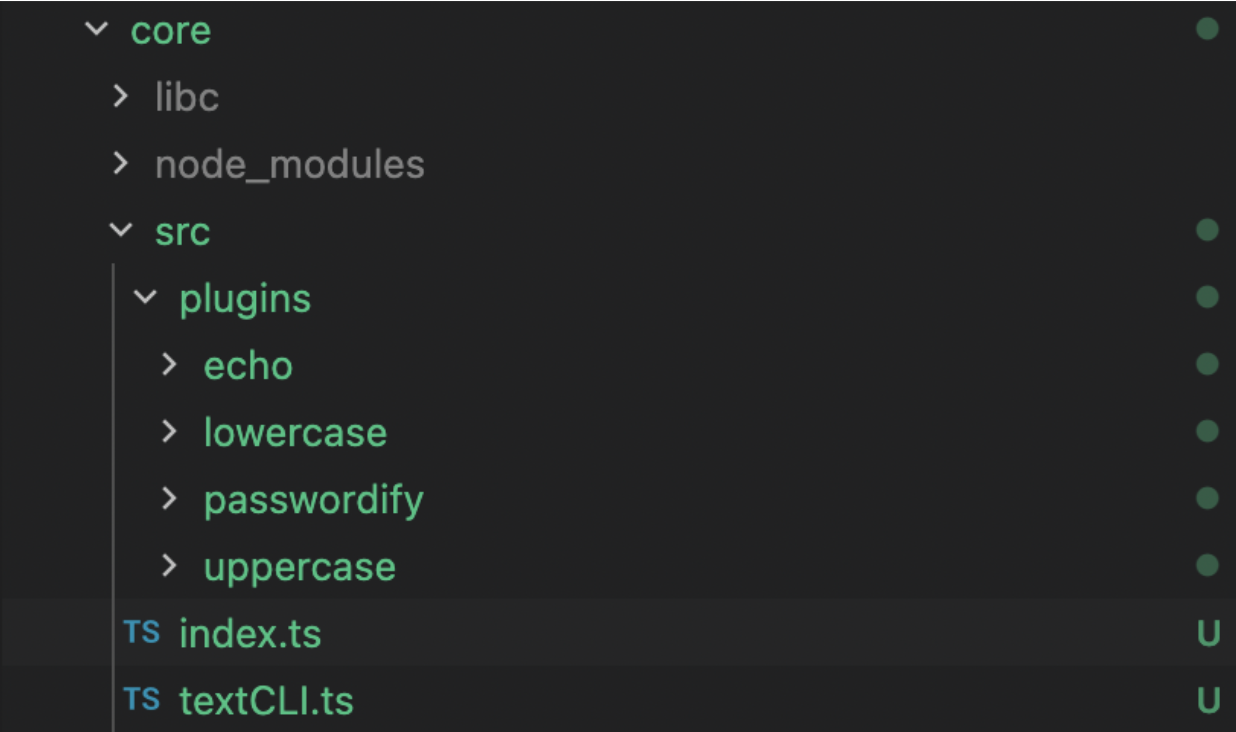
Co-located plugins organized in a folder with the core system.

Independent npm package
A npm package installed from a private or public npm registry.
import PluginManager from '@text-plugins/plugin-manager';
const manager = new PluginManager(__dirname);
manager.registerPlugin({
 name: 'colors-plugin',
 packageName: '@text-plugins/colors',
});
See source code on GitHub.
The key part of our system is the plugin manager, a special class that handles two important functionalities:
- Register a plugin
- Load a plugin
Register a plugin
Define a register method that keeps an in-memory list of the plugins, it performs some basic validations (the plugins are not duplicated and the package can be loaded). We manage the plugin list using a Map.
private pluginList: Map<string, IPlugin>;
Let’s see the implementation of the register method:
 registerPlugin(plugin: IPlugin): void {
   if (!plugin.name || !plugin.packageName) {
     throw new Error('The plugin name and package are required');
   }

   if (this.pluginExists(plugin.name)) {
     throw new Error(`Cannot add existing plugin ${plugin.name}`);
   }

   try {
     // Try to load the plugin
     const packageContents = plugin.isRelative ? requireModule(path.join(this.path, plugin.packageName)) : requireModule(plugin.packageName) ;
     this.addPlugin(plugin, packageContents);
   } catch (error) {
     console.log(`Cannot load plugin ${plugin.name}`, error);
   }
 }
Since the plugin manager supports loading npm packages or modules in directories (co-located), we use some help from the npm package require-module and the isRelative property from the plugin to resolve the plugin location correctly.
The IPlugin interface defines some common properties along all the plugins:
interface IPlugin {
 name: string;
 packageName: string;
 isRelative?: boolean;
 instance?: any;
 options?: any;
}
The plugin manager is added to the System core via its constructor:
import TextCLI from './textCLI';
import PluginManager from '@text-plugins/plugin-manager';
const manager = new PluginManager(__dirname);
new TextCLI(manager).displayPrompt();
Load plugin
Loading a plugin creates an instance of the plugin found by name. If any, it injects the options object, which is very useful to specify configuration values to our plugin (similar to Fastify).
Despite loading the plugin dynamically, we use the power of TypeScript generics to have a smooth developer experience. This generic type represents the plugin contract. Our example will describe the authorized actions that each plugin can perform.
 loadPlugin<T>(name: string): T {
   const plugin = this.pluginList.get(name);
   if (!plugin) {
     throw new Error(`Cannot find plugin ${name}`);
   }
   plugin.instance.default.prototype.options = plugin.options;
   return Object.create(plugin?.instance.default.prototype) as T;
 }
The Plugin contract
A plugin contract represents what actions a plugin can execute by interacting with the system services layer. In our example, we will use it to expose different transform behaviors to the CLI: Change color, replace characters, uppercase the text, etc. They’re simple enough to understand how it works, but you can extend these principles to build more complex contracts.
One of the critical parts of a Plugin is that it should respect the application contract. Since we’re using TypeScript in our example, it is easy to define the constraints of the plugin by defining clear actions supported. In this case, the application will support only text transformer plugins. We can represent the plugin contract using an abstract class.
An abstract class defines methods that need to be implemented by another Class. In our case, the plugin implementation for a text transformer.
abstract class TextPlugin {
 options: any;
 abstract transformText(text: string): string;
}
In our example, the plugins can transform the text in multiple ways by implementing the transformText method.
Let’s see how the color plugin works:
import { TextPlugin } from '@text-plugins/types';
import colors from 'colors';

class ColorsPlugin extends TextPlugin {
   transformText(text: string): string {
       return colors.rainbow(text);
   }
}

export default ColorsPlugin;
This is a really simple plugin that converts the text to a rainbow:


See source code at GitHub
Let’s see another transformation plugin:
The passwordify plugin, creates a mask for the original text by replacing the original characters with a symbol provided via options:
import { TextPlugin } from '@text-plugins/types';

class PasswordifyPlugin extends TextPlugin {
    transformText(text: string): string {
      return text.replace(/./g, this.options.symbol);
   }
}

export default PasswordifyPlugin;
The options are specified via the Plugin Manager:
manager.registerPlugin({
   name: 'passwordify-plugin',
   packageName: './plugins/passwordify',
   options: {
       symbol: '*'
   }
 });
To Wrap up
So far, you’ve learned how to create a basic plugin system with Node.js by relying on the power of TypeScript and understanding how to define a standard interface for registering plugins; The plugin manager can be as complicated as you want, using Dependendency injection, reflection, etc. Think about optimizations you can add to it! The basic principles should still apply.
See the full source code on GitHub.
