Blue Green Deployments on AWS
One of the best strategies to minimize downtime for critical services is to implement Blue-Green deployments.
What Are Blue-Green Deployments?

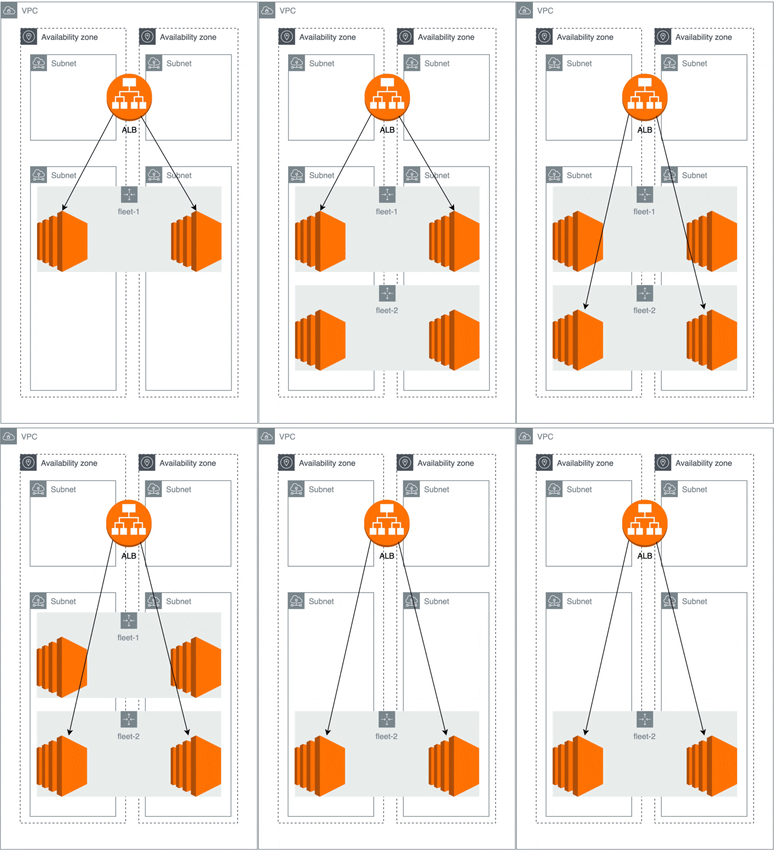
Blue-Green deployments is a deployment strategy that avoids downtime during application deployments and can easily roll back if a deployment fails. You have 2 (or more) server fleets that run a different version of the application. Then you can use DNS or load balancers to shift traffic from one version of the application to the newer version.
Sounds Awesome. How Do I Get Started?
Let's define what components are necessary for a successful blue-green system.
- Fleets: Because Blue-Green is implemented by the use of completely isolated fleets of servers running the application, you need to set up at least one application fleet running a base version of the application to start.
- Loadbalancer: To manage application traffic, an ELB (Elastic Load Balancer) will be used to manage where all the traffic is forwarded to.
Let's also define what the application is. We consider the application to be a simple monolithic stateless API with no external dependencies.
In this blog, we will be using AWS (Amazon Web Services) to perform blue-green deployments.
Application Fleets
To model the application fleet, we consider it to contain an autoscaled fleet of Amazon EC2 instances that runs the application in docker. Let’s model this in CDK:
export default class ApplicationFleetStack extends cdk.Stack {
 constructor(scope: cdk.Contruct, id: string, props?: cdk.Props) {
   // shared between all stacks
   const vpc = new ec2.Vpc(this, "Blue-Green-VPC");
   const asg = new autoscaling.AutoScalingGroup(this, "ASG", {
     vpc,
     instanceType: ec2.InstanceType.of(
       ec2.InstanceClass.BURSTABLE2,
       ec2.InstanceSize.MICRO
     ),
     machineImage: new ec2.AmazonLinuxImage(),
   });

   new cdk.CfnOutput(this, "fleetArn", {
     value: asg.arn,
     exportName: "fleetArn",
   });
 }
}
The above CDK code creates an Auto Scaling Group within AWS, which also creates an underlying launch template.
Load Balancers
AWS offers managed application (L7) load balancers as a service: ALB. Spin up a single ALB with a listener on port 80 for receiving external traffic. In CDK, it would look something like this:
export default class LoadBalancerStack extends cdk.Stack {
 constructor(scope: cdk.Contruct, id: string, props?: cdk.Props) {
   // shared between all stacks
   const vpc = new ec2.Vpc(this, "Blue-Green-VPC");
   const lb = new elbv2.ApplicationLoadBalancer(this, "LB", {
     vpc,
     internetFacing: true,
   });

   const listener = lb.addListener("Listener", { port: 3000 });

   const tg = new elbv2.ApplicationTargetGroup(this, "TG", {
     targetType: elbv2.TargetType.INSTANCE,
     port: 80,
     vpc,
   });

   new cdk.CfnOutput(this, "loadBalancerEndpoint", {
     value: lb.loadBalancerDnsName,
     exportName: "endpoint",
   });

   new cdk.CfnOutput(this, "targetGroupArn", {
     value: tg.arn,
     exportName: "targetGroupArn",
   });
 }
}
Combine The Components To Form An Initial Setup
Spin up one application fleet and a load balancer to have an initial setup. Collect the ARN of the load balancer target group and the autoscaling group that the fleet utilizes from the CDK output.
import AWS from "aws-sdk";

const fleetName = "fleet-1";
const TGArn = "arn:aws.....";

const autoscalingSdk = new AWS.AutoScaling();

await autoscalingSdk
 .attachLoadBalancerTargetGroups({
   TargetGroupARNs: [TGArn],
   AutoScalingGroupName: fleetName,
 })
 .promise();
New Version Released! Time To Upgrade!
Now you have a new version of the product! Time to upgrade the system.
First, spin up a new application fleet with the latest version using the previous code snippet. Then we can let the Blue Green process begin.
Note down the name of the AutoScaling Group of the new application fleet.
Attach The Fleet to Receive traffic
First, we have to attach a new fleet to the load balancer. This action will be similar to the initial setup.
const newFleetName = "fleet-2";

await autoscalingSdk
 .attachLoadBalancerTargetGroups({
   TargetGroupARNs: [TGArn],
   AutoScalingGroupName: newFleetName,
 })
 .promise();
And just like that, application traffic is now being sent to the new version of the application. Because both autoscaling groups are currently attached, the traffic is being split 50/50.
Detach the legacy Fleet
Now that traffic is being sent to the new fleet. We can drain the old fleet.
const oldFleetName = "fleet-1";

await autoscalingSdk
 .detachLoadBalancerTargetGroups({
   TargetGroupARNs: [TGArn],
   AutoScalingGroupName: oldFleetName,
 })
 .promise();
Wait 120 seconds (NodeJS express HTTP connection default time)......
And there it goes. All application traffic is now being sent to the new version of the application. This deployment was a success. Unless...
⚠️ The New Application is Failing ⚠️
Not all deployments are successful, and a missing semicolon could ruin your day. Now what? What happens if the new application fleet is defective? This is the magic of Blue Green. We can simply send traffic back to the old deployment!
First, attach the old fleet to the load balancer.
const oldFleetName = "fleet-1";

await autoscalingSdk
 .attachLoadBalancerTargetGroups({
   TargetGroupARNs: [TGArn],
   AutoScalingGroupName: oldFleetName,
 })
 .promise();
Immediately after, detach the new application fleet.
const newFleetName = "fleet-2";

await autoscalingSdk
 .dettachLoadBalancerTargetGroups({
   TargetGroupARNs: [TGArn],
   AutoScalingGroupName: newFleetName,
 })
 .promise();
Now wait 2 minutes, and all your customers will be served with the older stable fleets again.
