Asana OAuth: How to Access User Data Using OAuth
Authorization services are a critical part of any secure website because they focus on granting access to a set of resources once you've proven your identity. OAuth is an industry-standard protocol that anyone can follow to implement a robust and battle-tested authorization service.
In this post, you'll learn how to implement a Node.js application that connects to Asana and requests the authenticated user's data by using OAuth 2. We'll briefly look at the standard OAuth flow and the different permission options that are available to you. To start off, let's have a look at how OAuth works.
How Does OAuth2 Work?
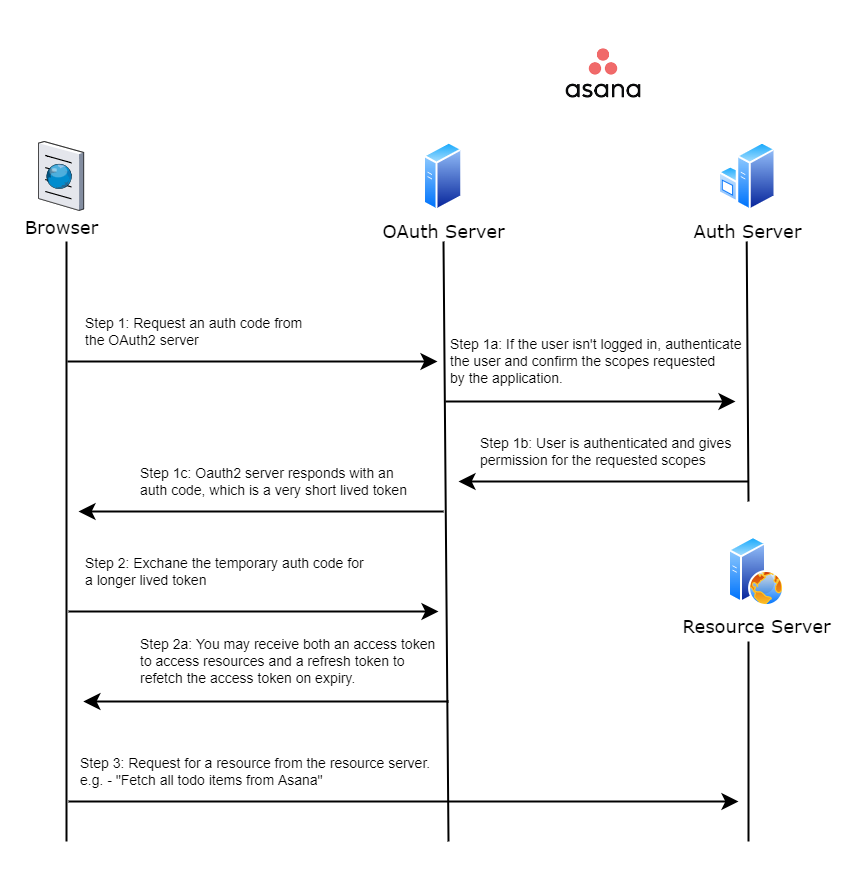
Authentication services identify users to a website and verify that they are who they say they are. Authorization services like OAuth use the identity information provided by the authentication service to decide what resources an authenticated user has access to within the software. This is more easily illustrated using the image below.

The 3 steps to connecting with an OAuth2
Be sure to pick a grant type that matches your use case. The flow depicted here is the Authorization Code Grant, which is ideal for client-server model applications. This is the flow we'll be implementing.
Asana supports the OAuth 2 protocol and provides its own authentication server. Now, let's look at out what you need to do in order to fetch your data from Asana.
Connecting to Asana Using OAuth2 and Node.js
In this exercise, you're going to write a Node.js application that will connect to Asana using OAuth2 and request your account information through their API. Before we get going, have a look at the prerequisites section to make sure you have everything.
Prerequisites
- A recent version of Node.js and npm
- An account on Asana
- A registered app on Asana Developers
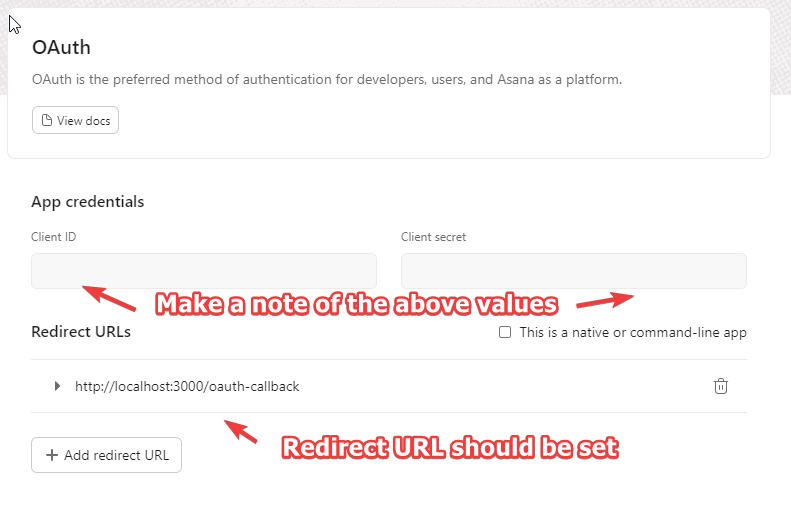
Ensure the app you registered on Asana Developers has been configured properly by setting the redirect URL in the OAuth section. The redirect URL is the URL to which the OAuth server sends the temporary code. For the example application, you'll be using a redirect URL value of http://localhost:3000/oauth-callback.

OAuth configuration
Now that you have all the above setup, let's get going!
Creating the Node.js Application and Installing Libraries
You're going to initialize the application and install the client libraries you need. Make sure you're inside the directory where you want to create the application in and run the following commands:
npm init -y
npm install asana express cookie-parser axios
Installing the official Asana library makes things easier when you connect to the Asana API. You can do this without the library as well, but then you'd need to do a fair amount of boilerplate coding. If you want to learn more about that, check out these recommended libraries.
Create a file named index.js and add the code below.
/* Add to index.js */
const express = require("express");
const asana = require("asana");
const app = express();
const cookieParser = require("cookie-parser");
const port = 3000;

app.use(cookieParser());

// Create an Asana client. Do this per request since it keeps state that
// shouldn't be shared across requests.
function getClient() {
  return asana.Client.create({
    clientId: <YOUR_CLIENT_ID>,
    clientSecret: <YOUR_CLIENT_SECRET>,
    redirectUri: "http://localhost:" + port + "/oauth-callback",
    scope: "openid email profile", // We'll be covering scopes in detail later on
  });
}
In the section above, you initialize express and the Asana client so that it can be used later. Next, you create the default route.
/* Add to index.js */

// Create a default route
app.get("/", (req, res) => {
  const client = getClient();
  const token = req.cookies.token;
  if (token) {
    // If we have a token, then go ahead and use it to fetch the user's profile information
    axios
      .get("https://app.asana.com/api/1.0/openid_connect/userinfo", {
        headers: { Authorization: `Bearer ${token}` },
      })
      .then((response) => {
        const data = response.data;
        res.end(
          `Hello ${data.name}, your email is ${data.email} and your picture is ${data.picture}`
        );
      });
  } else {
    // No token, so redirect to auth url
    res.redirect(client.app.asanaAuthorizeUrl());
  }
})
Once you create the default route, you have a starting point for your application that will trigger the OAuth flow. If you capture the token from the cookie, you can use it. Otherwise, you redirect the user to the authorize endpoint. Next, you'll create the callback URL.
/* Add to index.js */

app.get("/oauth-callback", (req, res) => {
  const code = req.query.code;
  if (code) {
    // If the code exists in the request, then exchange it for a token
    const client = getClient();
    client.app.accessTokenFromCode(code).then(function (credentials) {
      //Once we get the token, we save it in a cookie to use in later requests
      res.cookie("token", credentials.access_token, { maxAge: 60 * 60 * 1000 });

      // Redirect back home, where we should now have access to Asana data.
      res.redirect("/");
    });
  } else {
    // Authorization could have failed. Show an error.
    res.end("Error getting authorization: " + req.param("error"));
  }
});
Once you've added the route handler for the OAuth redirect URL, the Asana OAuth server will correctly redirect back to your application with the authorization code. Once you have that, you convert that into an access_token and refresh_token. The refresh token can be used to regenerate the access token once it expires.
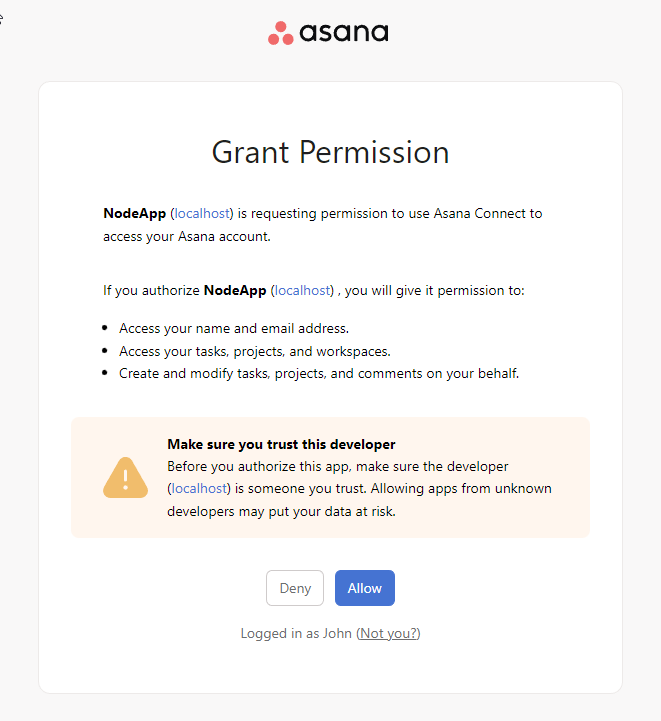
Try loading the http://localhost:3000 URL in your browser. If everything is configured correctly, you should first be redirected to a permissions page and then back to your application. The home page will now show your name, your email address, and your picture if it is available.

Grant permission screen

Now let's look at how you can fetch additional information from the Asana API.
OAuth Scopes
Asana has a comprehensive API that allows you to query all kinds of interesting information. You can find out more about the API in their API Explorer. However, if you modify your code to request data from one of these endpoints, your application will fail. This is because the scope requested in your application is sufficient (or scoped) to only fetch profile data from Asana's OpenID Connect endpoints.
You'll need to change the scope that you requested so that you can request additional resources. Change the scope to default and add the following new code to your index.js file.
/* Change the scope */
function getClient() {
...
    scope: "openid email profile default", // Add the 'default' scope
...
}

// Add new endpoint for clearing cookies
app.get("/clear", (req, res) => {
  res.clearCookie("token");
  res.end("cookie cleared");
});

// Add new endpoint for getting tasks
app.get("/get-tasks", (req, res) => {
  const client = getClient();
  const token = req.cookies.token;
  if (token) {
    client.useOauth({ credentials: token });

    // Before we get tasks, we need our workspace first
    client.workspaces.findAll().then((workspaces) => {
      if (!workspaces.data.length) {
        return res.end("No workspaces found");
      }

      // Now fetch the tasks
      client.tasks
        .findAll({
          assignee: "me", // We can use 'me' as shortcut to get tasks related to us
          workspace: workspaces.data[0].gid, // For now, we just fetch all the tasks for the first workspace only
          opt_fields: "completed,name", // We just need the name and whether the task is completed or not
        })
        .then((tasks) => {
          tasks.data.forEach((task) =>
            res.write(`${task.name} is ${task.completed ? "done" : "due"} \n`)
          );
          res.end();
        });
    });
  } else {
    res.redirect(client.app.asanaAuthorizeUrl());
  }
});
Now, carry out the following steps:
- Open the URL http://localhost:3000/clear and clear your existing cookies.
- Go to http://localhost:3000 so the application generates a new token with the expanded scope.
- Navigate to http://localhost:3000/get-tasks to view your tasks.

A list of tasks in your workspace
That looks good! Let's recap what you did here.
- As discussed earlier, the scope defines what resources are available with the token. The earlier scope you had was only sufficient to get the profile information.
- To query additional resources, you changed the scope and then regenerated your token. You did this by clearing the old token from your cookies and logging in again.
- Once the new token is generated, you can use the Asana client to query for workspaces and tasks.
Further Reading for Asana OAuth
With this example, we touched on some of the simpler concepts behind OAuth and Asana's implementation of the OAuth2 spec. Keep in mind that OAuth providers might have different implementations based on their needs. They should, however, generally follow the spec laid out on the official protocol page.
A good project for further exploration would be implementing OAuth without using the official Asana client. This should give you further insight into the requests and parameters involved in connecting with a standard OAuth provider. It will give you the confidence you need to step away from using libraries that are geared toward a particular vendor. The added advantage of reducing vendor lock-in is that your application will be able to leverage your existing solution with multiple OAuth providers.
Before your go..
This post was written by John Pereira. John is a technology enthusiast who's passionate about his work and all forms of technology. With over 15 years in the technology space, his area of expertise lies in API and large scale web application development, and its related constellation of technologies and processes.
